
Introduction
Azure Databricks is an analytics service designed for data science and data engineering. It is based on Apache Spark and allows to set up and use a cluster of machines in a very quick time.
It is a coding platform based on Notebooks. Notebooks are web applications made to create and share documents that contain live code, equations, visualisations and narrative text. They can be used for data cleaning and transformation, numerical simulation, statistical modelling, data visualisation, machine learning, etc.
Databricks is a company independent of Azure which was founded by the creators of Spark. Azure Databricks was designed with Microsoft and the creators of Apache Spark to combine the best of Azure and Databricks. It features for instance out-of-the-box Azure Active Directory integration, native data connectors, integrated billing with Azure.
I recently had a project involving Azure Databricks to process data in files stored on Azure Blob Storage. I really appreciated this tool and I wanted to write this Chronicle to present it. I believe that Azure Databricks can be used in many kind of use cases involving data.
In the end of the Chronicles, we will show how the tools presented in Databricks can be used in Dynamics and how they can leverage the value of the Data contained in D365 !
Notebooks Presentation
Overview
If you don't know Notebooks yet, I will quickly give an overview of it here.
You might have already heard of Jupyter Notebooks, which are also quite famous. Notebooks in Databricks are very similar.
Basically, a Notebooks is a web application which is composed of a collection of cells in which code can be written.
- The cells are presented one under the other
- Cells can be added anywhere and deleted/moved
- Cells share the same execution context, but can be executed independently. This allows to work only on some lines of code
- The result of the execution of a cell is presented right under the cell
- Cells can also contain text with formatting options (using markdown or html syntax)
- This is great as it allows to organise the Notebook, add titles, sections, comments, analyses, questions, responses, etc.
These characteristics allow to combine code and results of executions in a very intuitive manner. It is a great tool for instance to present reports, to share insights with other people, to analyse data.
Notebooks have become hugely used in the world of Data Science, Big Data, Machine Learning, etc
In Databricks, Notebooks can be written in Python, R, Scala or SQL.
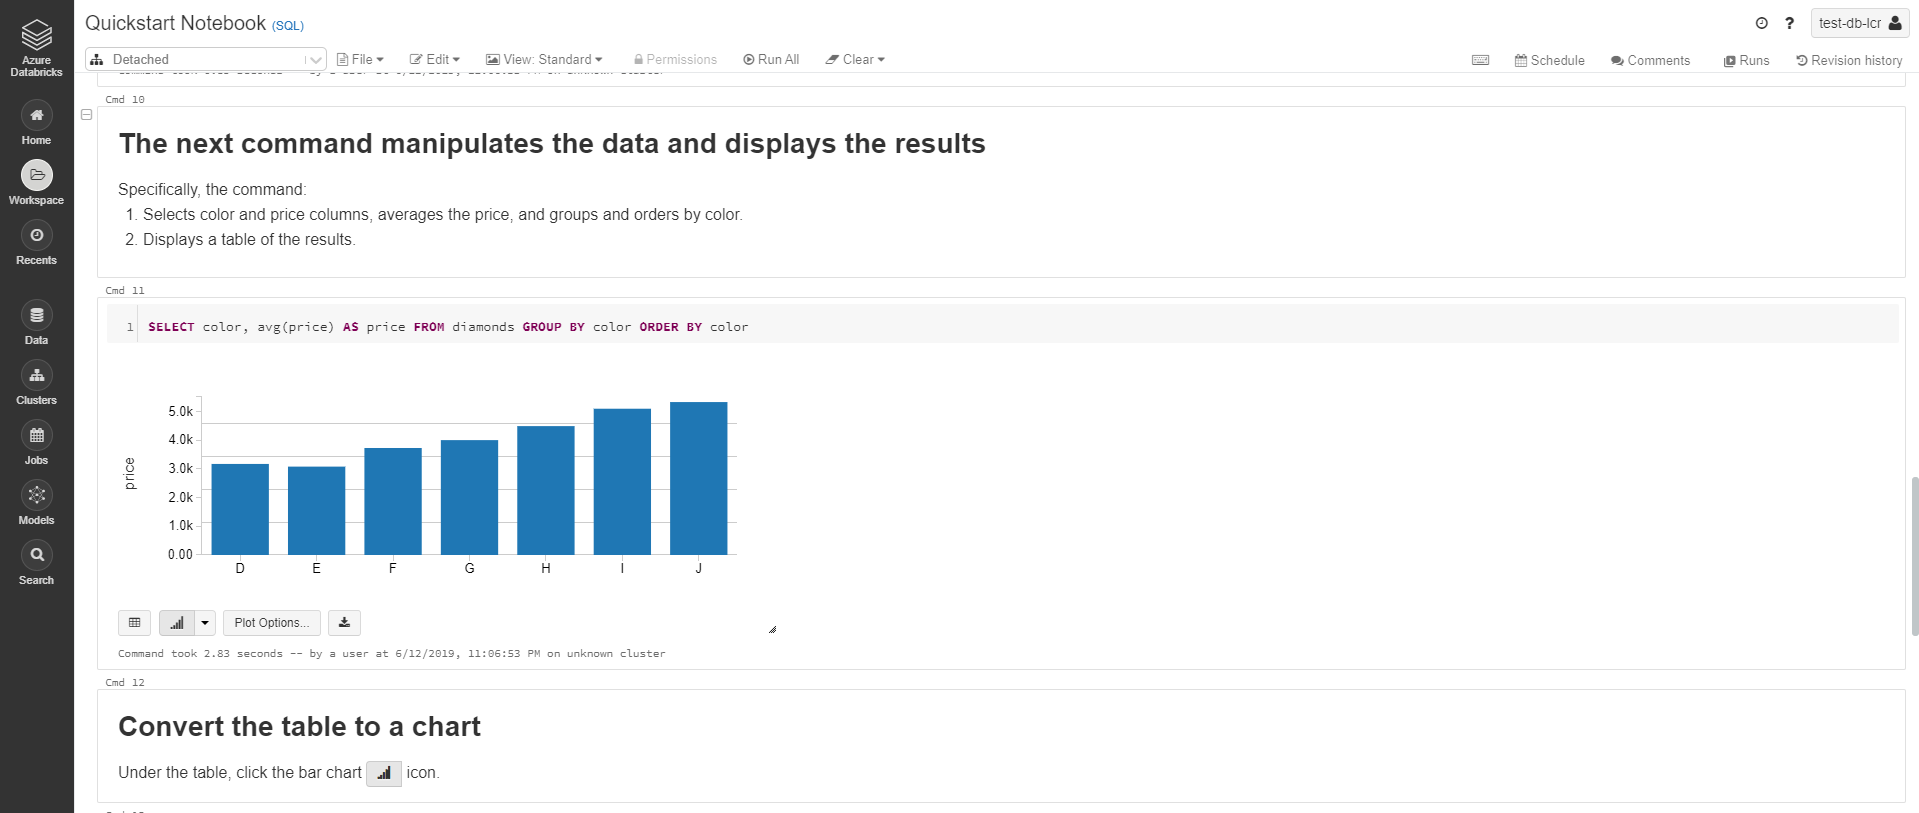
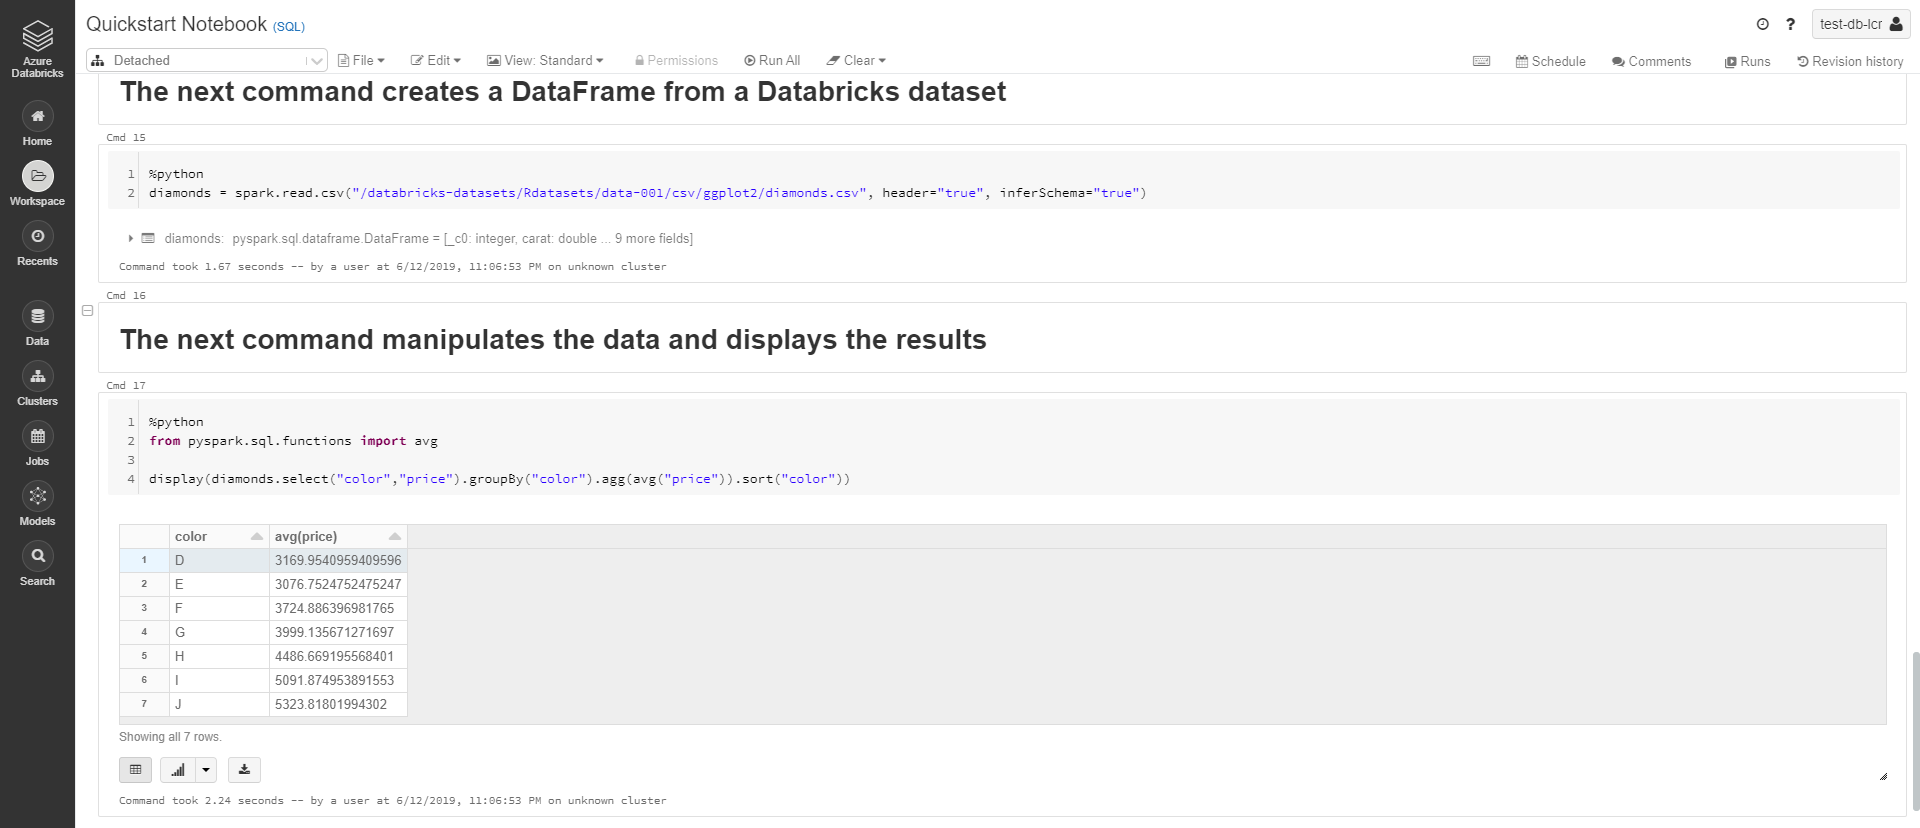
Below are some printscreens. I let you note the organisation in cells, with a mix of text, code and results of execution.
Collaborative work with Notebooks
Notebooks of Azure Databricks can be shared between users. In standard tier, all notebooks of a workspace are available to all users. In Premium tier, access can be restricted with Role Base Access Control.
People who share a Notebook can work on it at the same time. Any modification made by a user is directly visible for the other users! Just like when you work on an online Excel or Word document with other users.
This is another great feature that encourages collaborative work.
Databricks Utilities
Some tasks related to Databricks can be executed directly in the Notebooks, using the Databricks Utilities. They allow for instance to:
- Work with object storage efficiently
- Chain and parameterize notebooks
- Work with secrets
The Databricks Utilities are available in Python, R and Scala notebooks. They are very useful and can often be used in projects. A few examples of their use will be given along the Chronicle.
Create Workspace
To create an Azure Databricks resource, you can go to the Azure Portal and select "Create a resource" -> Azure Databricks.
You then choose an Azure Subscription, a resource group, a workspace name, a location for your workspace and a Pricing Tier. There are two available tiers: Standard and Premium, that are described later in this Chronicle. There is also a Trial for a Premium Tier with 14-Days free DBUs (a unit of processing capability which will be described later).
You can also choose to deploy the workspace in your own Virtual Network.
Portal Overview
I will quickly present the Azure Databricks Portal. Below is the Home Page:

The menus on the left and on the top are available on all pages in the Portal.
On the left, you have buttons to:
- Access the notebooks, libraries, Machine Learning experiments contained in the Workspace
- Access the Databricks File System (DBFS)
- Manage clusters
- Manage Jobs
- Manage Machine Learning Models
- Access recent pages
- Search resources in the Workspace
On the top:
- The "PORTAL" button is a link to the Azure Portal
- The question mark provides links to pages like documentation, help center, release notes, etc
- The button on the right if the question marks displays the name of the Azure Databricks Workspace. Clicking on it gives access to settings and to other Azure Databricks Workspaces that the user has access to.
Cluster
To execute a process in Azure Databricks, the first step is to create a cluster of machines. Several clusters can be created in a workspace. Each cluster can have characteristics specific to the processes it was created for.
Creation of cluster
To create a Cluster in Databricks, go to the "Cluster" menu and click "Create Cluster".
The following form opens:

Let's review together the options:
- Cluster Mode: choose between standard and high-concurrency. A high-concurrency cluster is optimised to run concurrent SQL, Python, and R workloads.
- Pool: choose a Pool. With a Pool, some instances of cluster are kept on standby. When a Cluster needs to start, it uses one of these instances to reduce the startup time.
- Databricks Runtime Version: Select the Databricks runtime used in the cluster.
- Enable autoscaling: Allows to autoscale the number of workers used in the cluster (see details below)
- Terminate after: A duration can be set. If it is set, the cluster will terminate after the specified time interval of inactivity
- Worker Type: choose the worker type, i.e. the type of Virtual Machine.
- Details can be obtained in the documentation of Azure Virtual Machines. An overview is given here: https://azure.microsoft.com/en-us/pricing/details/virtual-machines/series/
- The main characteristics displayed in Databricks are the RAM, the number of CPU cores, the number of Databricks units.
- If "Enable autoscaling" was selected, you can choose the minimum and maximum number of workers in the cluster. The number of instances will automatically be set to provide the required resources for processes running.
- The workers run the Spark executors and other services required for the proper functioning of the clusters. The Spark workload is all distributed on worker nodes. If a cluster doesn't have any worker, Spark can't be used. But it is possible to use non-Spark commands that will run on the Driver node
- Driver Type: choose the driver type, i.e. the type of Virtual Machine.
- The driver maintains state information of all notebooks attached to the cluster
- The driver node is also responsible for maintaining the SparkContext and interpreting all the commands run from a notebook or a library on the cluster
- The driver node also runs the Apache Spark master that coordinates with the Spark executors.
Libraries
Libraries can be added to a Databricks cluster. To add some, go the "Libraries" tab in the cluster configuration menu:
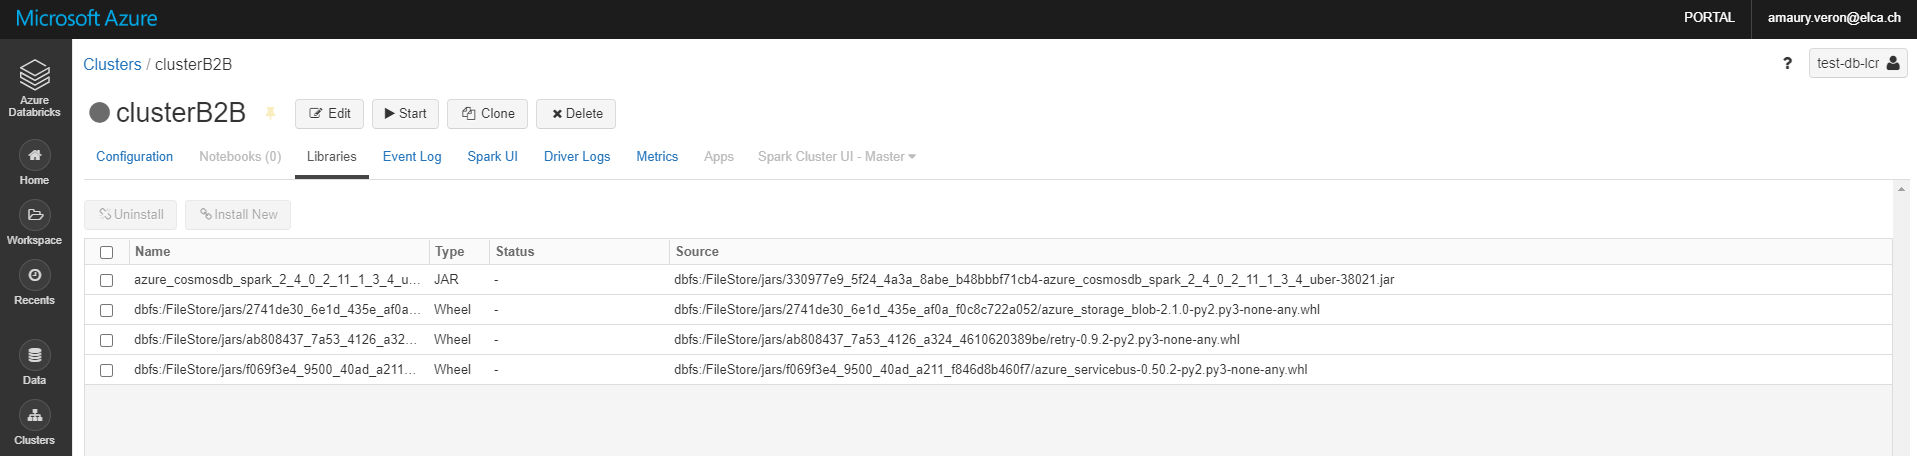
Note that to install a new library, the cluster must be running.
The library can come from different sources:
- It can be uploaded as .jar, .egg or .whl. You can upload it from your local storage or from the Databricks File System (more information about it in the following of the chronicle).
- It can be installed with PyPI, Maven or CRAN, giving the package name and optionally the version
Store secrets
In most projects, there is a need to store some parameters securely. This can for instance be parameters that are used to authenticate to external services.
They can be stored securely in Databricks-backed secret scopes or in Azure Key Vault-backed secret scopes. Secret scopes are collections of secrets identified by a name. There can be up to 100 secret scopes by Workspace.
In the Standard tier of Azure Databricks, any user can read/write secrets in the scopes. In Premium tier, different permissions can be assigned to the users. This is an important advantage of the Premium tier, as it adds much more security for the access to secrets.
Databricks-backed secret scopes
A Databricks-backed secret scope is stored in an encrypted database owned and managed by Azure Databricks.
These scoped can't yet be managed with a graphical interface. You need to use either:
- The Databricks CLI. Documentation can be found here: https://docs.microsoft.com/en-us/azure/databricks/dev-tools/cli/
- or the Secrets API. Documentation can be found here: https://docs.microsoft.com/en-us/azure/databricks/dev-tools/api/latest/secrets
Azure Key Vault-backed secret scopes
Azure Key Vault-backed secret scopes can be created in the Databricks portal. However, there is no direct button to the creation form. To access it, the only way is to go directly to the URL: https://<databricks-instance>#secrets/createScope
The following form opens:
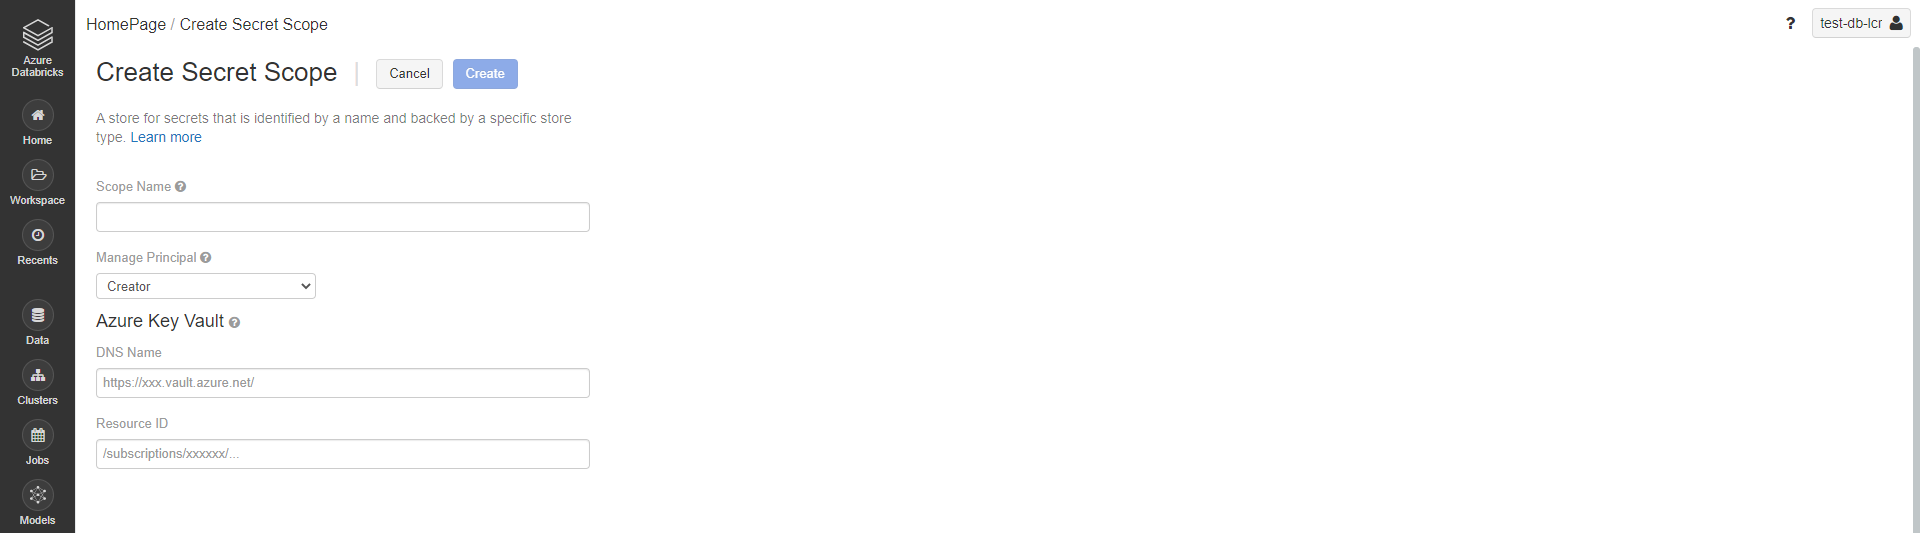
You have then:
- To give a name to the Scope
- To select the manage principal: Creator or All Users. It gives read/write permissions either to all users or only to the creator of the scope. In Standard tier, only the "All Users" option is allowed.
- To enter the DNS name and the Resource ID of the Key Vault. They can be found under the Key Vault's Properties section in the Azure Portal
To manage further the Key Vault-backed secret scope, you will need to use the Databricks CLI or the Secrets API. To manage the Secrets (for instance set or delete a secret), you will need to go to the Key Vault resource in the Azure portal or use the Key Vault API (documentation can be found here: https://docs.microsoft.com/en-us/rest/api/keyvault/).
Retrieve a secret in a notebook
To retrieve a secret in a notebook, you need to use the Databricks Utilities. Here is the command in Python:
{python_variable} = dbutils.secrets.get(scope = "{scope_name}", key = "{secret_name}")
Note that for security reasons, if you try to print the value of the variable, the string '[REDACTED]' will be displayed. So the Secret can't be retrieved by a developer.
When a secret is retrieved in a Notebook, it is stored in the cache of the Cluster. If a secret has changed, the cluster must be restarted to let it retrieve the latest version of the secret.
Jobs
Jobs allow to run notebooks or .jar files either immediately or on schedule.
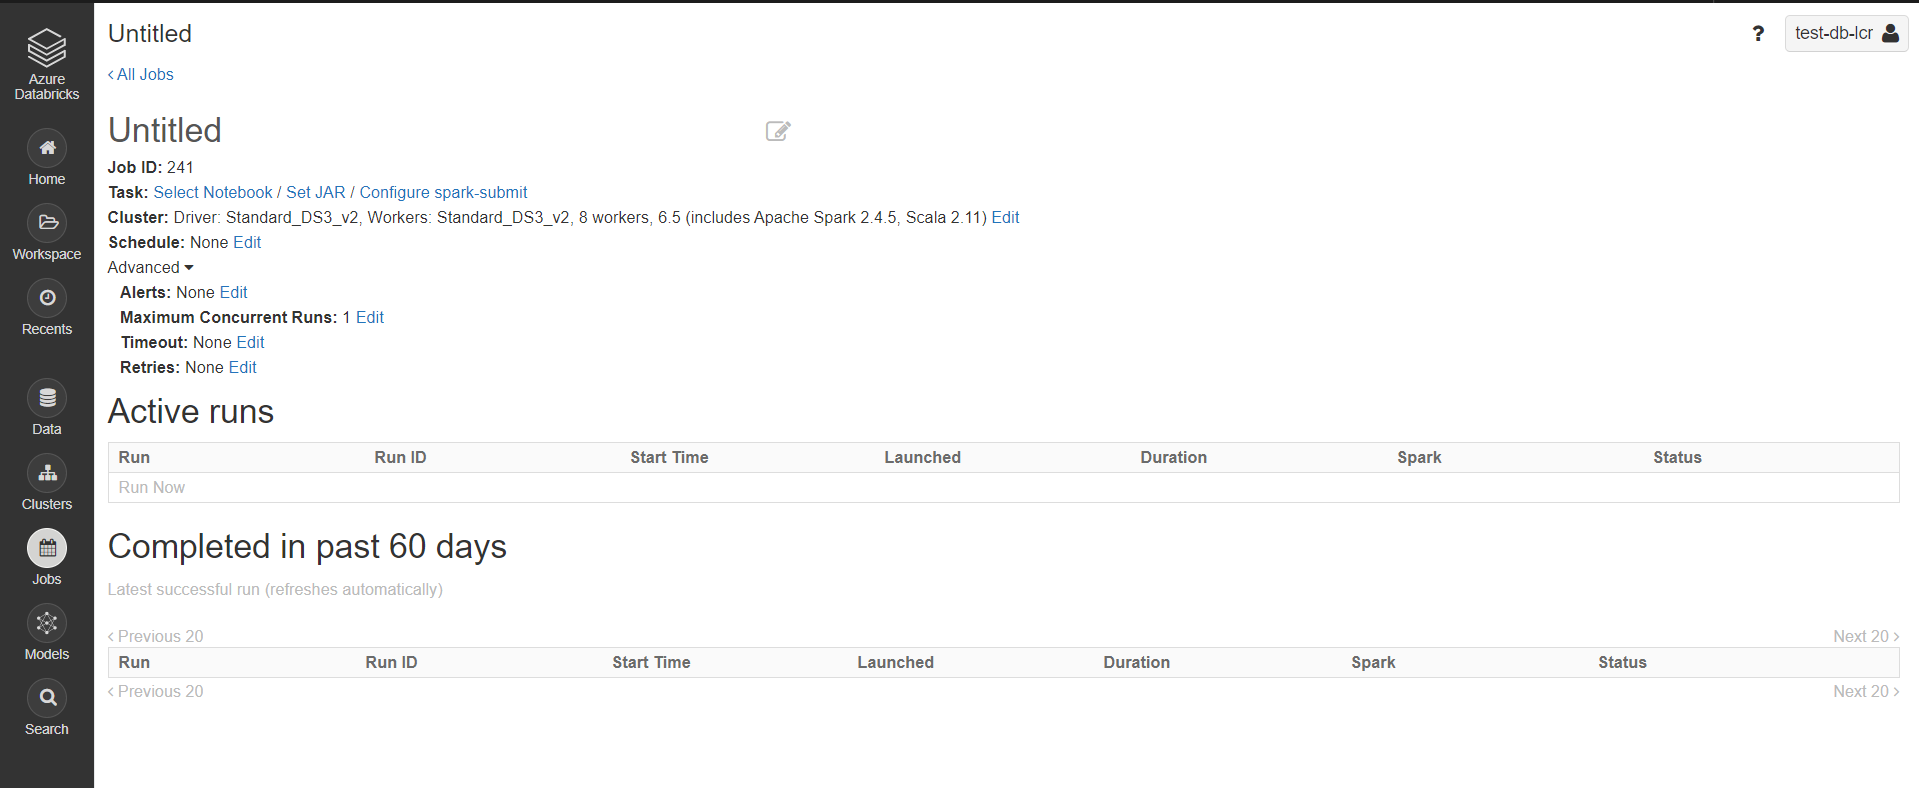
When creating a Job, you first define the Task to execute. This is either a Notebook or a .jar file contained in the Workspace. You can choose to run it with a particular Cluster or a default one. It can be necessary to choose a specific cluster for instance when it contains libraries that are needed in a Notebook.
Then, you specify the scheduling of the Job if it must have one.
There are 4 other advanced settings:
- Alerts: it allows to send emails when a run starts, succeeds, or encounters a failure
- Maximum Concurrent Runs: Allows to specify a maximum number of concurrent runs for this job. If the job has reached its maximum number of active runs, the potential new runs will be skipped. This impacts the parallelism characteristics for this job
- Timeout: If a job is still running when the timeout period is reached, it will be terminated. It is possible to set no timeout.
- Retries: If a job fails, it can be rerun according to the policy defined here. You can specify the maximal number of retries (or set an unlimited number of retries), as well as the duration between two tries (up to 3 hours). You can also retry if a timeout has occurred.
The active runs and runs completed in the past 60 days can be opened in the Job history. They show the Notebook with the results obtained for this run. Having all runs available for 60 days is a great feature of Databricks!
Data Factory and Databricks
Azure Data Factory (ADF) is Azure's cloud ETL service for scale-out serverless data integration and data transformation.
It is a nice tool to orchestrate processes. For instance, it contains Activities to call web services, Azure Functions, and... Azure Databricks!
Activities for Databricks
ADF contains three Activities related to Azure Databricks:
- Notebook: to run a Notebook of a Databricks workspace
- Jar: to run a .jar file of a Databricks workspace
- Python: to run a .py file of a Databricks workspace
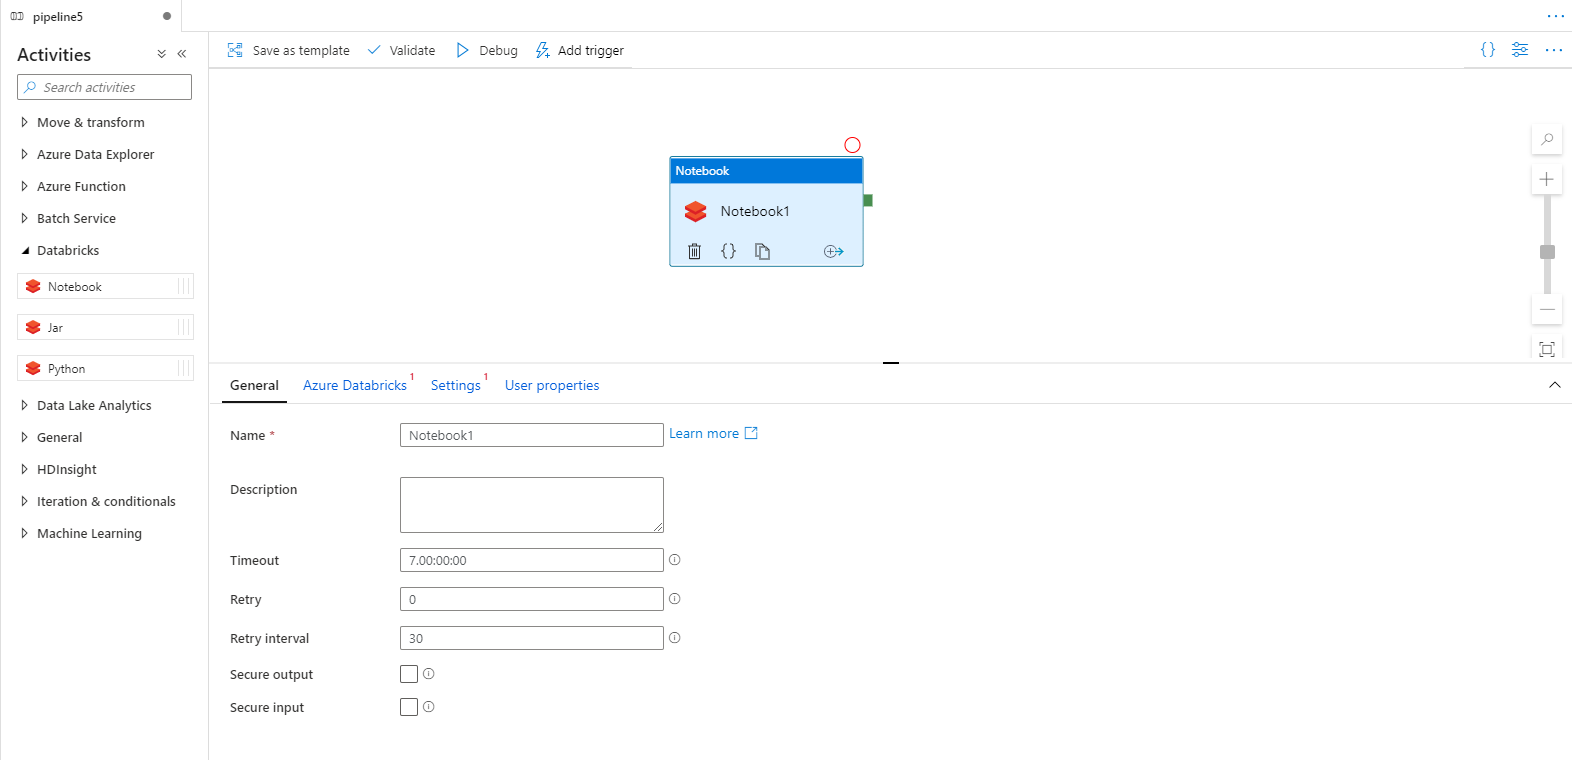
The three Activities provide basically the same functionalities.
In the "General" Tab, you can:
- Define a timeout period: if the execution goes beyond it, it is stopped
- Define a retry policy: the execution can be reprocessed if it fails
- Choose to secure input and/or ouput: input and output of the Activity won't be logged
In the "Azure Databricks" tab, you select the linked service to the Databricks Workspace.
In the "Settings" tab:
- Define the path to the Notebook to be executed
- Define parameters to send to the Notebook
- Define libraries to install on the Cluster that is used
And the "User properties" tab, common to all Activities. It allows to monitor any Activity property. These properties can for instance be viewed in the history of pipeline runs.
Libraries
Different ways are available to specify libraries to install on the cluster.
If the library is of type:
- .jar, .egg or .whl: provide a DBFS URI to the library
- pypi or cran: provide the name of the pypi/cran package to install, and optionally the version. You can also indicate a repository that contains the package. If none is given, the default pip index/cran repo will be used
- maven: give maven coordinates. Optionally a repository and a list of dependencies to exclude
Note: If the linked service for Databricks uses an existing cluster, these libraries can also be directly referenced or installed in the cluster, rather than being specified here.
Pass parameters between ADF and Databricks
The parameters sent to Databricks by ADF can be retrieved in a Notebook using the Databricks Utilities:
dbutils.widgets.text("{parameter_name_in_ADF}", "","")
{python_variable} = dbutils.widgets.get("{parameter_name_in_ADF}")
It is also possible to pass back values from a Notebook to ADF:
- In the Notebook use the command: dbutils.notebook.exit("{value_to_return}")
- In the ADF Pipeline, consume it with the function: @activity('databricks notebook activity name').output.runOutput.{value_to_return}
Monitoring
One great feature of this integration is that current and past executions of Databricks Notebooks can be retrieved. To do this, go to the history of pipeline runs. Select the pipeline run you are interested in. Find the DatabricksNotebook activity and select the "glasses" icon:

This opens a "Details" pop-up with a URL to the run results of the Notebook that was executed for this pipeline:
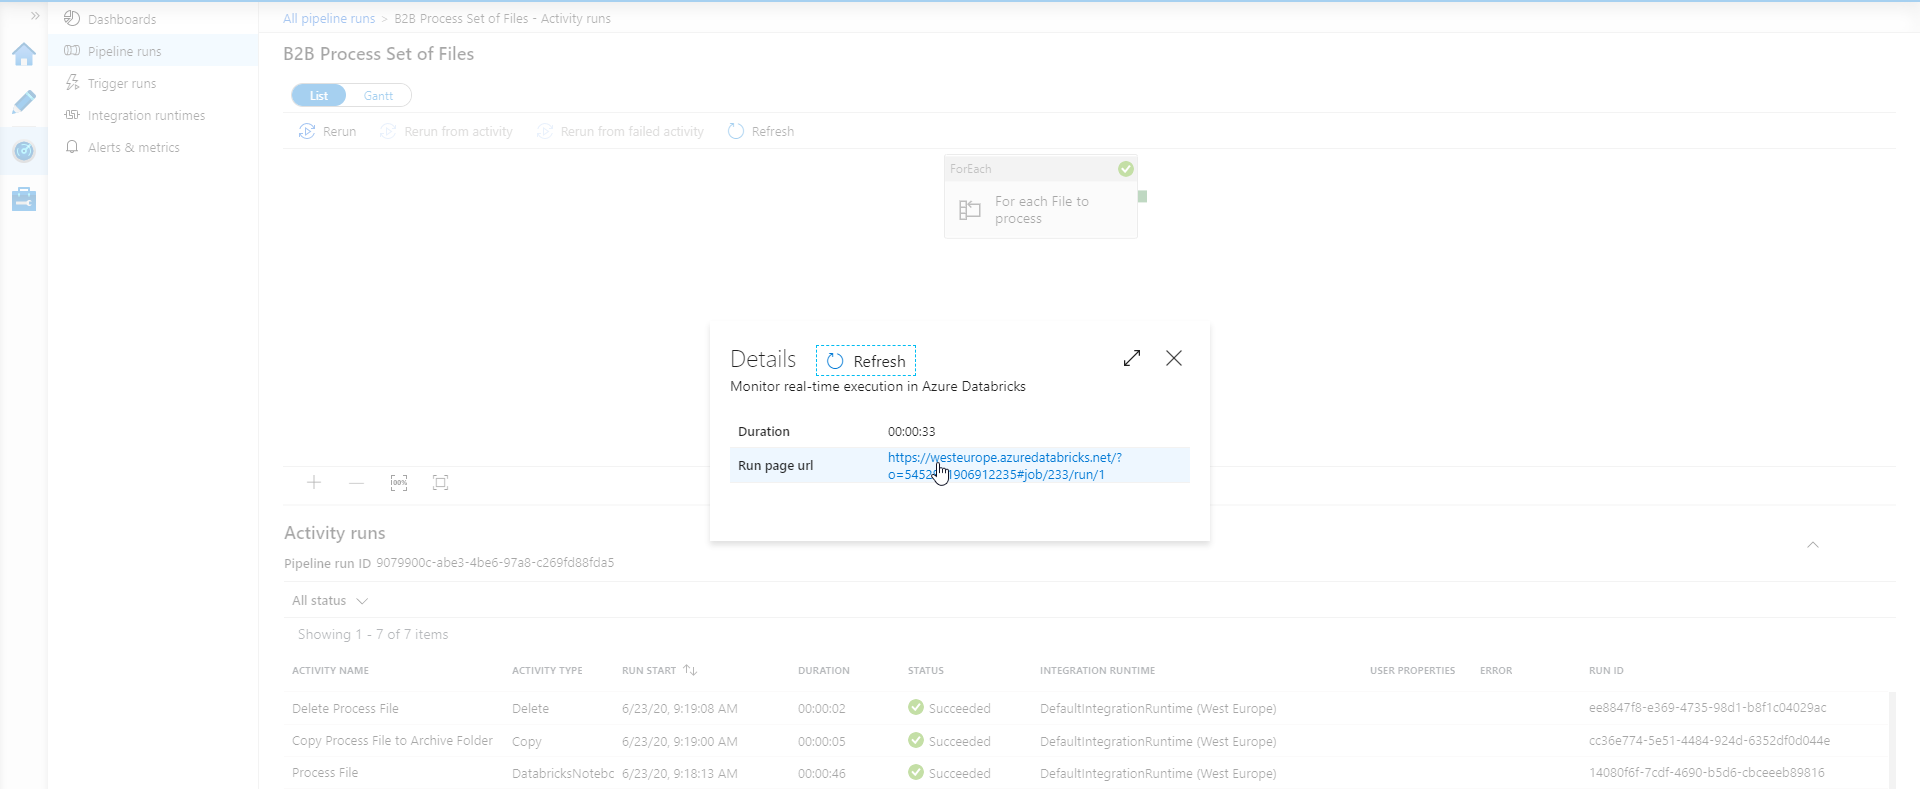
Here is a printscreen of the execution result of a Notebook:

It also shows:
- The origin of the execution: the name of the run starts with "ADF", standing for Azure Data Factory, and then adds the name of the Data Factory
- The time at which the execution started
- The duration of the execution
- That status: can be Succeeded, Failed, Cancelled. This corresponds to the output of the Activity in the ADF Pipeline
- The Cluster used
- The parameters received from ADF
Note: These executions can't be found in the Jobs History of the Pipeline. They can only be retrieved from the pipeline runs History of Data Factory.
Linked Service configuration
In Azure Data Factory, the connection to an external resource is managed with a Linked Service. So, to use the Databricks Activities, a Linked Service to Databricks must be created. It requires a token to authenticate into Databricks.
To create a token, go the Databricks Portal. Click on the top-right Button and select "User Settings". Then, click "Generate New Token". It is possible to specify a limited lifetime for the token or to let it live indefinitly.

When configuring the Linked Service in Data Factory, this token must be provided to let ADF authenticate. The token can be stored directly in ADF or using the Key Vault.
The Linked Service must also:
- reference an existing cluster
- or reference an existing instance pool
- or define a new cluster. The form has the same fields as the ones seen before for the creation of a cluster through the Azure Databricks Portal.
Databricks with other Azure resources
Databricks can of course be used with many Azure resources using their APIs. There exists many libraries to simplify the interaction with Azure resources.
I used some in production for a project and they are very helpful and work well. More precisely, I used Python libraries for Azure Cosmos Db, Azure Blob storage and Azure Service Bus.
Machine Learning
Databricks includes a service to manage the full lifecycle of Machine Learning Models.
For instance, it allows to manage versions of models and stage transitions (between Staging, Production, Archived).
Machine Learning models can be saved in the service, and then loaded when needed in Notebooks.
All this can be managed either though the UI of the portal or through the API of the service. So everything can be handled in the code of Notebooks for instance.
Machine Learning often requires powerful resources. As Azure Databricks provides cluster of machines, it really looks like a great tool for Machine Learning use cases.
Databricks File System (DBFS)
Databricks provides a distributed file system called... the Dabricks File System. it is mounted in a Workspace and is available in clusters. It is thus available in the Notebooks.
Data can be accessed in the Workspace without requiring credentials. The interaction with the data uses directory and file semantics instead of storage URLs, which makes it more user-friendly. Files are persisted so that there is no risk to lose data after a cluster shuts down.
The DBFS can be accessed through the Azure Databricks Portal. It can also be accessed with code in several ways.
If the code is run in a Spark cluster, DBFS objects can be accessed using:
- Databricks file system utilities. Documentation can be found here: https://docs.databricks.com/dev-tools/databricks-utils.html#dbutils-fs
- Spark APIs. Documentation can be found here: https://docs.databricks.com/data/databricks-file-system.html#dbfs-spark
- Local File APIs. Documentation can be found here: https://docs.databricks.com/data/databricks-file-system.html#fuse
If the code is run on a local computer, DBFS objects can be accessed using:
- Databricks CLI. Documentation can be found here: https://docs.databricks.com/dev-tools/cli/dbfs-cli.html
- DBFS API. Documentation can be found here: https://docs.databricks.com/dev-tools/api/latest/dbfs.html
Below are four examples to access the DBFS in Python with the Databricks file system utilities:
- dbutils.fs.mkdirs("/foobar/")
- dbutils.fs.put("/foobar/baz.txt", "Hello, World!")
- dbutils.fs.head("/foobar/baz.txt")
- dbutils.fs.rm("/foobar/baz.txt")
Here files are accessed from the DBFS root as if it was a local filesystem!
Use Databricks with Dynamics 365
In this part, we will now see how the power of Databricks can be used with Dynamics 365!
I will first provide python code samples to connect to Dynamics 365 and make some CRUD operations on it. The code uses directly the Web API of Dynamics 365. Here is the link to the full documentation of Dynamics 365 Web API: https://docs.microsoft.com/en-us/powerapps/developer/common-data-service/webapi/overview
I will then detail possible use cases with Databricks and Dynamics 365.
Create an Azure App Registration
As you might know, the first step to connect to Dynamics 365 though an application is to create an Azure App Registration.
You can also refers to this chronicle : https://dynamics-chronicles.com/article/step-step-connect-d365-clientsecret-use-apis
To do so, go to your Azure Active Directory and create a new App Registration.
In the APIs permissions, add the permission "Dynamics CRM/user_impersonation".

In the "Certificates & secrets" tab, add a new client secret. We will use it to connect to Dynamics 365 as a Service Principal.
Note that we can also authenticate using the credentials of a user instead of using a client secret. We will not do it here but it is very similar and details for it can be found in the Web API documentation.
Get the Access Token
Our application has to retrieve an access token.
For this we need the URL of the CRM, the Client Id and the Client Secret of the Service Principal created before, and the Tenant Id:
import requests
import json

#Variables to retrieve the OAuth token
baseurl = 'https://{Organization}.crm4.dynamics.com/'
clientid = '0000000-0000-0000-0000-000000000000'
clientsecret =  '******************************='
tokenendpoint = 'https://login.microsoftonline.com/{Tenant Id}/oauth2/token'
Note: you should store sensitive values in Databricks-backed secret scopes or Azure Key Vault-backed secret scopes!
And here is the query to get the Access token:
#Authorization token request
tokenpost = {
    'client_id':clientid,
    'client_secret':clientsecret,
    'resource':baseurl,
    'grant_type':'client_credentials'   #for Service Principal
}

#Execute request
tokenresponse = requests.post(tokenendpoint, data=tokenpost)

#extract the access token
accesstoken = tokenresponse.json()['access_token']
Note that for a more efficient code, you should add retry patterns, exception handling.
Retrieve records
Now that we got the Access Token, we can query Dynamics 365. The Access token must be passed in the header of the requests.
Here we retrieve (just for the example) the Name and the GUID of Contacts
#Values to query your crm data
crmwebapi = 'https://{Organization}.crm4.dynamics.com/api/data/v9.1'
crmwebapiquery = '/contacts?$select=fullname,contactid' #web api query

#Request headers
crmrequestheaders = {
    'Authorization': 'Bearer ' + accesstoken,
    'OData-MaxVersion': '4.0',
    'OData-Version': '4.0',
    'Accept': 'application/json',
    'Content-Type': 'application/json; charset=utf-8',
    'Prefer': 'odata.maxpagesize=500',
    'Prefer': 'odata.include-annotations=OData.Community.Display.V1.FormattedValue'
}

#Make the CRM request
crmresponse = requests.get(crmwebapi+crmwebapiquery, headers=crmrequestheaders)

#get the response json
crmresults = crmres.json()

#loop through it
for x in crmresults['value']:
    if x['fullname'] != None:
        print (x['fullname'] + ' - ' + x['contactid'])
And we get an output with that look:
Samuel Alvoli - 3e7685f0-e886-e911-a819-000d3ab2d847
Ameli Maro - d2577ef6-e886-e911-a819-000d3ab2d847
Paul Anill - 1f587ef6-e886-e911-a819-000d3ab2d847
Sandra Fussiger - 25587ef6-e886-e911-a819-000d3ab2d847
........
Update records
And here is a request to update a record in Dynamics 365.
crmwebapiquery2 = '/contacts(fabd28a4-5592-e911-a81e-000d3ab2d12d)'

#Crm request headers
crmrequestheaders2 = {
    'Authorization': 'Bearer ' + accesstoken,
    'OData-MaxVersion': '4.0',
    'OData-Version': '4.0',
    'Accept': 'application/json',
    'Content-Type': 'application/json; charset=utf-8',
    'Prefer': 'odata.maxpagesize=500',
    'Prefer': 'odata.include-annotations=OData.Community.Display.V1.FormattedValue'
}

jsonbody = {
  'churn_probability': '0.72',
  'churn_description': '3 Cases in the Last Month; Long wait before reaching Call center; Sentiment Analysis in mails shows irritation of the Customer'
}

#make the crm request
crmres2 = requests.patch(crmwebapi+crmwebapiquery2, headers=crmrequestheaders2, json=jsonbody)
Use Case
Now, let's focus on a real use case!
If the data you have in your company allows it, you could create a Machine Learning model in Databricks to predict customer churn. The data from Dynamic 365 about your customers should obviously have a significant part in your model. Useful data could come from entities like Contact, Account, Cases, Opportunities, Contracts, etc.
The data may come from other data sources as well, stored in other systems or directly into the Databricks File System.
You would use Databricks to manage all the life cycle of your Machine Learning model.
You would create a Notebook that retrieves data from Dynamics 365 and other sources. You would call your Machine Learning model and get a prediction giving for instance the churn probability for a customer.
And you would then update the Customer Data in Dynamics 365, giving information about the probability of Churn of the Customer.
Based on it, you could create Dashboards in the CRM (CRM dashboards or Power BI dashboards. See this chronicle to see how to embed Power BI Dashboards in Dynamics 365: https://dynamics-chronicles.com/article/study-power-bi-embedded-integration-dynamics-365).
You could also create a Workflow that sends a notification to the Owner of a Customer when the probability of churn goes beyond a certain threshold.
In Databricks, you could create a Job that executes this Notebook on schedule. The Churn information would then be automatically updated in your CRM.
And, last but not least, you would benefit from the power of parallel computing with Spark, probably the most powerful existing tool for this. You would be able to handle this use case for hundreds of thousands of Customers, with data coming from Dynamics 365 and other sources. Spark and clusters would be leveraged in a couple of minutes thanks to the simplicity of use of Databricks!
Similarly, you could also develop Machine Learning Models that help you manage the interests of your customer and better target Marketing campaigns. And many other kinds of use cases that would help improving your Customer Engagement :)
Pricing
Billing overview
Azure Databricks is billed with an Azure subscription. It bills for virtual machines provisioned in a cluster and for Databricks Units (DBUs) used on the cluster. A Databricks Unit is a unit of processing capability which depends on the VM instance selected.
The DBU cost depends on the pricing tier of the Databricks Workspace and on the workload used.
Pricing tiers
There are two possible pricing tiers:
- Standard
- Premium
The Premium tier includes all Standard features, and it proposes additional features such as:
- Role-based access control for notebooks, clusters, jobs, and tables
- JDBC/ODBC Endpoint Authentication
- Audit logs (in preview)
Workload
There are three possible workloads. There are listed below from the most restrictive to the less restrictive (in term of proposed features):
- Data Engineering light
- Data Engineering
- Data Analytics
Basically, as Microsoft presents it, the Data Engineering and Data Engineering Light workloads allow data engineers to build and execute jobs, and the Data Analytics workload allow data scientists to explore, visualize, manipulate, and share data and insights interactively.
Pay as you go
This is the default billing model. With it, the DBUs are billed on a per-second usage.
As said above, the cost of the DBUs depend on the pricing tier and the workload chosen. To give an overview, below is a table of the costs depending of these:

When the cluster is terminated, there is no cost at all!
DBU pre purchase plans
It is possible to optimise costs of the Pay as you go model with pre purchase plans.
In these plans, you purchase in advance the amount of DBUs that you want to be able to use for either 1 or 3 years.
The discount can reach up to 37% (for a 3-year pre purchase plan of 6,000,000 DBUs!)
Example
Here is a table of prices for three kind of general purpose instances:

The costs are displayed for a standard tier and a Data Analytics workload.
To keep an idea in mind: for the DS3 v2 instance, the total cost for a pay as you go billing model is of CHF 0.563/hour. This instance is the cheapest available. But it is powerful enough for many use cases.
And remember that if you are using a pay as you go model, you pay only when the cluster is running.
Conclusion
So Azure Databricks is really a great tool to work with data. It allows to leverage the resources of a whole cluster of machines in a couple of minutes. Parallel computing can be done across machines with Spark, giving access to one of the most powerful tool of Big data processing. It also features a whole solution to manage the life cycle of Machine Learning models and to train/use the models efficiently on the cluster.
Azure Databricks is a coding platform so it is made for people with experience in development. It uses programming languages known to be simple to use, such as Python.
The Notebooks provide a very convenient user experience, oriented on collaborative work. They are really good to expose results of a code-based study, combining cells of code and cells of texts/diagrams.
With its pay-as-you-go billing model, you pay only when a cluster is running. So you can easily keep an Azure Databricks instance that you use only once in a while !
Finally, it might be found very useful in some Dynamics 365 projects requiring high computing power !