
Introduction
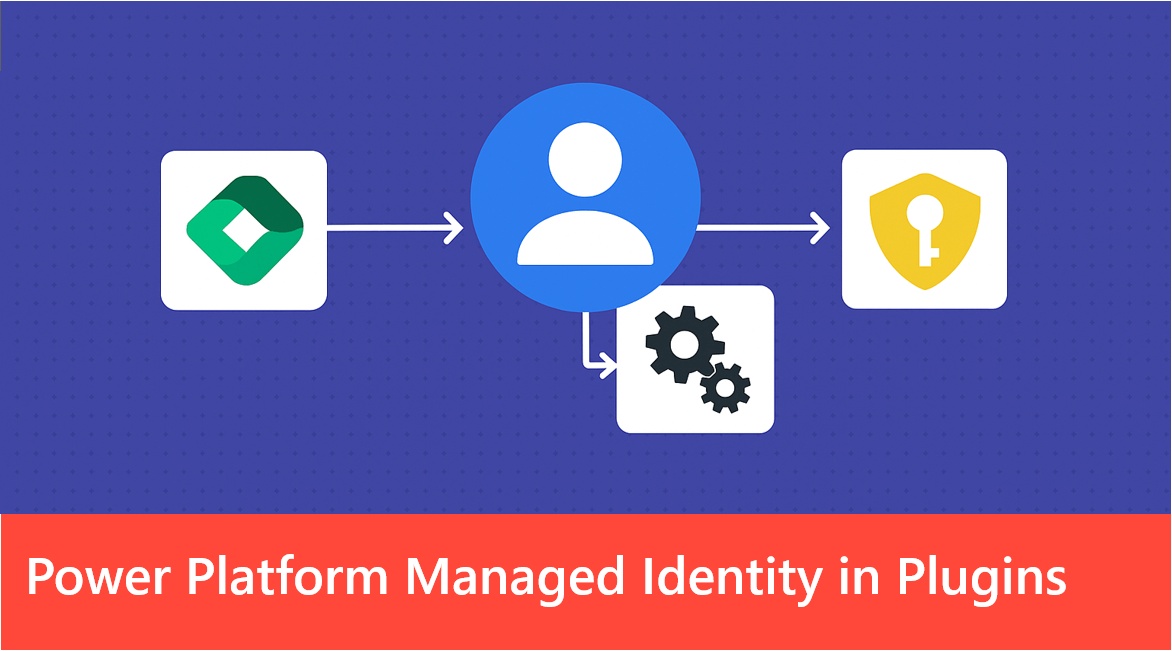
The days of storing Client ID and secret of your Key Vault in Dynamics are coming to an end. With Power Platform Managed Identity, Dataverse plug-ins can now connect to Azure resources that support managed identity without the need for credentials. Please note that at the time of writing this article, this feature is still in preview and is not intended for production use.
This marks a significant improvement in security and access management, eliminating the risks associated with storing credentials while simplifying integration between Dataverse and Azure. In this article, we’ll explore how this feature works and the process for implementing it.
How to implement it
Microsoft’s documentation is missing some details that can make the configuration process challenging. In this article, I’ll provide a clear, step-by-step guide with practical examples to help you set everything up quickly and efficiently. My goal is to simplify the process and ensure you have a smooth experience getting it to work.
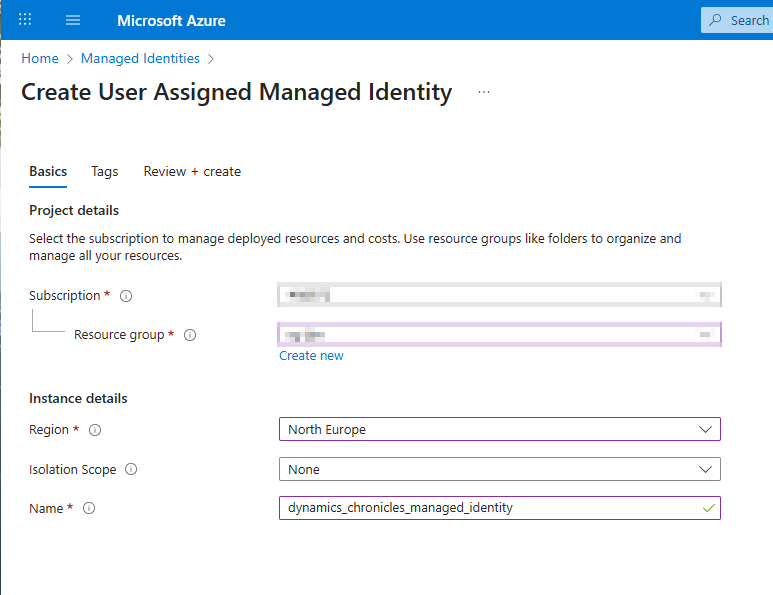
Step 1 : Create a new app registration or user-assigned managed identity
- Create new "User Assigned Managed Identity". You can follow this documentation to create it.
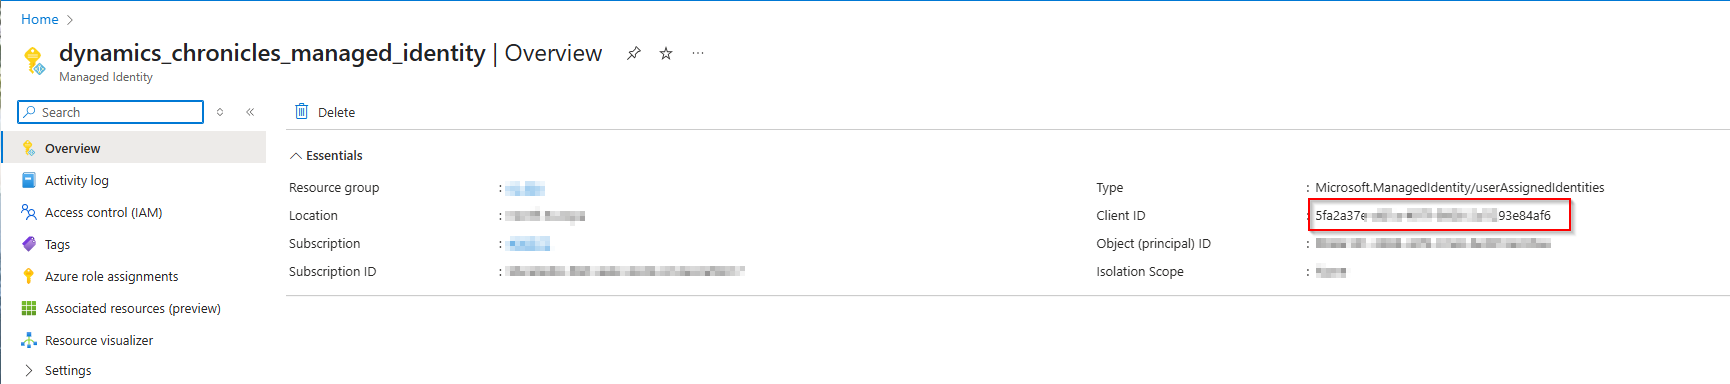
- Copy and save the "Client ID" value of your managed identity to be used in step 6
Step 2 : Create Key Vault
- Create a key vault
- Create a secret with name "DynamicsChroniclesSecret" and with secret value = "Managed identity for Power Platform is working"
- In "Access control (IAM)" of your key vault, add the role assignment "Key Vault Secrets User" to the User Assigned Managed Identity created in step 1
Step 3 : Create a certificate
- Open Powershell to create a certificate using this script
# Generate a self-signed certificate
$cert = New-SelfSignedCertificate -Subject "CN=dynamicschronicles, O=corp, C=dynamicschronicles.ch" -DnsName "www.dynamicschronicles.ch" -Type CodeSigning -KeyUsage DigitalSignature -CertStoreLocation Cert:\CurrentUser\My -FriendlyName "dynamicschronicles"
# Set a password for the private key
$pw = ConvertTo-SecureString -String "complexpwd12345" -Force -AsPlainText
# Export the certificate as a PFX file
Export-PfxCertificate -Cert $cert -FilePath 'C:\temp\dynamicschronicles_certificate.pfx' -Password $pw
Write-Host "Self-signed certificate exported as C:\temp\dynamicschronicles_certificate.pfx."
# Display thumbprint
$cert.Thumbprint
- Copy and save the "Thumbprint" value to be used in step 5

Step 4 : Create a plug-in assembly, sign it and register it
- Create a new plug-in using Visual Studio. Here is an example of code :
using Microsoft.Xrm.Sdk;
using System;
using System.Collections.Generic;
using System.Net.Http;
using System.Net.Http.Headers;

namespace ManagedPlugin
{
    public class ManagedPlugin : IPlugin
    {
        public void Execute(IServiceProvider serviceProvider)
        {
            // Obtain the tracing service
            ITracingService tracingService =
            (ITracingService)serviceProvider.GetService(typeof(ITracingService));

            // Obtain the execution context from the service provider.
            IManagedIdentityService managedIdentityService = (IManagedIdentityService)
                serviceProvider.GetService(typeof(IManagedIdentityService));

            // Obtain the execution context from the service provider.
            IPluginExecutionContext context = (IPluginExecutionContext)
                serviceProvider.GetService(typeof(IPluginExecutionContext));

            // Initialize empty token
            string token = string.Empty;
            string[] scopes = new string[] { "https://YOUR-DYNAMICS-ORG-URL.crm4.dynamics.com/.default" };

            try
            {
                tracingService.Trace("Scopes in GetAccessTokenManagedIdentity: " + string.Join(", ", scopes));
                token = managedIdentityService.AcquireToken(scopes);
                tracingService.Trace($"MANAGED IDENTITY TOKEN : {token}");
            }
            catch (Exception ex)
            {
                tracingService.Trace($"Failed to acquire token {ex.Message}");
            }

            var keyvaultname = "YOUR-KEYVAULT-NAME";
            var secretname = "DynamicsChroniclesSecret";

            // Get Token
            var kv_scopes = new List<string> { "https://vault.azure.net/.default" };
            var kv_token = managedIdentityService.AcquireToken(kv_scopes);
            tracingService.Trace($"KV TOKEN : {kv_token}");

            var keyvaultsecretUrl = $"https://{keyvaultname}.vault.azure.net/secrets/{secretname}?api-version=7.4";

            try
            {
                using (HttpClient client = new HttpClient())
                {
                    client.DefaultRequestHeaders.Authorization = new AuthenticationHeaderValue("Bearer", kv_token);
                    client.DefaultRequestHeaders.Accept.Add(new MediaTypeWithQualityHeaderValue("application/json"));

                    var request = new HttpRequestMessage(HttpMethod.Get, new Uri(keyvaultsecretUrl));
                    var response = client.SendAsync(request).Result;

                    string json = response.Content.ReadAsStringAsync().Result;

                    var keyVaultResponse = System.Text.Json.JsonSerializer.Deserialize<KeyVaultResponse>(json);

                    tracingService.Trace($"KV SECRET VALUE : {keyVaultResponse.value}");

                }
            }
            catch (Exception ex)
            {
                tracingService.Trace($"Failed to acquire token {ex.Message}");
            }

        }

    }
}
public class KeyVaultResponse
{
    public string value { get; set; }
    public string id { get; set; }

}
- Replace the following values with yours
- Line 27 => "https://YOUR-DYNAMICS-ORG-URL.crm4.dynamics.com/.default"
- Line 40 => "YOUR-KEYVAULT-NAME" (name of the key vault created in step 2)
- Build the plugin
- Sign the plugin using signtool and the following Powershell command
.\signtool sign /f "C:\temp\dynamicschronicles_certificate.pfx" /p "complexpwd12345" "C:\Path_to_your_plugin\bin\Debug\ManagedPlugin.dll"
- Register the plug-in and register a new step (i.e. create of account)
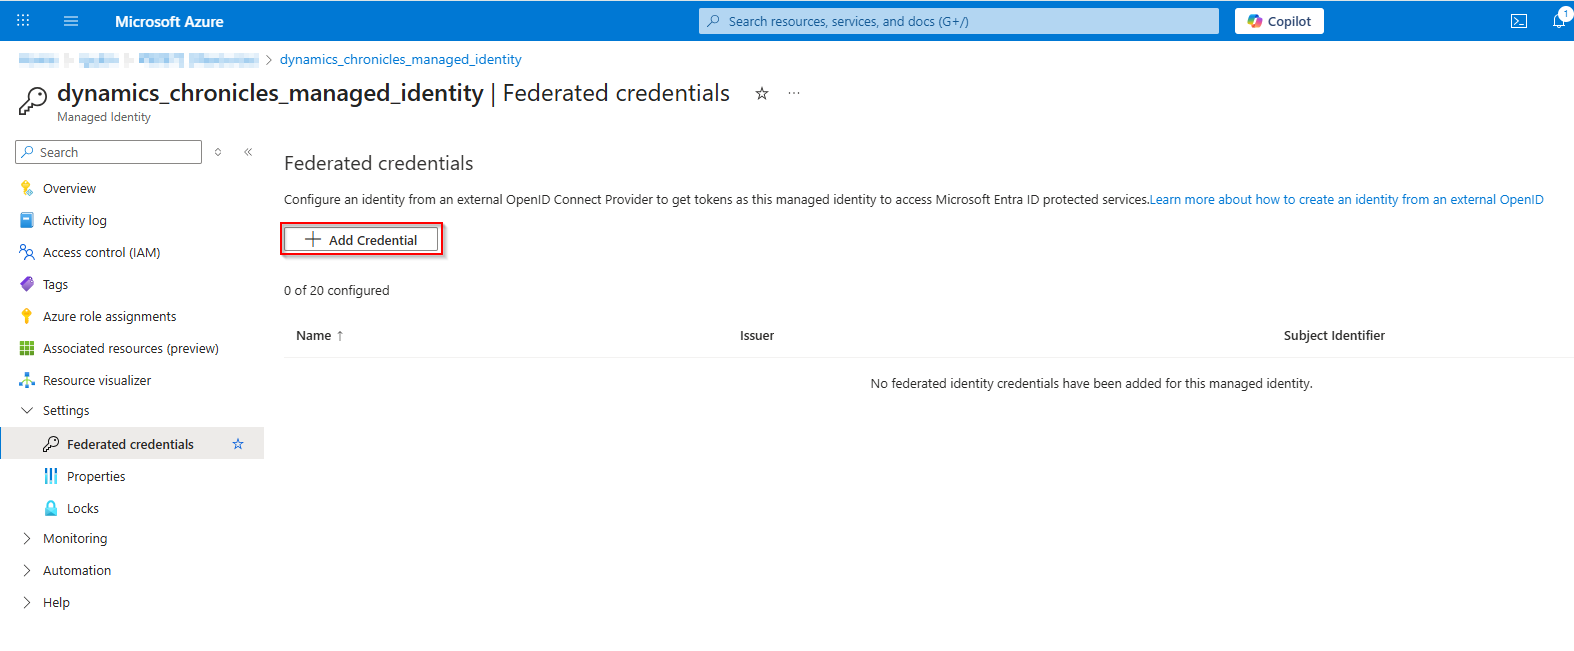
Step 5 : Configure federated identity credentials
- Open the User Assigned Managed Identity created in step 1
- Navigate to "Settings/Federated credentials" and click on "Add Credential"
- Select "Other" for "Federated credential scenario"
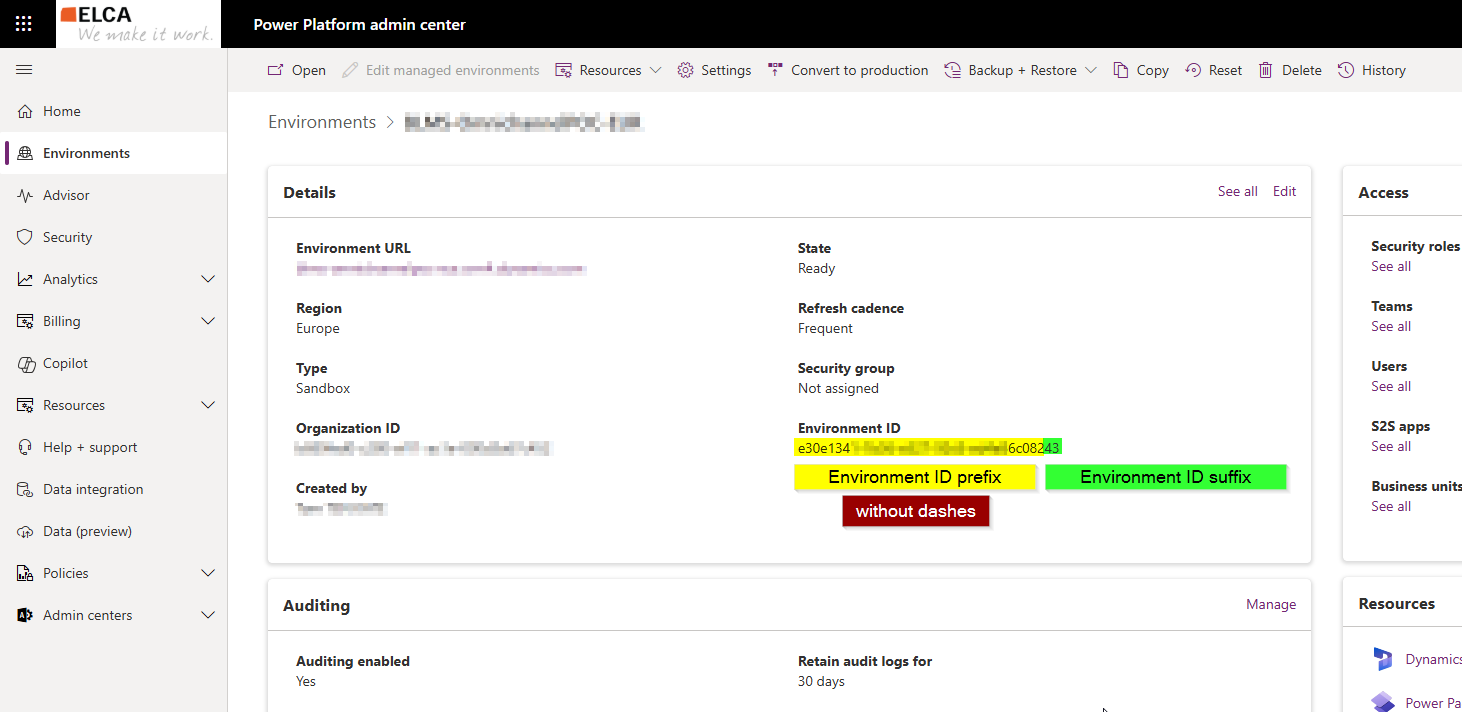
- Set "Issuer" = https://[Dynamics environment ID prefix].[Dynamics environment ID suffix].environment.api.powerplatform.com/sts
- Replace "[Dynamics Environment ID prefix]" with your environment ID (except the last two characters and without dashes)
- Replace "[Dynamics Environment ID suffix]" with the two last characters of the environment ID
- Set "Subject identifier" = component:pluginassembly,thumbprint:[Thumbprint],environment:[Dynamics environment ID]
- Replace "[Thumbprint]" with Thumbprint value copied in step 2
- Replace "[Dynamics environment ID]" with your environment ID (with dashes)
- Set "Name" to whatever you want
- For "Audience", you can keep the default value
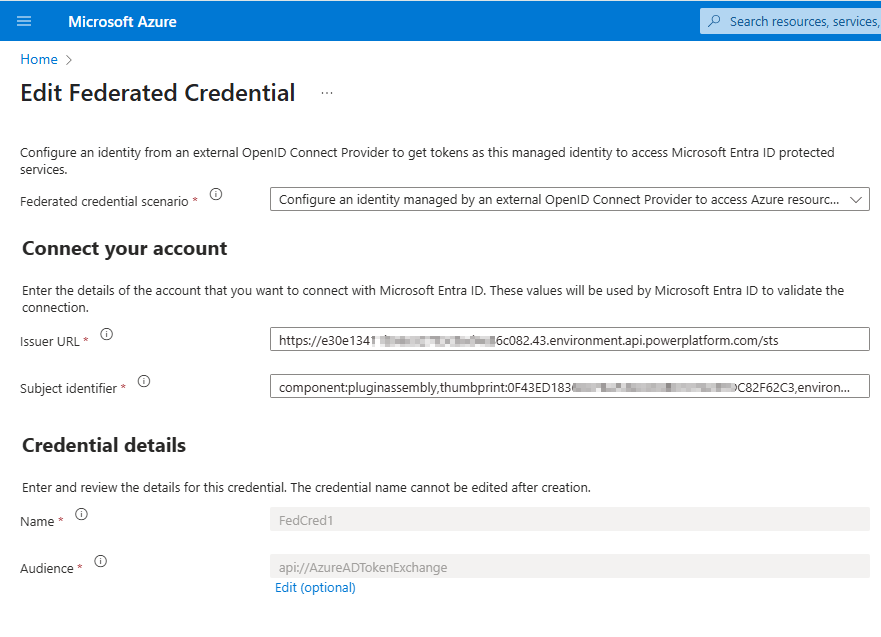
- Click on "Add" to create the Federated Credential
Step 6 : Create managed identity record in Dataverse
- Open "XRMToolbox" and open the tool "Plugin Identity Manager" (you can also create it manually if you want, see documentation here)
- Select your plugin assembly (1)
- Click on "Link to New Identity"
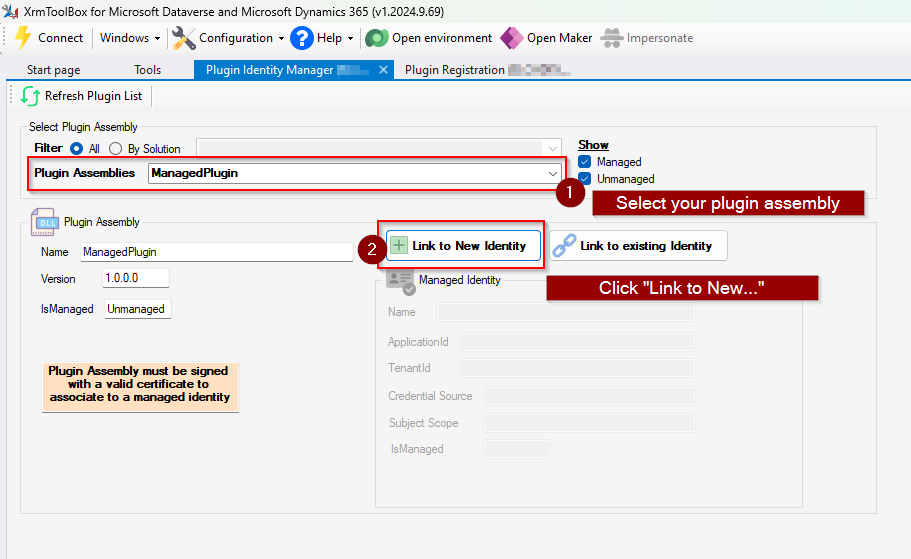
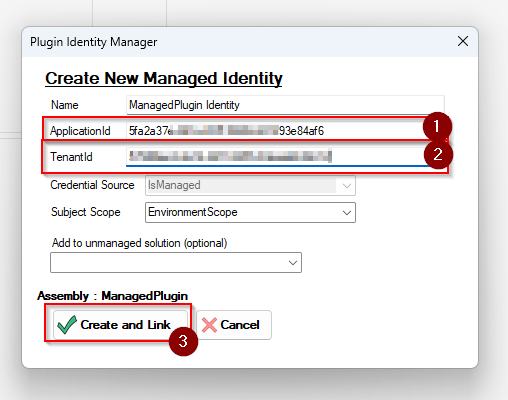
- Fill in the following information and click on "Create and Link"
- ApplicationId = "Client ID" value of your managed identity copied in step 1
- TenantId = Your tenant Id (Directory ID in Azure)
Verification
Good news ! You're ready to go and check if everything is working well. To do so:
- Trigger your plugin. In our case, it will be the creation of an account
- Open Plugin Trace Log and check the plugin execution and if the secret is correctly retrieved
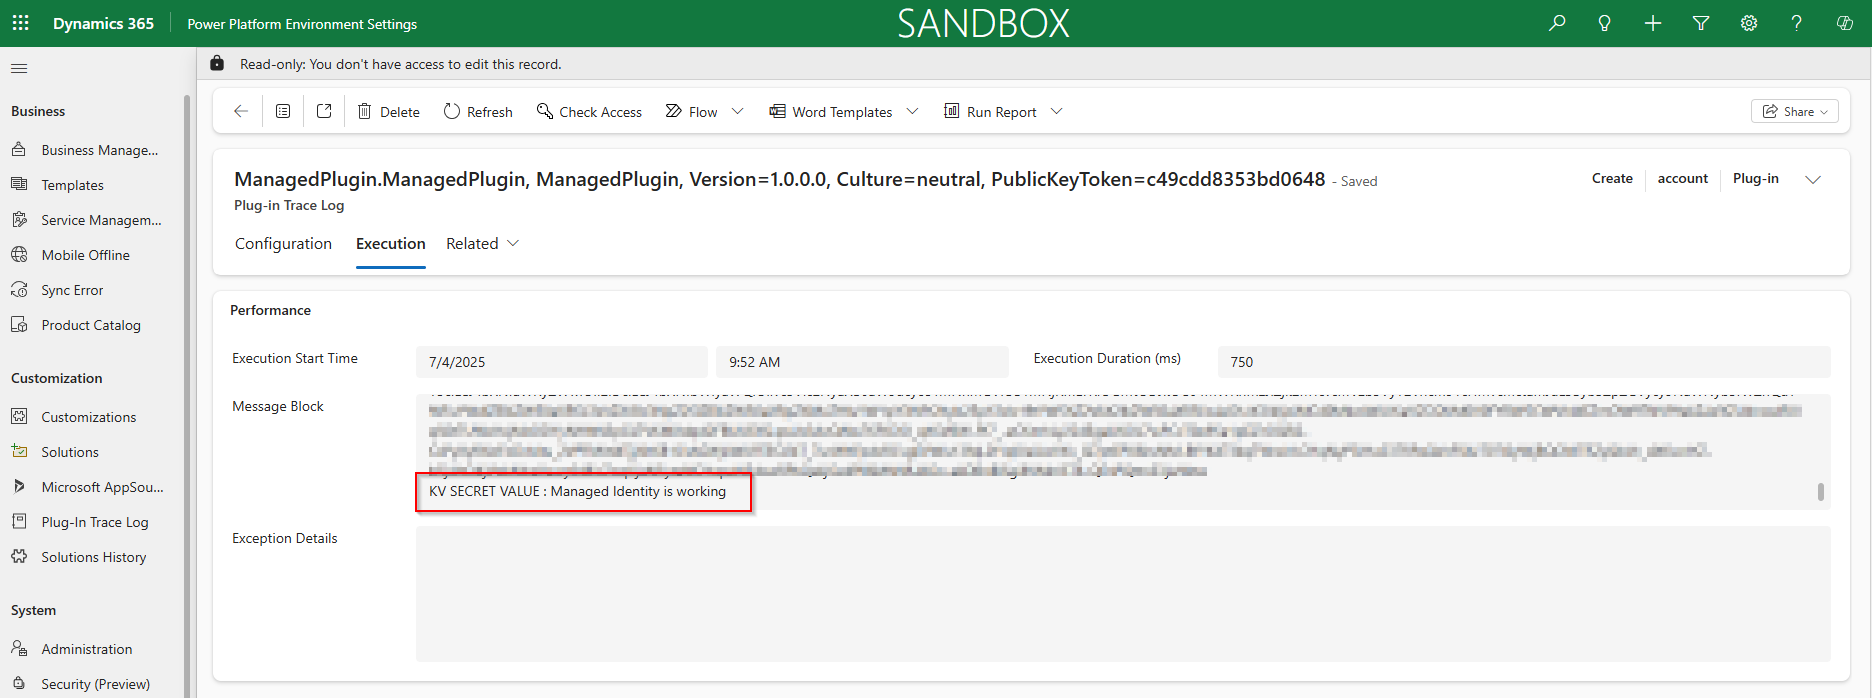
Everything is working well — we are now able to connect and retrieve secrets from Key Vault without having to store or manage any credentials in Dataverse.
I hope this step-by-step guide was clear and helped you configure everything easily on your end. If that’s not the case or if any steps need further clarification, please let me know in the comments.
