
Azure DevOps for Power Platform:
Azure DevOps is a Microsoft product that provides version control, reporting, requirements management, project management, automated builds, testing, and release management capabilities. It covers the entire application lifecycle and enables DevOps capabilities
The article Azure DevOps for Dataverse using Power Platform Build Tools shows you a basic usage of Azure Pipeline to export and import solution
In this article, we'll implement some advanced setup for Azure Pipeline in the build steps
We'll complete the following steps:
-
Implement basic setup for Azure Pipeline
-
Publish CRM customizations
-
Export unmanaged solution (.zip file)
-
Unpack the unmanaged solution to a folder
-
Commit changes of the unmanaged solution (a folder after unpacking) to git
-
Using variables and variable group
-
Conclusion
1. Implement basic setup for Azure Pipeline
To follow the rest of this article, you need to follow Azure DevOps for Dataverse using Power Platform Build Tools to implement the basic setup.
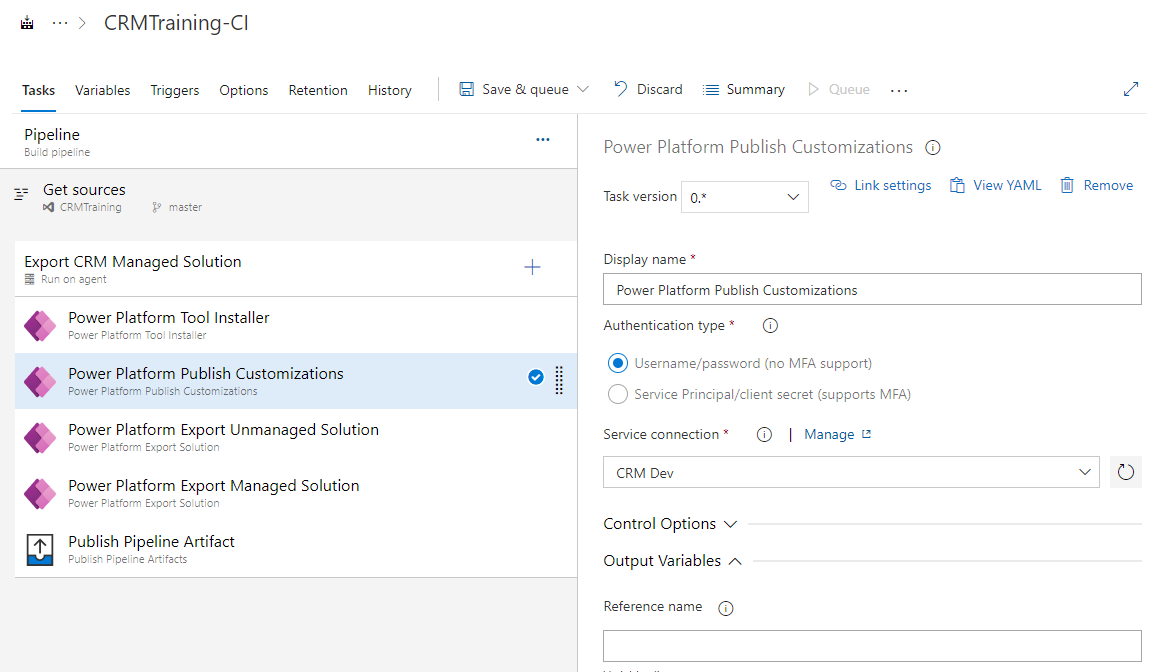
2. Publish CRM customizations
The power platform extension support publishes customization before exporting.
To do this, add a "Power Platform Publish Customizations" to the build pipeline. You need to specify a connection to the CRM DEV environment
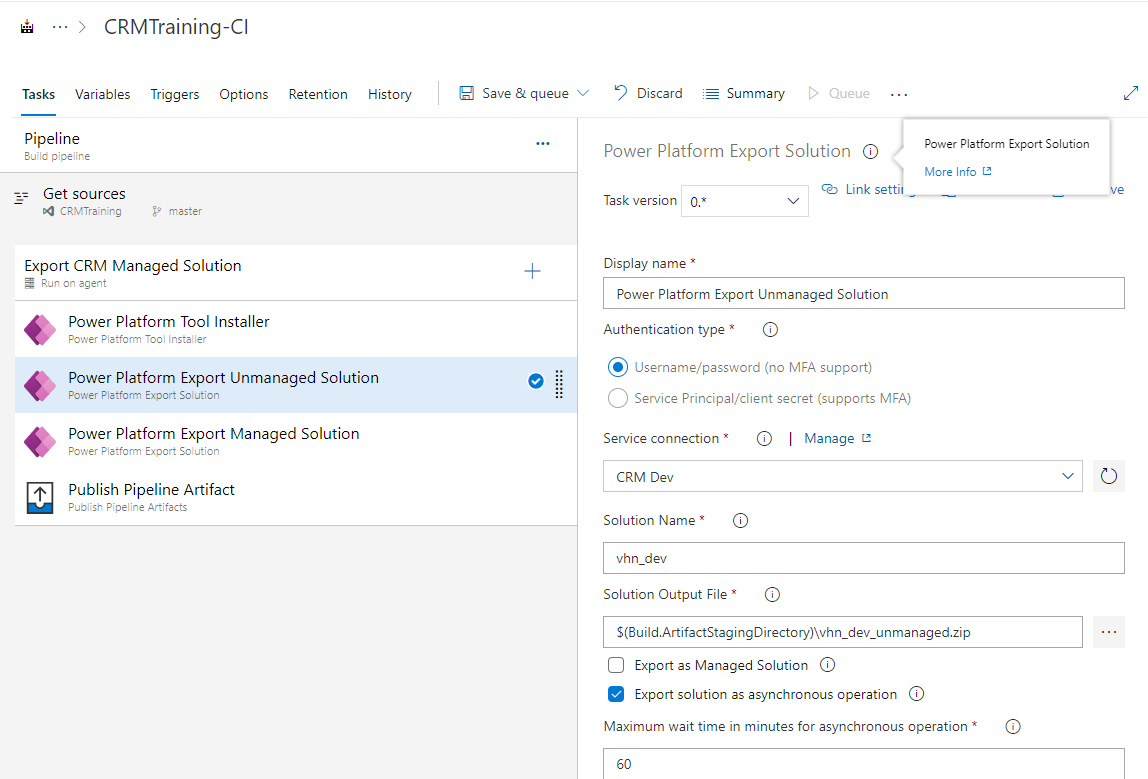
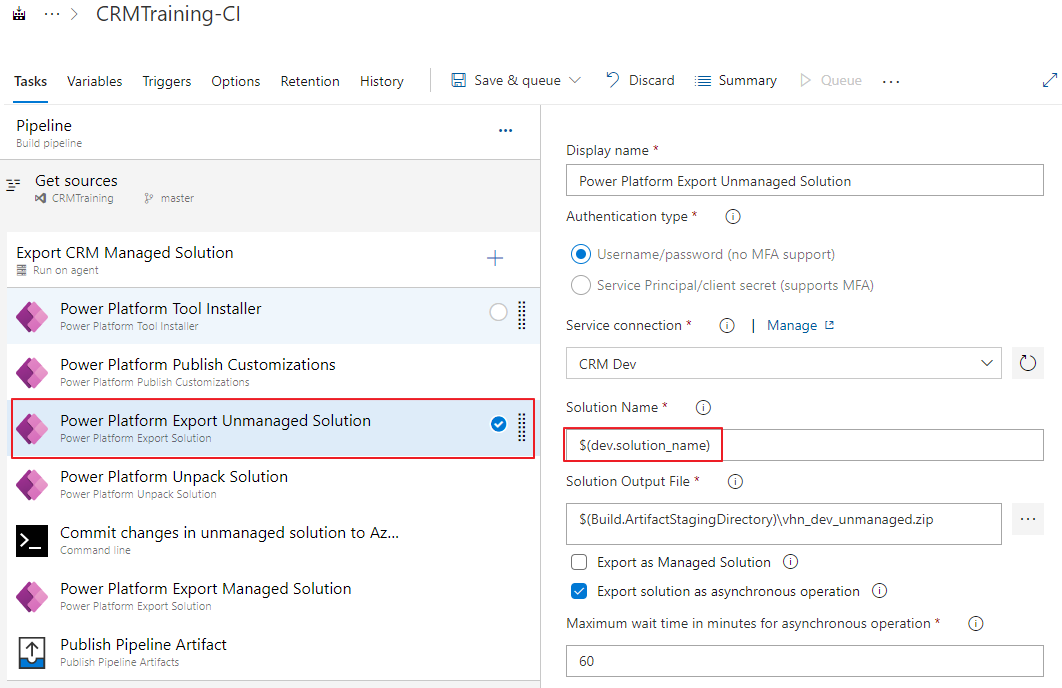
3. Export unmanaged solution
You can also export solution as unmanaged in Power Platform Build Tools
Note: Step 4 and Step 5 will use data from this step.
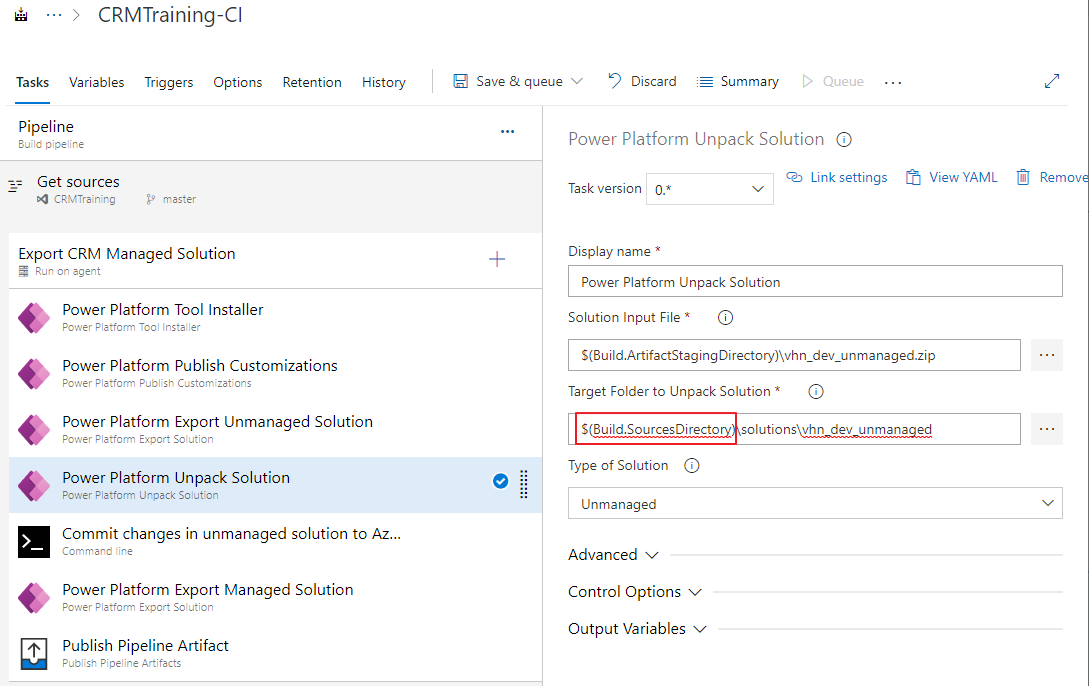
4. Unpack a managed solution
In Step 3, we already export the unmanaged solution, it's a .zip file
We can use Power Platform Build Tools to unpack (unzip) solution into a folder
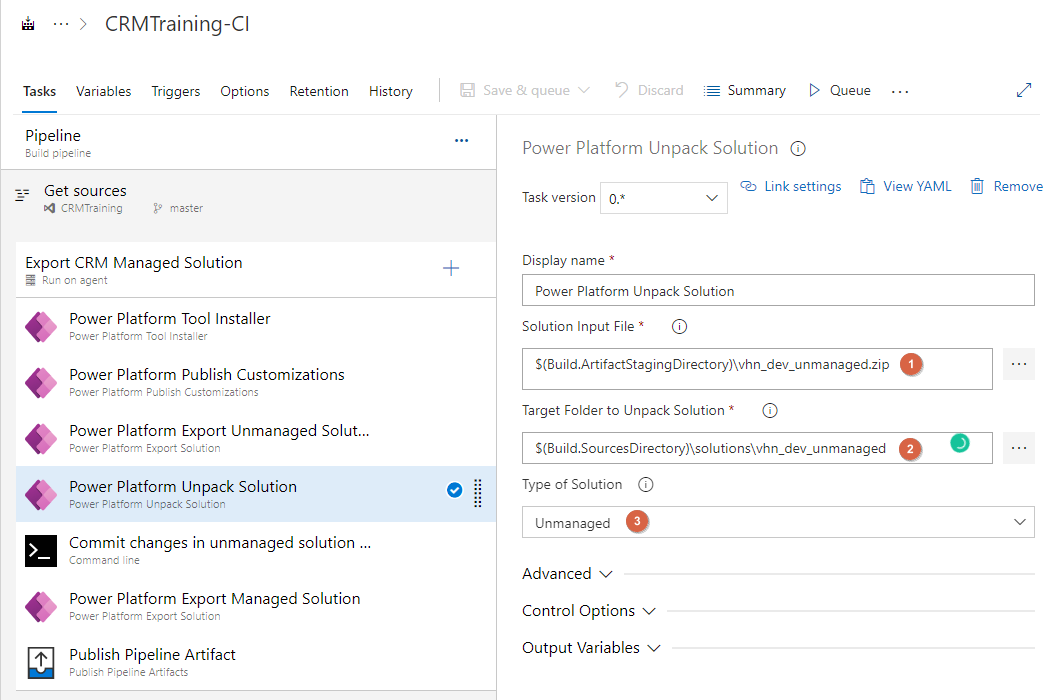
Parameters:
- Select the unmanaged solution from the build at Step 3
- $(Build.ArtifactStagingDirectory): this is a predefined variable of Azure DevOps
- Select the folder name to contain the unpack solution
- $(Build.SourcesDirectory): this is a predefined variable of Azure DevOps which points to the git repository root folder
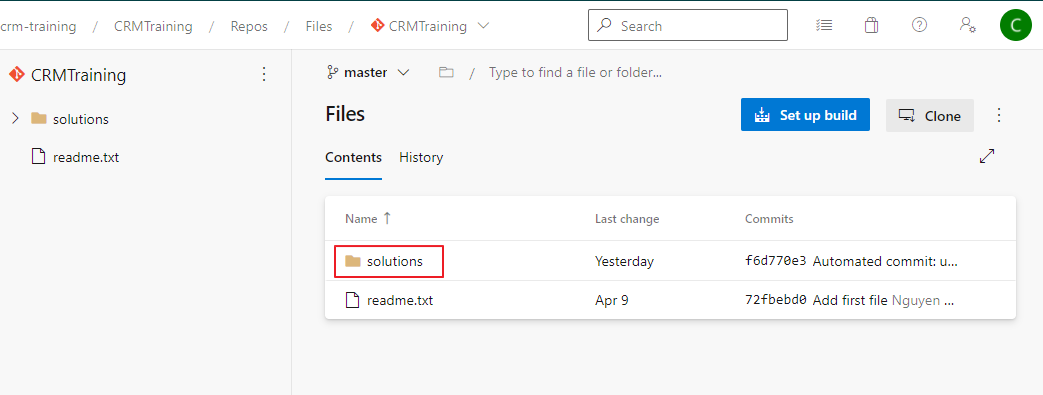
- Make sure the folder "solutions" exits in your repo
- The type of solution is Unmanaged
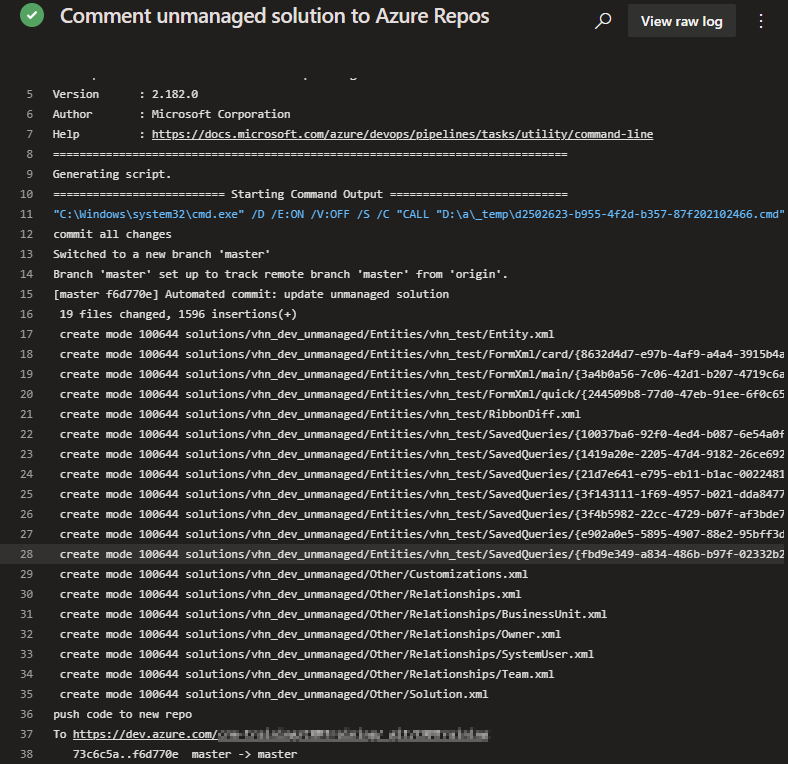
5. Commit changes of the unmanaged solution (a folder after unpacking) to git
It's helpful to commit the changes to Git to track all changes that go to the PROD environment.
To do this, we can create a Window command to commit changes in folder "solutions".
5.1 Update permission configuration
Open Project Settings at the left-bottom of Azure DevOps
Set "Allow" for permission "Contribute" for the current user or group
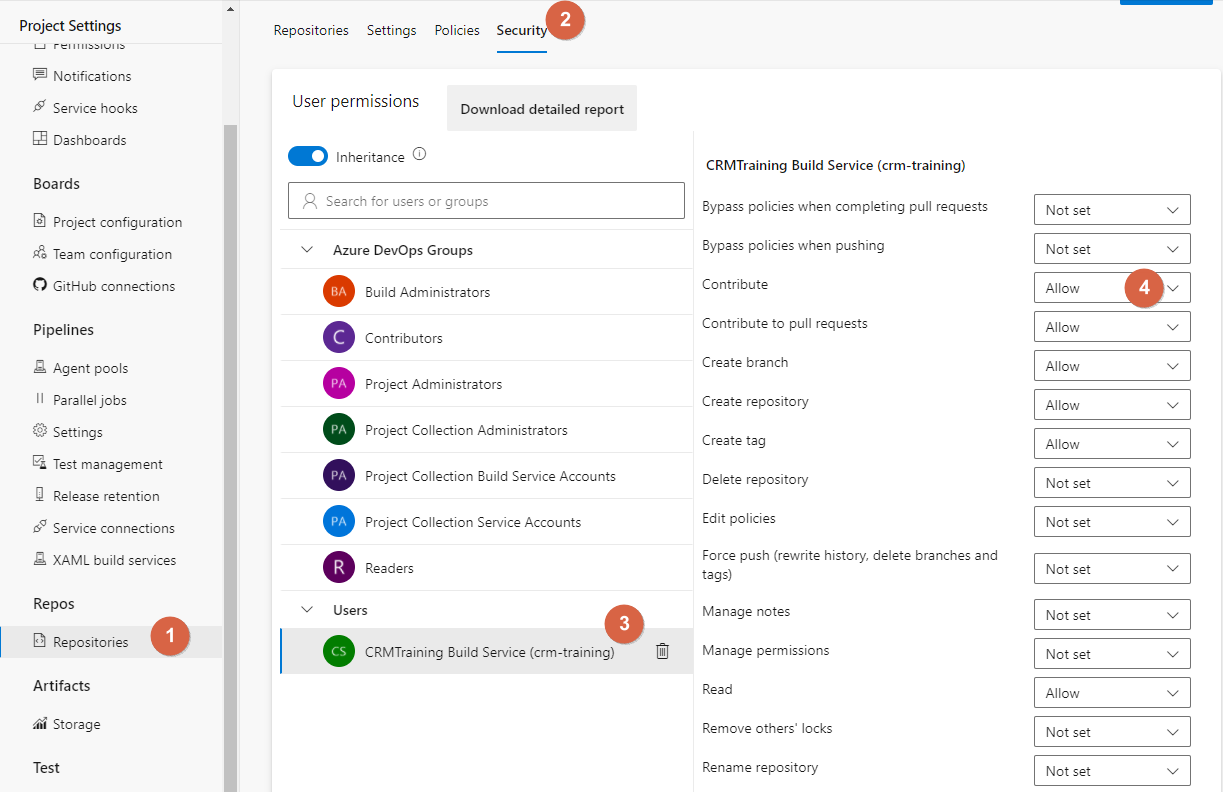
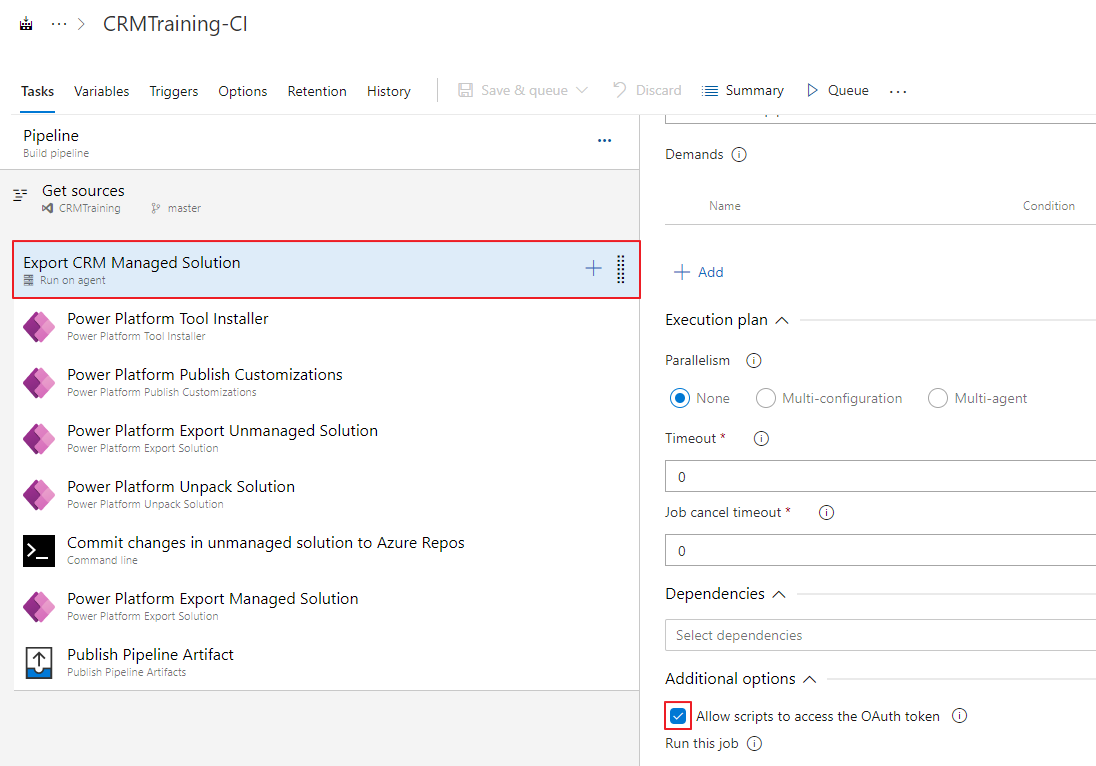
Allow scripts to access the OAuth token
If you do not update the configuration correctly, we'll get these error when commit code using Azure Pipeline
- Fatal: Cannot prompt because user interactivity has been disabled.
- You need the Git 'GenericContribute' permission to perform this action
5.2 Create Window command task to commit solution
After updating the configuration in 4.1, you need to create a command-line task to commit code (the unmanaged solution) into GIT to track change
To do this, create a new "Command line" task
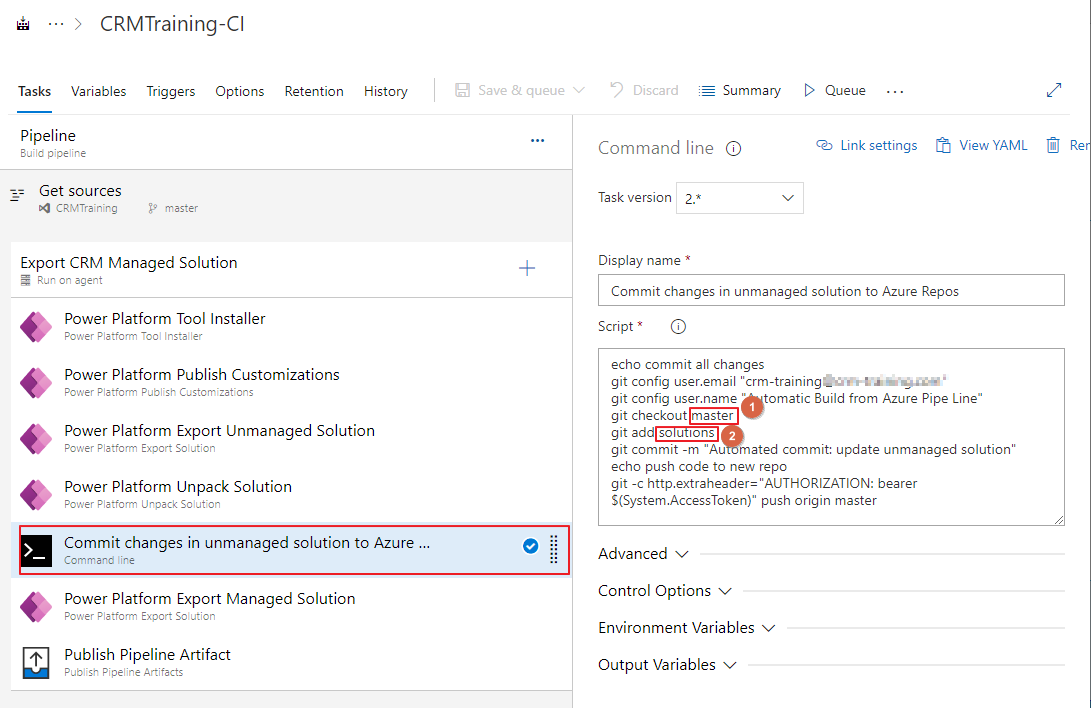
- "master": the name of the branch that you want to commit to
- "solution": the folder that contains data to commit. See detail in Step 4
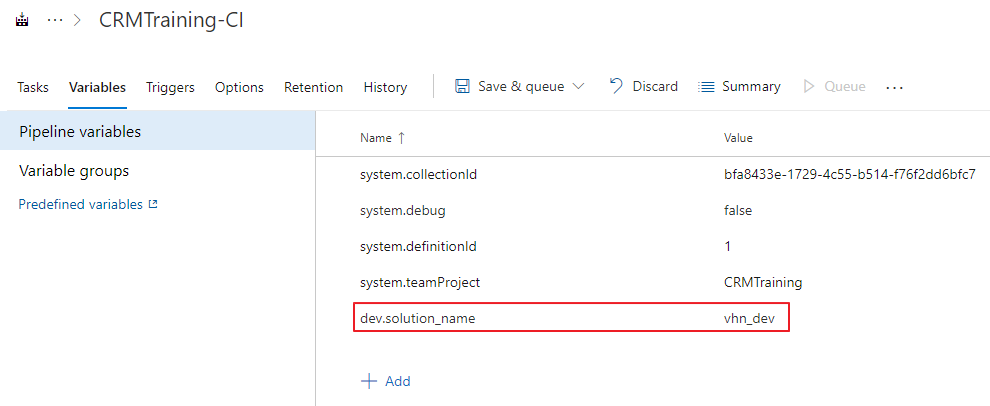
6. Using variables and variable group
When you configure for the Azure DevOps task, you can use variables for each config parameter instead of hard code.
There are 3 kinds of variables in Azure DevOps
- Pipeline variables: custom variable for this pipeline. You can create as many as you want.
- Predefined variables: predefined variables of Azure Pipeline. For example "$(Build.SourcesDirectory)"
- Variable groups: Use a variable group to store values that you want to control and make available across multiple pipelines. See detail in "6. Using variable groups from Azure Key-Val"
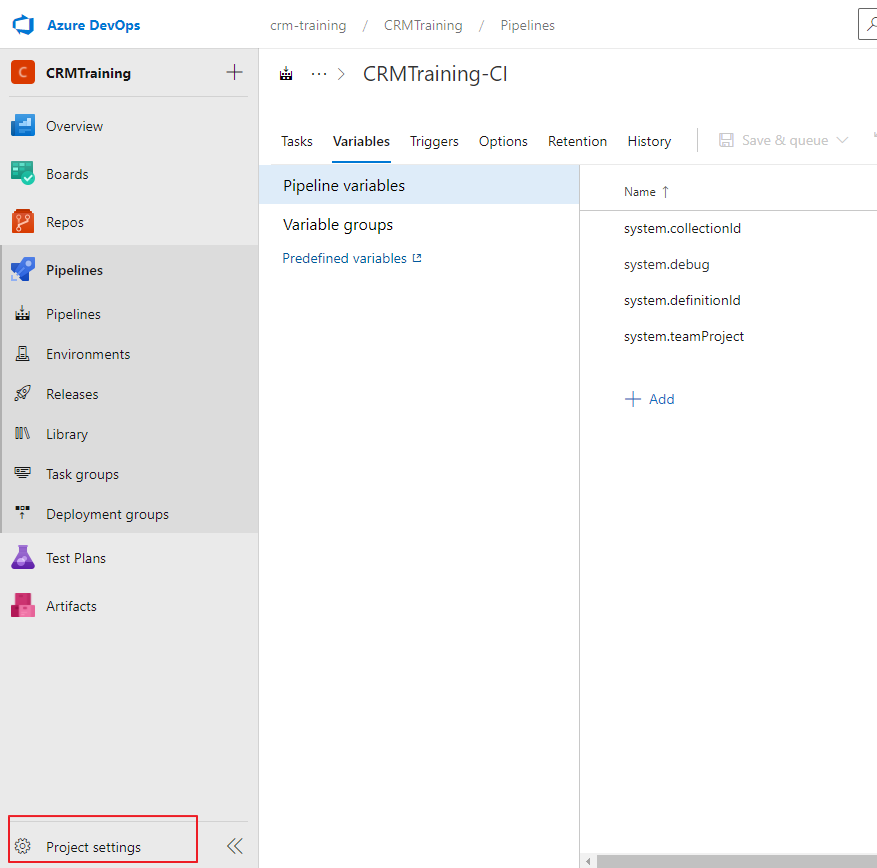
6.1 Using variables
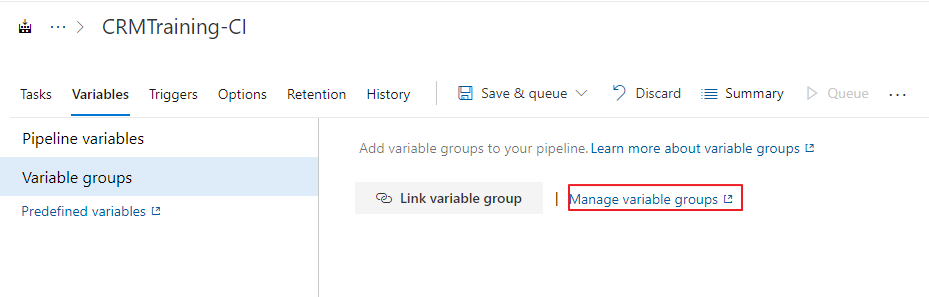
To access variable, open tab "variables"
Now, let's try to create a new variable "dev.solution_name" and replace the hard code solution name in task "Power Platform Export Unmanaged Solution"
6.2 Using variable groups
Open variable group library
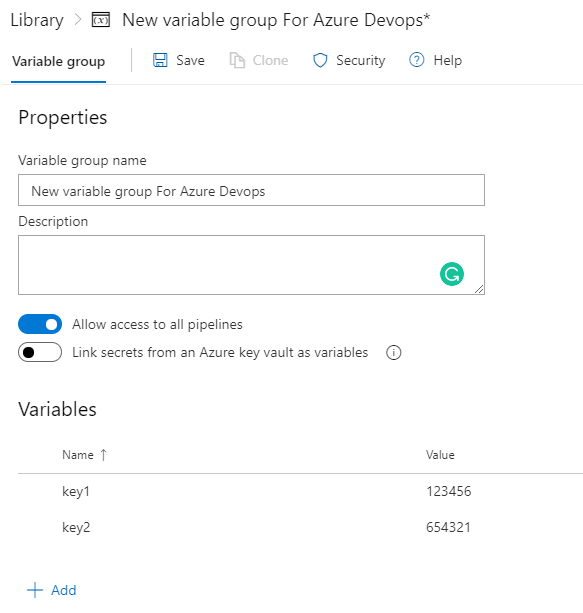
Create 2 sample variables
Link variable group to pipeline
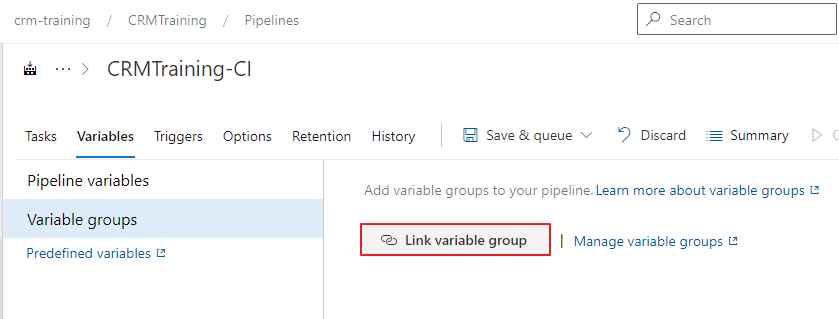
Select your variable group
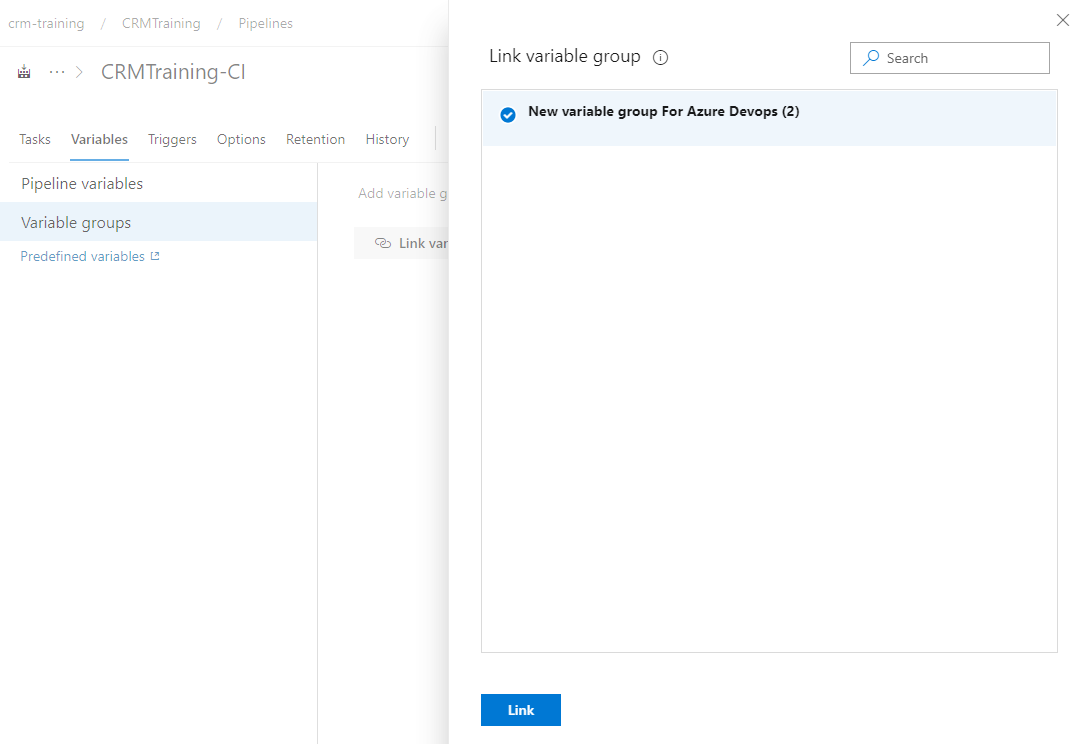
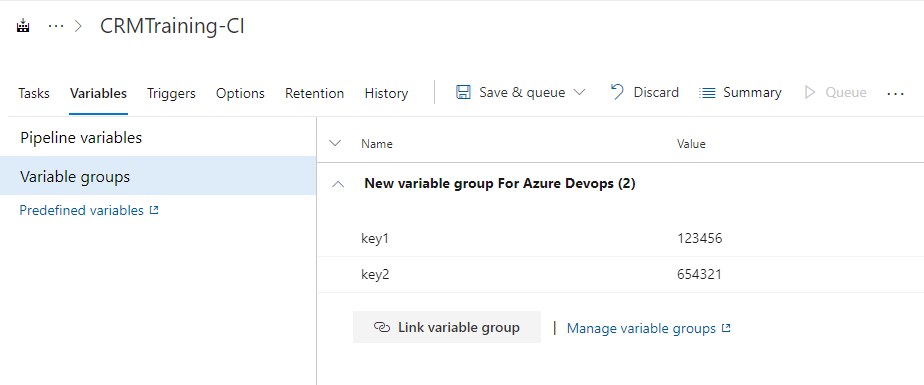
Now, you can use $(key1), $(key2) in your pipeline configuration.
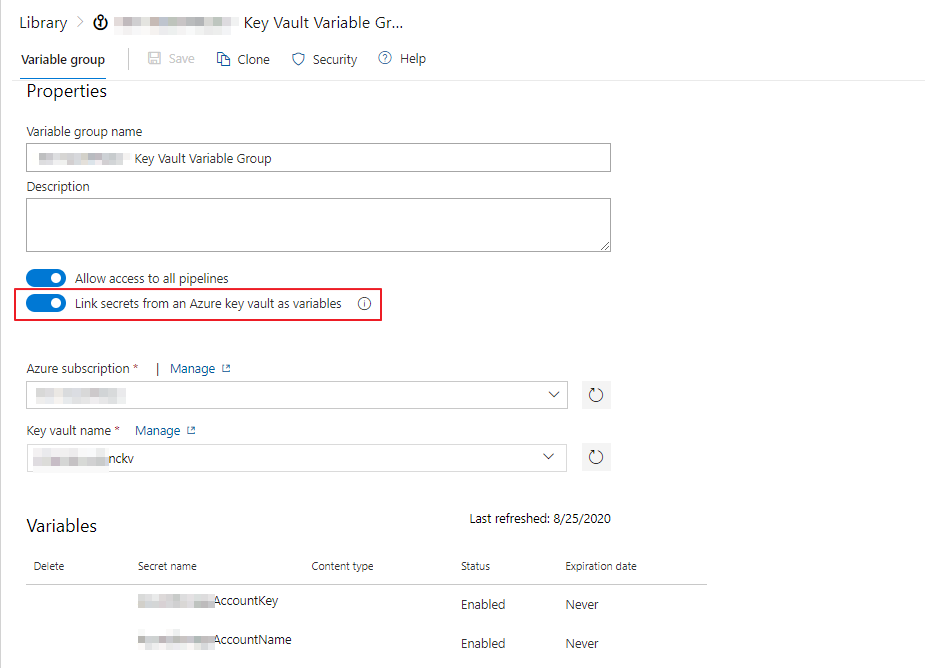
6.3 Link Azure Key-Val to the variable group
You can also create variable group from Azure Key-Val
To do this you need to register a Azure subscription and setup your Azure Key-Val, then link it to Azure DevOps
7. Conclusion
- This article is the advanced setup for Azure DevOps, you can see the basic setup here Azure DevOps for Dataverse using Power Platform Build Tools
- Azure DevOps Pipeline is powerful, you can do most CI/CD tasks using it
- Using variable is a best practice, you can define a value that you can then use in your pipeline
- Azure Key-Val increase security and control over keys and passwords, you should use it when possible
Azure DevOps for Power Platform