Dynamics 365 call action in button : In many cases, you might want to call an Action from a custom button of the Command Bar. In this trick, we will see in a quick tutorial how to do so.
We follow a very simple Use Case. In a Case Form, we create a custom button. It calls a JavaScript function. And the function calls the Action and passes a parameter to it.
The Action modifies the "Description" field of the Case and writes in it: "This Case is about: {Title of the Case}." That's obviously a very simplified Use Case, but it is sufficient to discover the process and then extend it to meet your needs!
Create the Action
First, we create our Action:
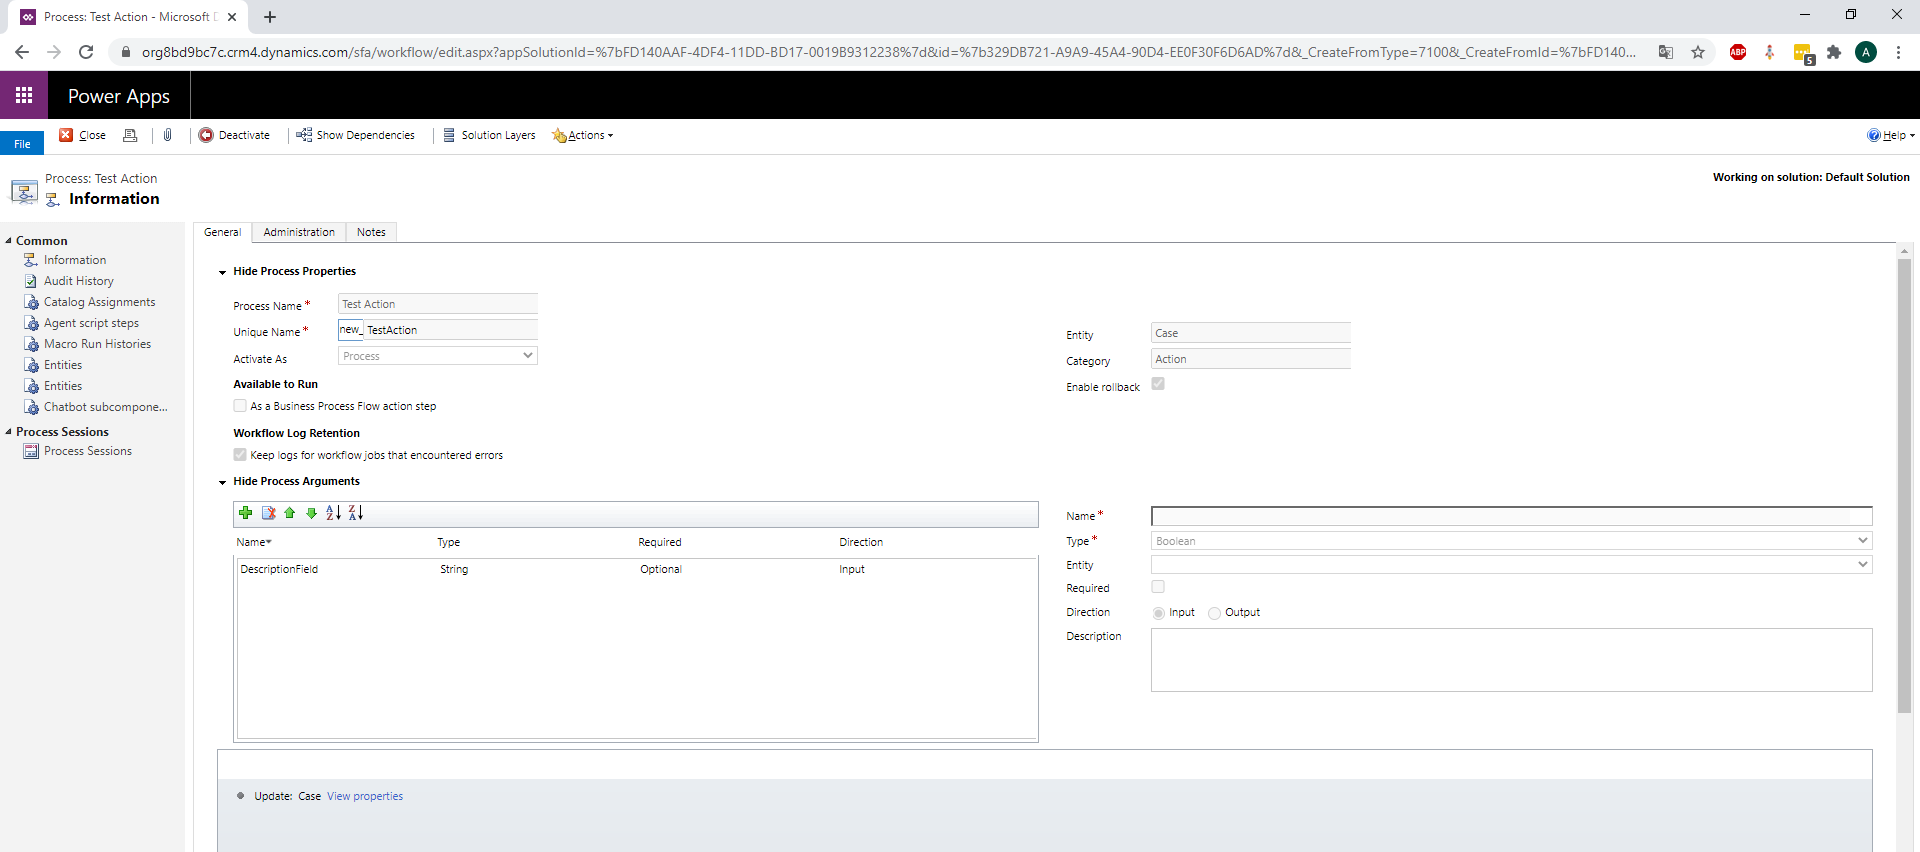
We bound it to the entity Case and we call it new_TestAction. We add an input parameter "DescriptionField".
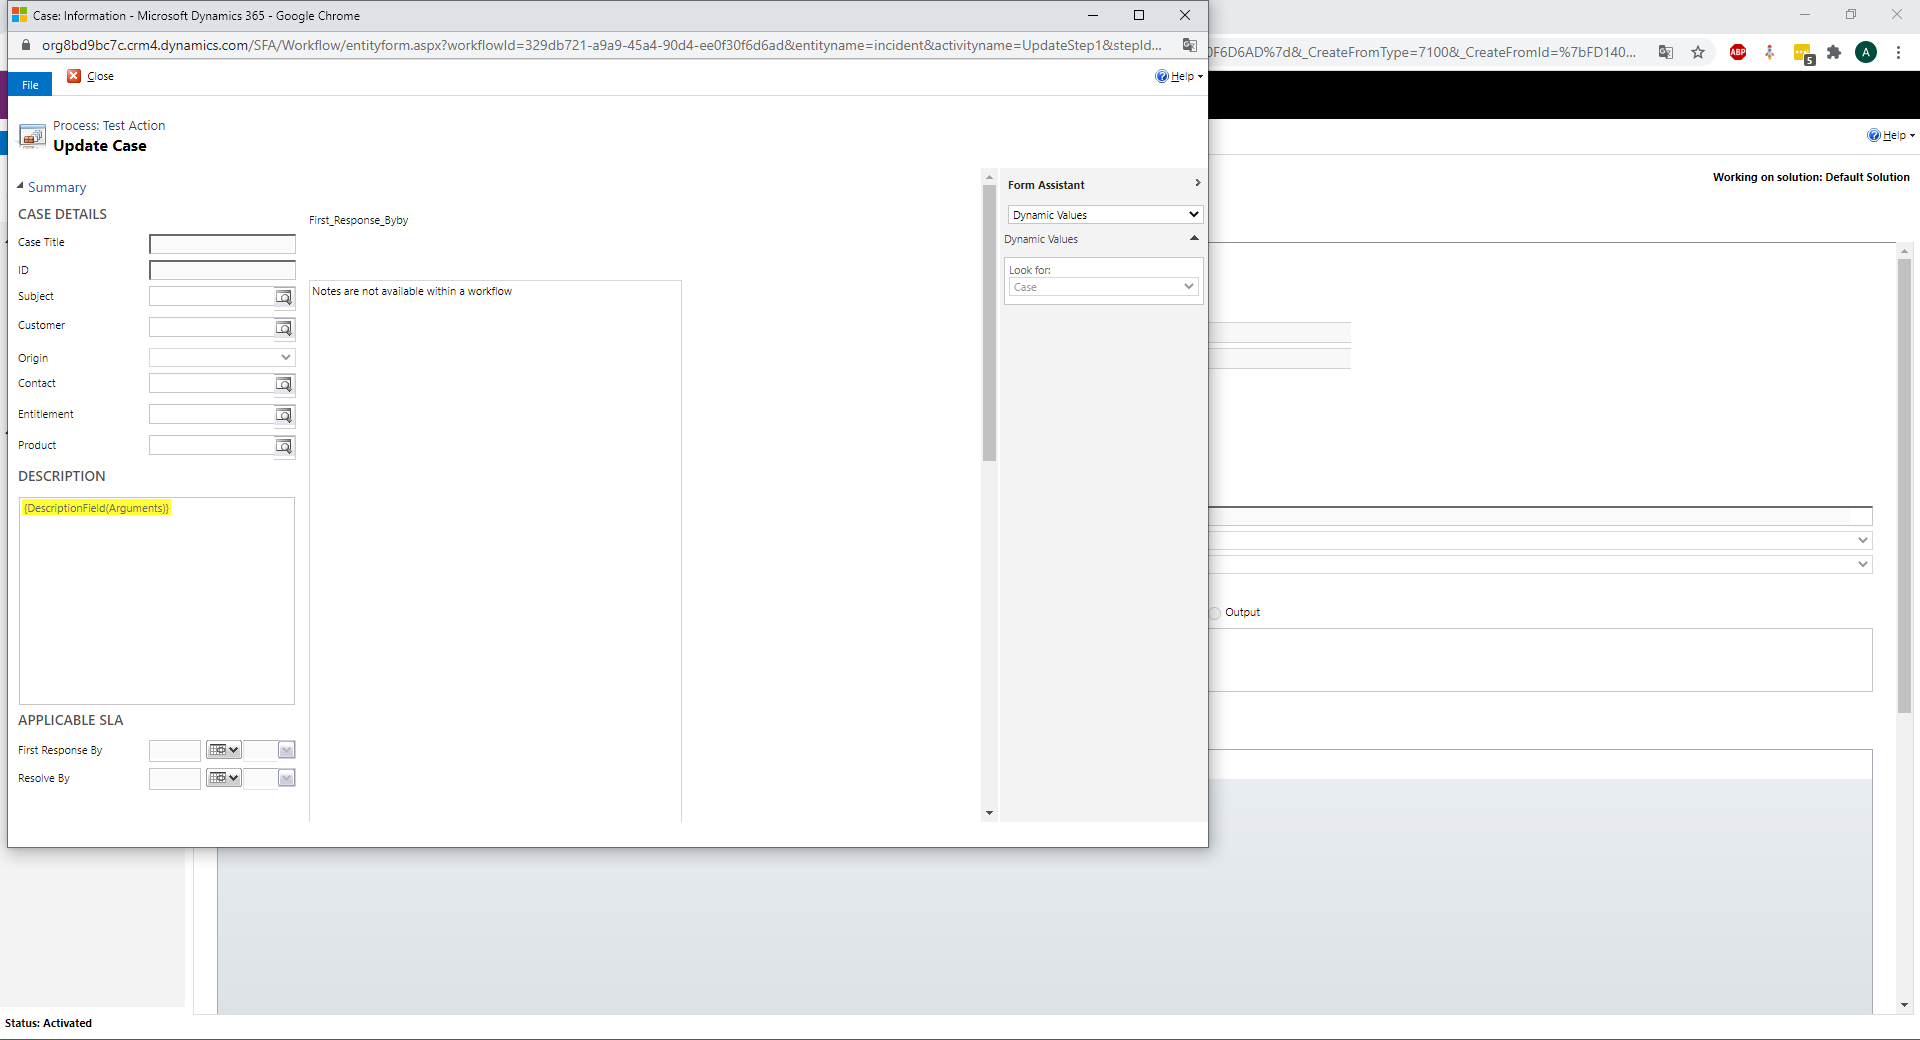
We pass this input to the "Description" field of the Case:
This Action will be called from our JavaScript, which we review in the next part.
Create a JavaScript Web Resource
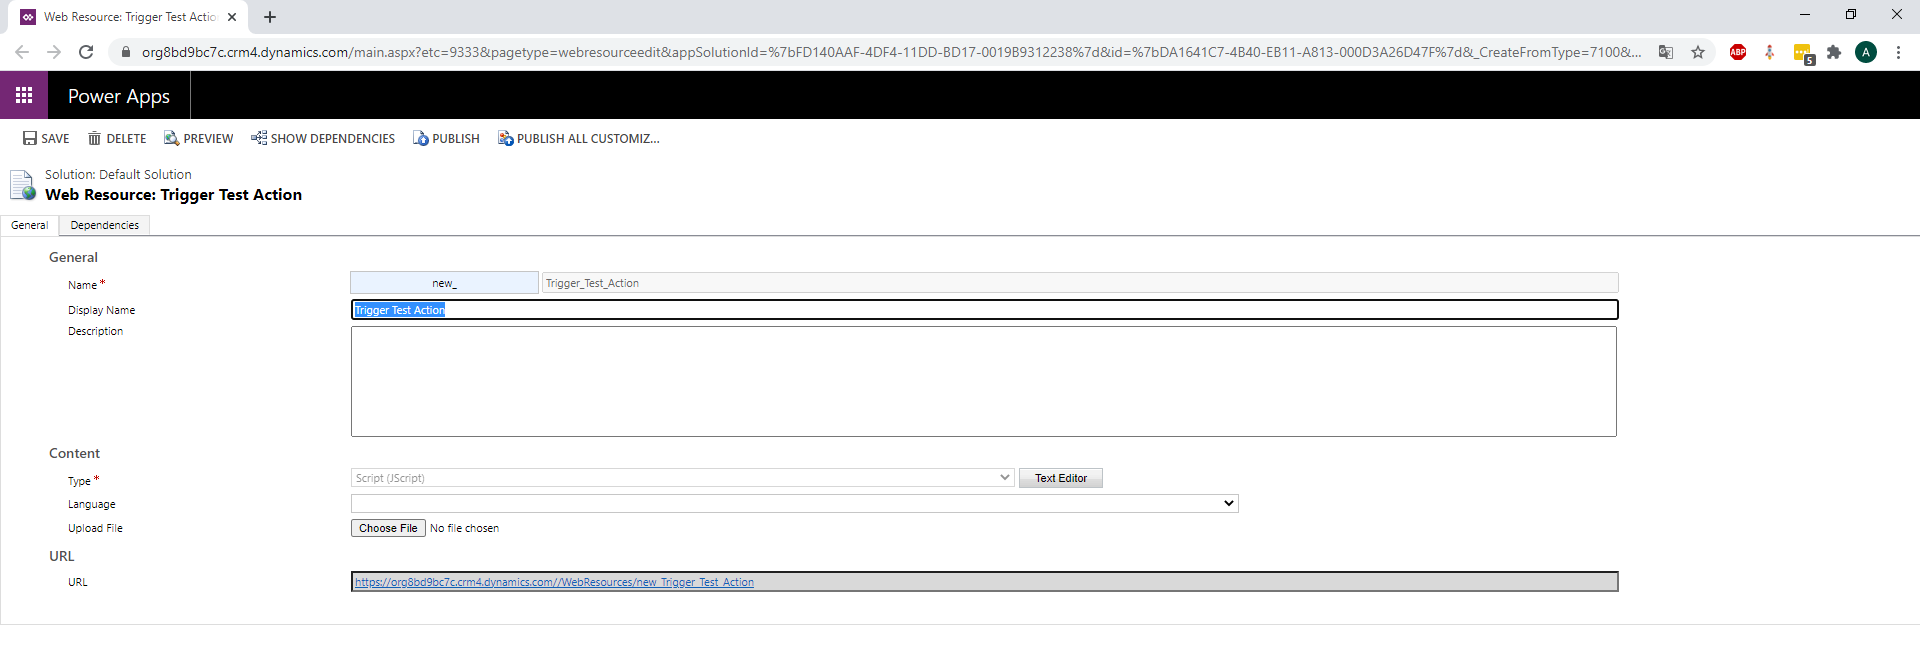
We create a new JavaScript called "Trigger Test Action":
And here is our JavaScript code:
function TriggerAction(context) {

    var Id = Xrm.Page.data.entity.getId().replace('{', '').replace('}', '');
    var serverURL = Xrm.Page.context.getClientUrl();

    var data = {
        DescriptionField: "This Case is about: " + Xrm.Page.getAttribute("title").getValue() + "."
    };

    var query = "incidents(" + Id + ")/Microsoft.Dynamics.CRM.new_TestAction";
    var req = new XMLHttpRequest();
    req.open("POST", serverURL + "/api/data/v9.1/" + query, true);
    req.setRequestHeader("Accept", "application/json");
    req.setRequestHeader("Content-Type", "application/json; charset=utf-8");
    req.setRequestHeader("OData-MaxVersion", "4.0");
    req.setRequestHeader("OData-Version", "4.0");
    req.onreadystatechange = function () {
        if (this.readyState == 4 /* complete */) {
            req.onreadystatechange = null;
            if (req.status >= 200 && req.status <= 300) {
                var data = JSON.parse(this.response);
            } else {
                var error = JSON.parse(this.response).error;
            }
        }
    };
    req.send(window.JSON.stringify(data));
}
The parameter "context" allows to retrieve the execution context. We will see in the next part how to send this context from the custom button. It is not used in this simple Use Case, but we present it as it can quickly become useful.
First, we get the Id of the opened record and the URL of the CRM.
Then, we define the new value for the description field in a "data" dictionary that will be sent to the Action. The key-values of the dictionary correspond to the inputs of the Action.
And then we call the CRM Web API to trigger the Action we created in the previous part.
Now, the last step is to create a button to call the JavaScript.
Create the Button with the Ribbon Workbench tool
To add our custom button, we use the famous Ribbon Workbench tool. If you don't know it yet, you can learn about it and download it here: https://www.develop1.net/public/rwb/ribbonworkbench.aspx
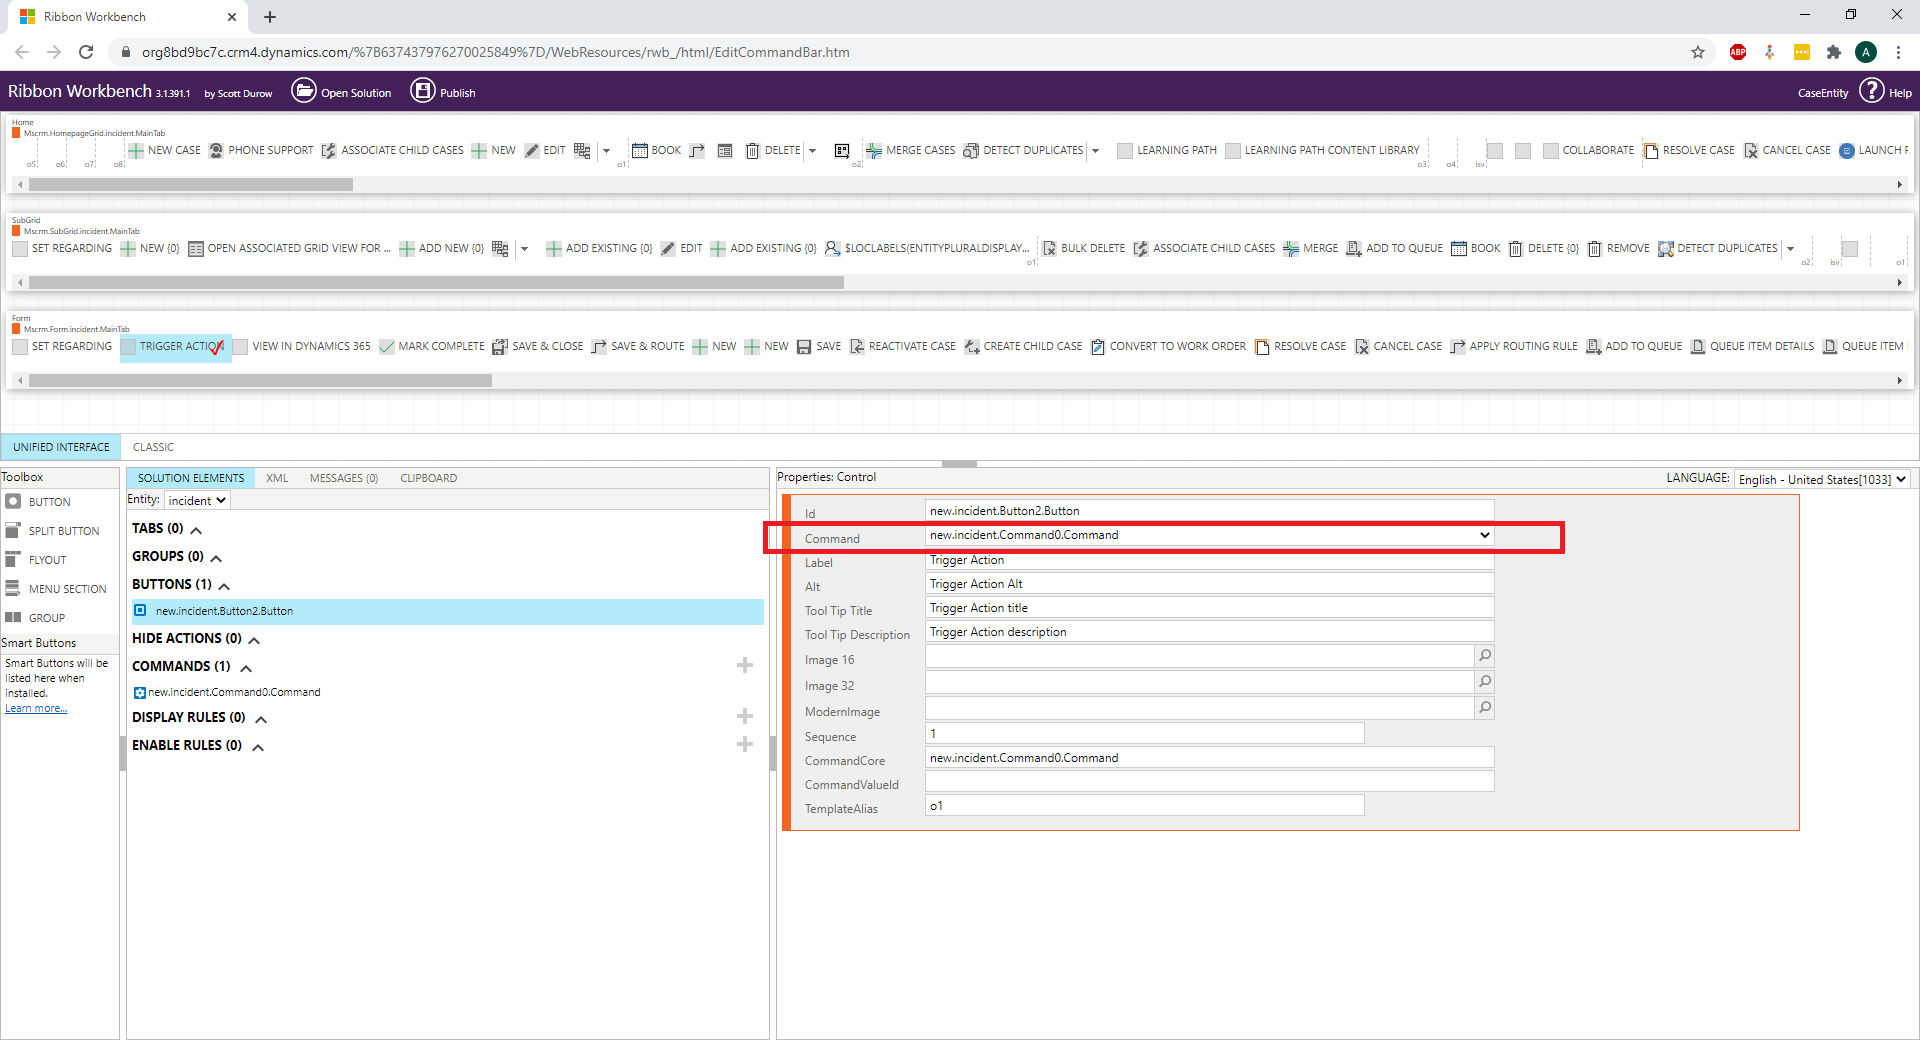
So first we add our new custom Button in the Form, which we call "Trigger Action". And we fill in the properties of the Button:
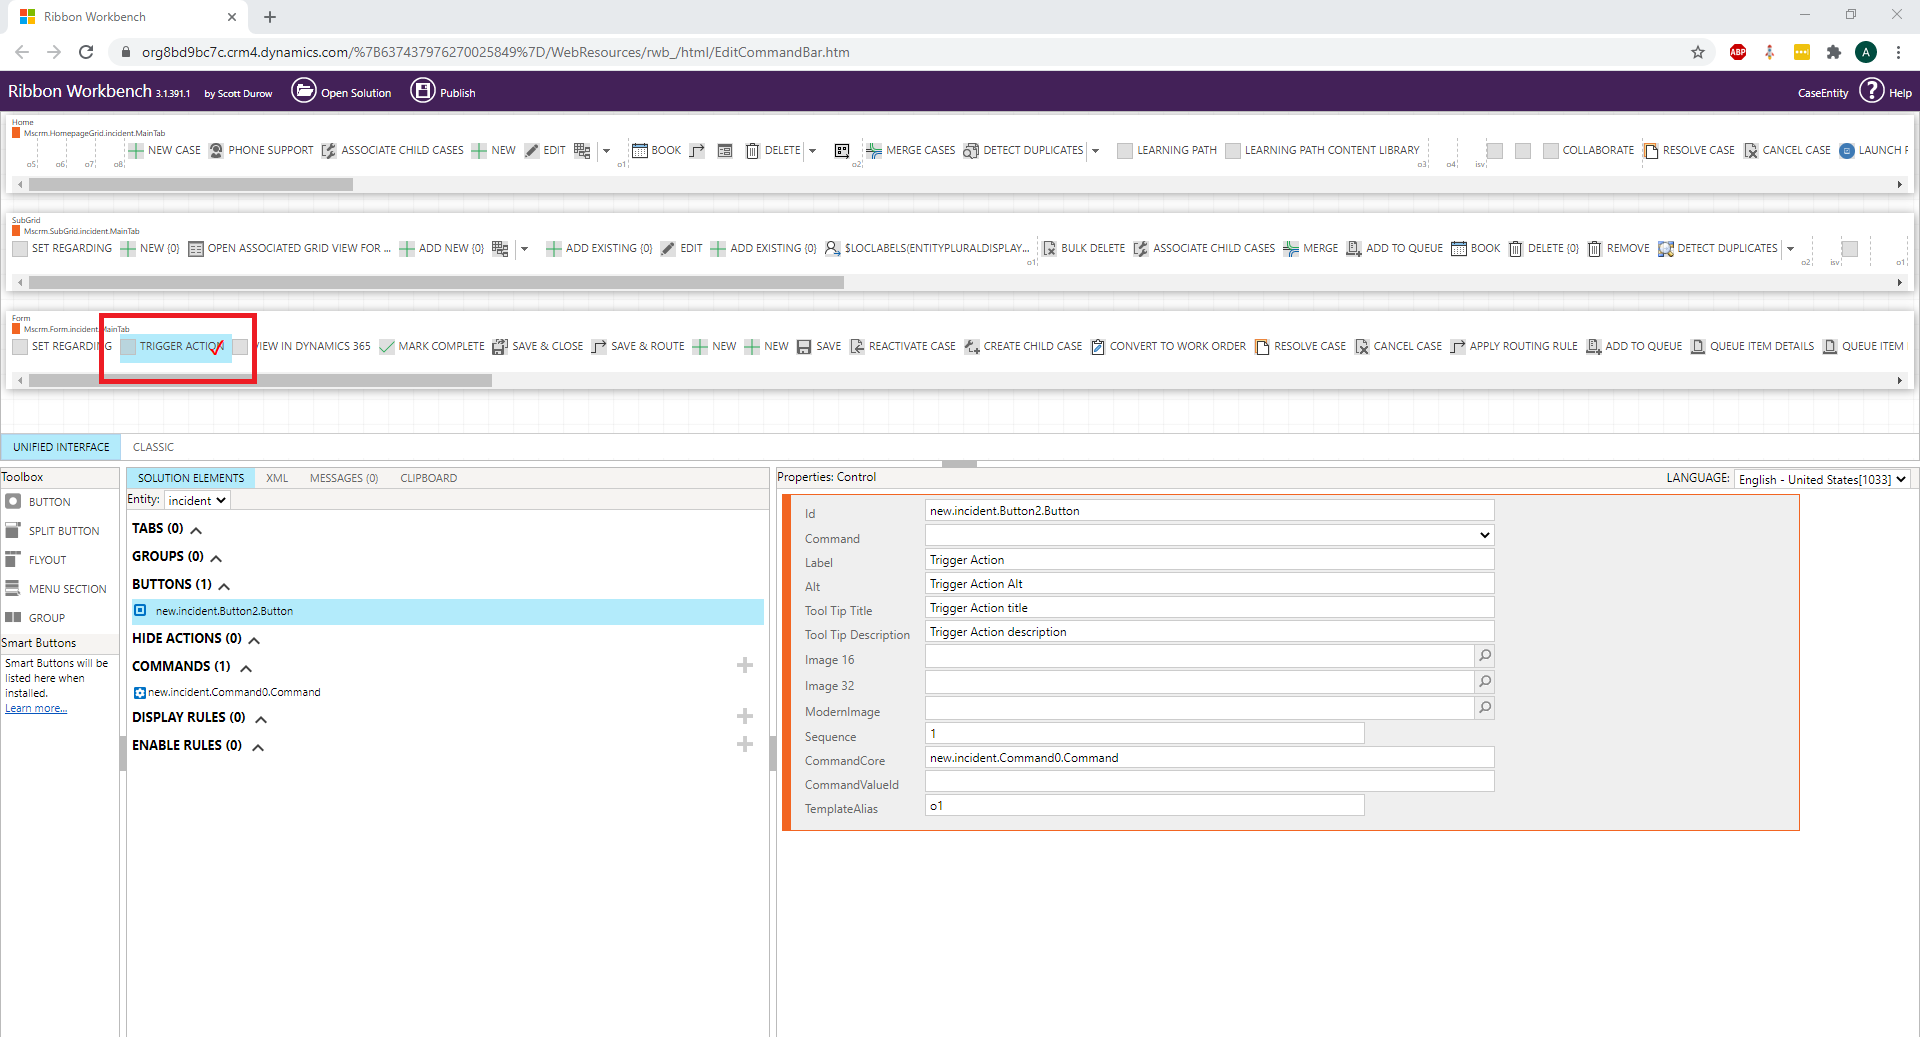
Then, we add a new Command. In the Command, we create a JavaScript Action. The library is our Web resource new_Trigger_Test_Action and the function to call is TriggerAction:
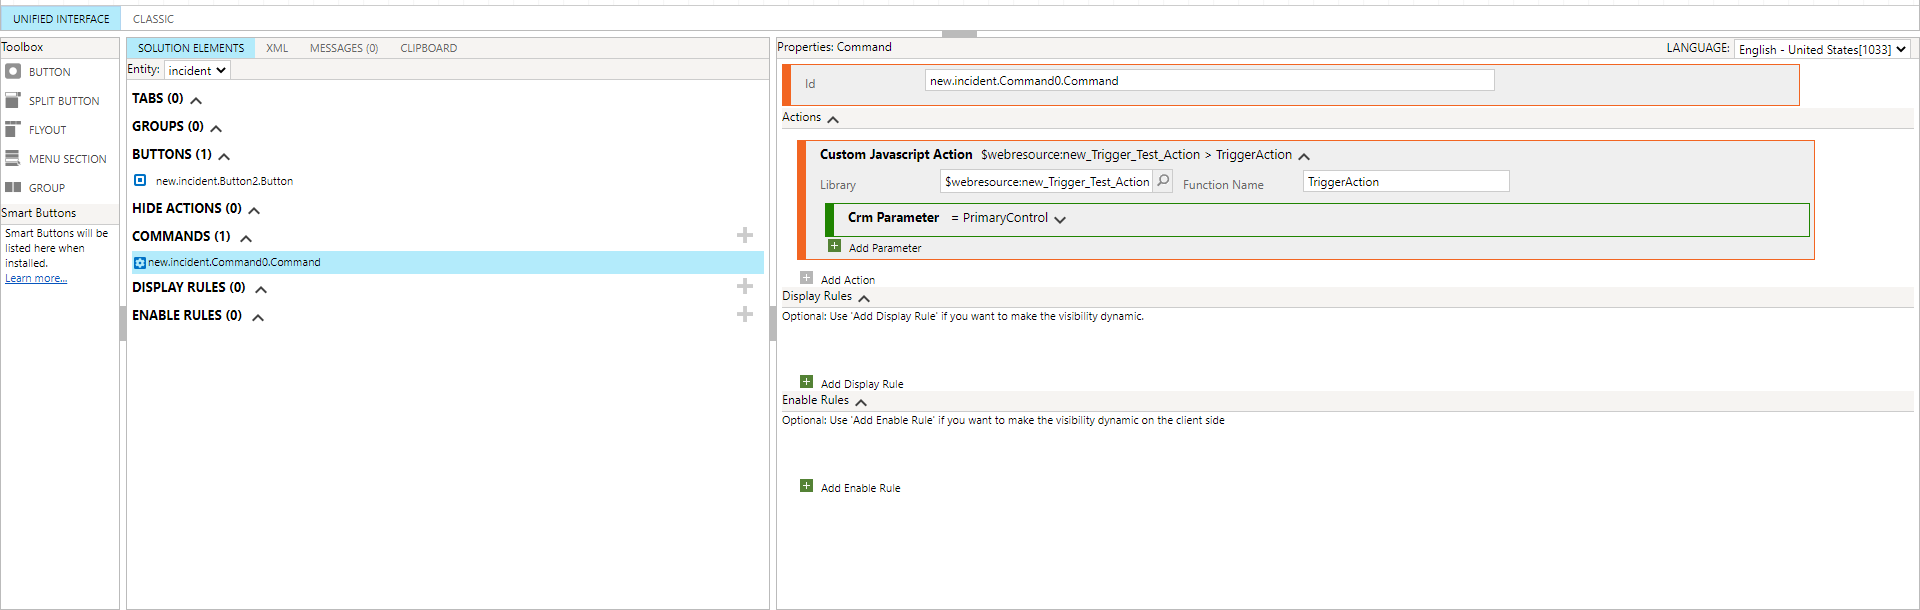
We also add the CRM Parameter "PrimaryControl".
This parameter allows to retrieve the execution context in the argument passed in the JavaScript function (as mentioned in the previous part).
Now, you can add the Command in the properties of your button:
Publish everything... And that's it! You can now click your button in the Form and this will call your Action!
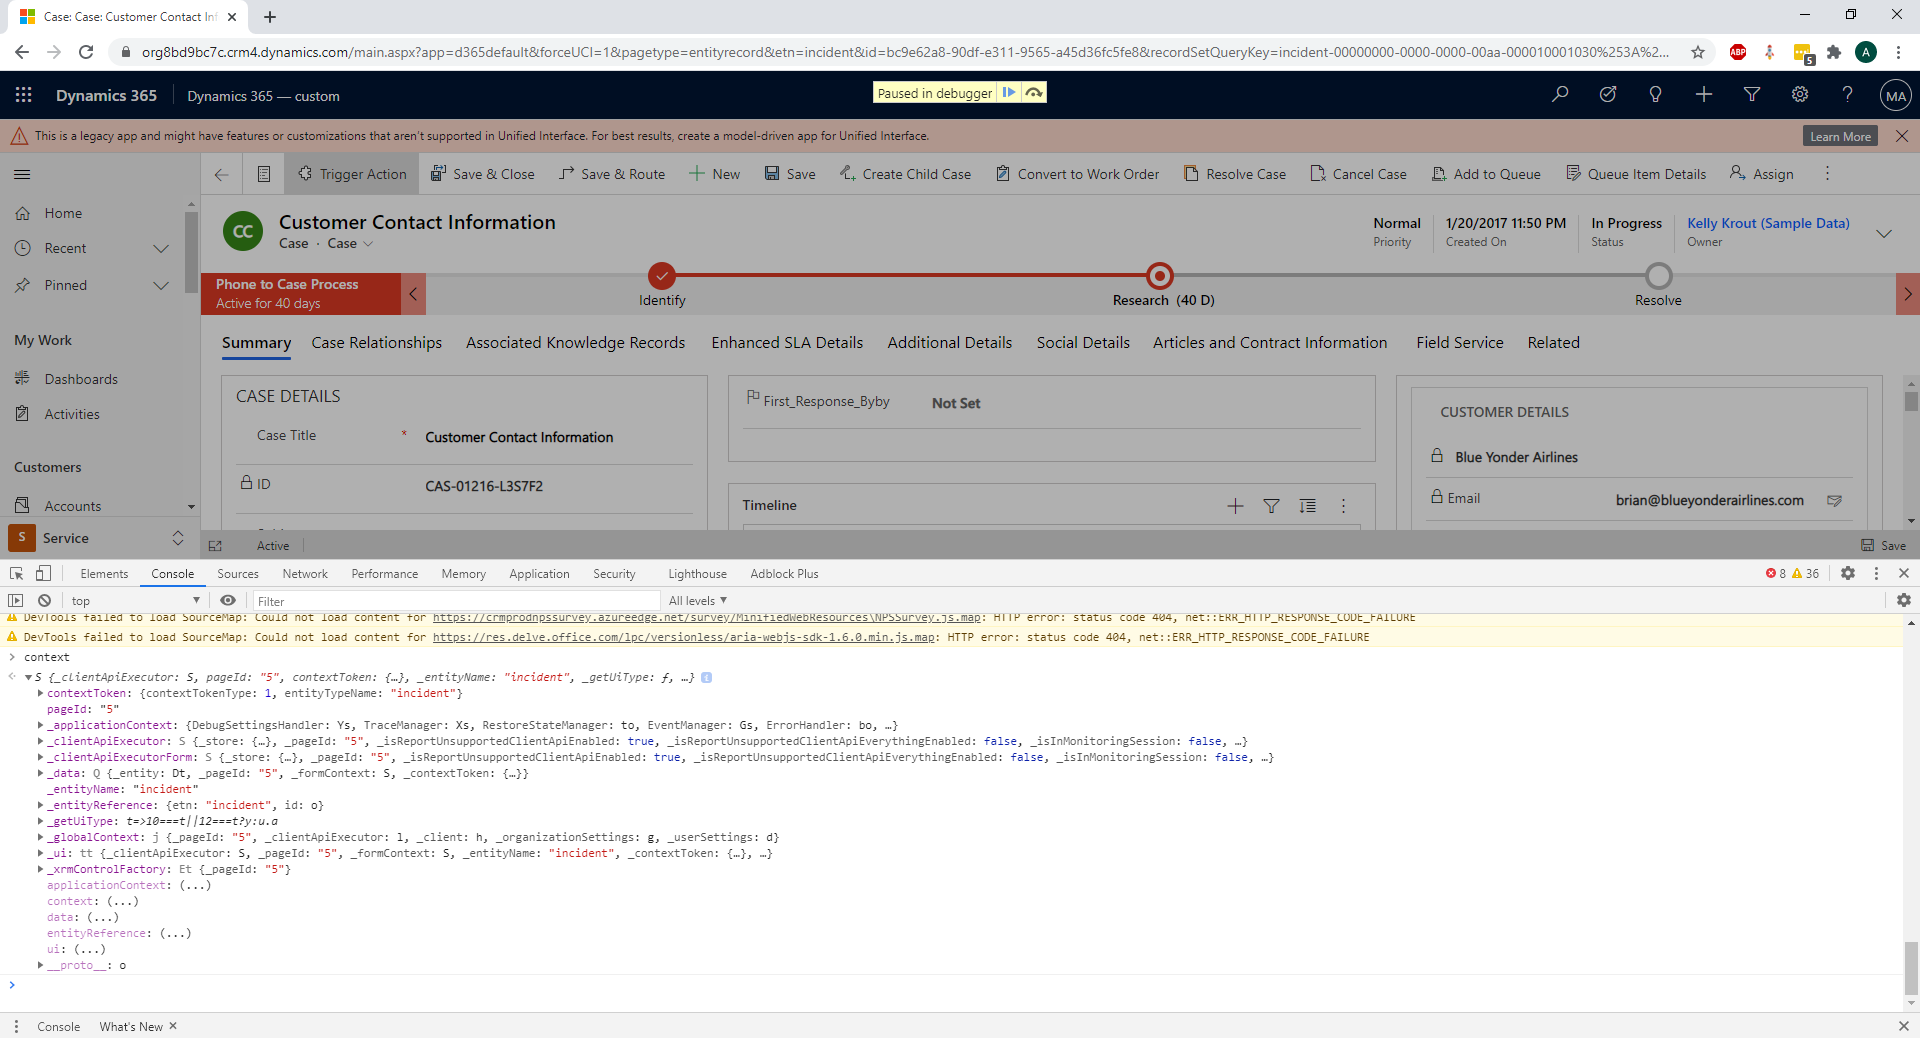
A last note about the execution context: you can check its value in the console of your client.
Add the "debugger;" command at the beginning of the TriggerAction() function of the JavaScript. Open the console and click on the custom button. Then in the console, check the value of the context argument:
Hope you enjoyed this quick tutorial !
Dynamics 365 call action in button