
Dynamics 365 onpremise v9.0 UCI Enable report features
The online version of Dynamics 365 is gaining more and more users, but what about on-premises?? Almost deprecated you will say? I don't think so ;) Microsoft announced recently a new version with some new feature from online version to onpremise version https://powerapps.microsoft.com/en-us/blog/next-on-premise-update-brings-the-latest-version-of-unified-interface/
However, on this new version I didn't find it will support Report feature on UCI. This article will help you to have some knowledge about the way Report on classic mode work and give you the solution to enable this important feature on CRM v9.x onpremise Unified Interface.
Here's how to resurrect the missing functionality to run Reports !
Prerequisites:
- Know how to add a custom button to ribbon
- Know supported function of CRM
- Know how to using html web resource in CRM
Disclaimer : This article will not cover the creation of the custom web resource. We will focus more on the tricky parts that you could encountered during your dev. The code is provided AS IS without any kind of guarantee ;) :p
1. Report type in CRM
First, let's see some basics about report type in Dynamics 365.
| Report type | Display location |
|---|---|
| FormForRelatedRecordType | Form |
| ListForRelatedRecordType | Entity list |
| Filterable | Section for current record |
| Not Filterable | Section for all record |
2. How to display list avaiable reports for an entity ?
Let's talk about two possible options to display list reports for an entity:
- Split button/Fly out button: You can use the RibbonWorkbench, see this article.
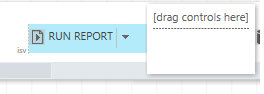
- By using a web resource:
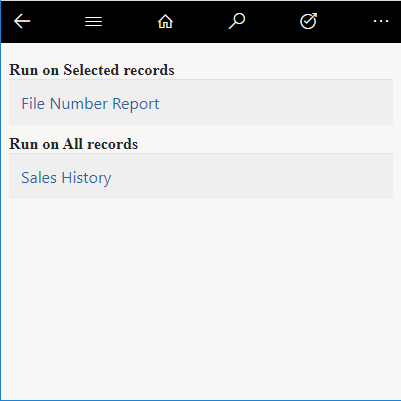
As I know, in CRM v9.0 Unified Interface, Split button/Fly out button are not stable to build (It have some issue with the display and command - I might tell you this issue in another article). Therefore, I suggest you use a web resource instead. We can build a generic web resource and show a list reports using parameters.
3. How to retrieve reports for an entity
First challenge is about to get the list of reports for a specific entity. This is a tricky topic, so I'll give you the generic fetchXML to retrieve this list.
<fetch version="1.0" output-format="xml-platform" mapping="logical" distinct="true" >
    <entity name="report" >
        <attribute name="name" />
        <attribute name="filename" />
        <attribute name="languagecode" />
        <attribute name="ispersonal" />
        <attribute name="iscustomizable" />
        <attribute name="ismanaged" />
        <attribute name="isscheduledreport" />
        <attribute name="reportid" />
        <filter type="and" >
            <condition attribute="componentstate" operator="eq" value="0" />
            <condition attribute="parentreportid" operator="null" />
            <filter type="or" >
                <condition attribute="languagecode" operator="eq" value="${lcid}" />
                <condition attribute="languagecode" operator="eq" value="-1" />
            </filter>
        </filter>
        <order attribute="name" descending="false" />
        <link-entity name="reportentity" from="reportid" to="reportid" link-type="inner" alias="reportentity" >
            <attribute name="objecttypecode" />
            <attribute name="isfilterable" />
            <filter type="and" >
                <condition attribute="objecttypecode" operator="eq" value="${entityTypeCode}" />
            </filter>
        </link-entity>
        <link-entity name="reportvisibility" from="reportid" to="reportid" alias="reportvisibility" >
            <attribute name="visibilitycode" />
            <filter type="and" >
                <condition attribute="visibilitycode" operator="eq" value="${reportDisplayInCode}" />
            </filter>
        </link-entity>
    </entity>
</fetch>
In the fetchXML above, we have some parameter. Here is the explanation :
| Parameter name | Meaning and Usage |
|---|---|
| lcid | User language id |
| entityTypeCode | Entity type code |
| reportDisplayInCode |
Report type:
|
4. Execute report for a single record
Then we have to find the way to run the report for a single selected record. To do thath we just need to build the right URL then open it. The format for URL is:
${clientUrl}/crmreports/viewer/viewer.aspx?action=run&context=records&helpID=${reportFileName}&id=${reportId}&records=${recordId}&recordstype=${entityTypeCode}
Parameter explaination:
| Parameter name | Meaning and Usage |
|---|---|
| clientUrl | Url contains Organization name (Ex: http://example.com/OrgName) |
| reportFileName | Report filename |
| reportId | Report Id |
| recordId | Record Id |
| entityTypeCode | Entity type code |
5. Execute report for multiple records
This challenge is not so easy, is about how to run the report but for a selection of records.
Microsoft don't provide the information on how to execute report on multiple records. After a day of investigations, I tried reading the JS source code of the CRM to figure out how to deal with this point. And I finally found how Microsoft managed to open the dialog offering to choose the record selection and how we can process the selected records (single or multiple records) ! This is the hidden part of this article. Note that this part is not realy supported since it's not part of the SDK.
Step 1: Show the dialog
You can open the standard report dialog by using this URL :
${clientUrl}/_grid/cmds/dlg_runreport.aspx?id={${reportId}}&numselected=${numberOfSelectedRecord}&enableview=1
- Parameter explaination :
| Parameter name | Meaning and Usage |
|---|---|
| clientUrl | Url contains Organization name (Ex: http://example.com/OrgName) |
| reportId | Report Id |
| numberOfSelectedRecord | Number of selected record |
Then, the standard dialog appears and provide three options that you may already know:
-
All applicable records
-
The selected records
-
All records on all pages in the current view
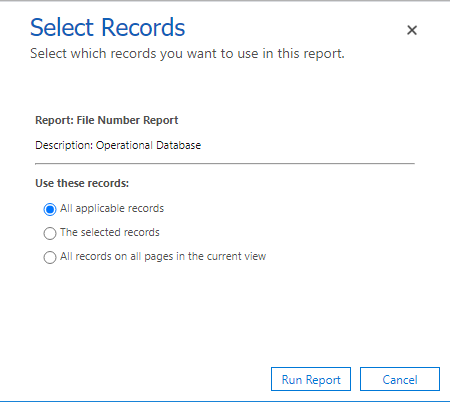
Step 2: Run the report
- For the first option "All applicable records", you can just open an url with the format below
${clientUrl}/crmreports/viewer/viewer.aspx?action=run&helpID=${reportName}&id={${reportId}}
The parameter for this Url is the same at some Url I write before.
- For the second and third you need to use a custom JS function that will encapsulate the complexity of this multiple selection. After a hard work I woulk like to share with you this JS code that should helps a lot on this task :
var reportConstants = {
    records: 'records',
    fetch: 'fetch',
    fetchxml: 'fetchxml'
};
var removeUnusedParam = (selectedItemIds, fetchXml, recordsInput, fetchXmlInput, form) => {
    if (fetchXml && recordsInput) {
        form.removeChild(recordsInput);
    }
    if (selectedItemIds && fetchXmlInput) {
        form.removeChild(fetchXmlInput);
    }
};
var openReportWithPostRequest = (retrievedReport, entityTypeCode, selectedItemIds, fetchXML) => {
    var form = window.document.getElementsByName(windowConstant.gridViewReport)[0];
    if (!form) {
        form = window.document.createElement('form');
        form.name = windowConstant.gridViewReport;
        form.method = 'post';
        form.style = 'display:none;';
        window.document.body.appendChild(form);
    }

    var context = selectedItemIds ? reportConstants.records : reportConstants.fetch;
    form.action = CommonJScriptLib.SupportMethods
        .prependOrgName(`/crmreports/viewer/viewer.aspx?action=run&id={${reportId}}&helpID=${reportFileName}&context=${context}&recordstype=${entityTypeCode}`);

    var recordsInput = form[reportConstants.records];
    var fetchXmlInput = form[reportConstants.fetchxml];
    var inputName = selectedItemIds ? reportConstants.records : reportConstants.fetchxml;
    removeUnusedParam(selectedItemIds, fetchXML, recordsInput, fetchXmlInput, form);
    var inputElem = null;
    if (fetchXmlInput && fetchXML) {
        inputElem = fetchXmlInput;
    } else if (recordsInput && selectedItemIds) {
        inputElem = recordsInput;
    }
    else {
        inputElem = document.createElement('input');
        form.appendChild(inputElem);
    }
    inputElem.name = inputName;
    inputElem.value = selectedItemIds ? selectedItemIds.join(';') : fetchXML;

    var width = window.screen.availWidth * 0.75;
    var height = window.screen.availHeight * 0.9;
    var top = (window.screen.height - height) / 2;
    var left = (window.screen.width - width) / 2;
    var today = new Date();
    var popup = window.open("/_static/loading.htm", today.getTime().toString(), `width=${width},height=${height},status=1,resizable=1,left=${left},top=${top}`, true);
    popup.focus();

    form.target = popup.name;
    form.submit();
}
6. Some advice and Limitations
As you can see this article tries to provide you all the needed technical information to build your own solution around Report menu for D365 onpremise v9.0. This is comming from a real scenario where we had to find a solution to manage this point. Maybe Microsoft will patch this "bug" in a next rollup, maybe not, in any case, you have my design now :)
I would like to remind that these technical solutions introduced here are unsupported ! Therefore, you need to be careful when using it. You also need to maintain it when CRM upgrade (Onpremise quite stable). But because the lifecycle of OnPremise version is now very slowdown, you should enjoy this code for some time!
You need to make this as generic as possible in order to been able to use it for any entity.
I hope this article will help you to build report feature on Unified Interface for CRM v9.x onpremise!
You can leave a comment or contact us if you have any question!
Dynamics 365 onpremise v9.0 UCI Enable report features