
Filtering Dynamics 365 Finance and Operations Dataverse Virtual Entities in Customer Portal
PowerApps portal helps you exposing CRM data to your customer through a web application. It works pretty well when the data are persisted in CRM, then we can use all the power of the dataverse platform to propose forms, views and processes to the end customer.
The CRM Portal Management application proposes a full set of tools to manage the customer access: Table permission, Web Roles, Content access level, Web Page Access etc... but there are some limitations to it.
Note: In the scenario the customer is logged in the Portal as a CRM contact.
What is this article for?
In this article, I will present a technical approach that we used in a project to circumvent a limitation of the use of Virtual Entities in a PowerApps Portal + CE + FnO setup. Indeed, standard security and integration tools provided by Microsoft does not allow to filter FnO data with the contact context from the Portal.
Integration scope
In this scenario, CRM is interfaced with the Customer Portal and with Dynamics 365 for Finance and Operations (twice).
For the Accounts, Contacts and all related data (address, electronic address...) the interface with F&O is made with Dual-Write. This scenario involves the usage of the Party entity and adds a new entity name Contact for Party (or Contact for Customer or Vendor) which mimics the possibility to add a contact to several accounts and vice-versa. These entities are standard and included in the Microsoft Dual-Write solutions.
Global Address Book integration documentation:
For the Sales tables of F&O we will use Virtual Entities with the Microsoft standard connector. The link between CRM account and Sales Virtual Entity is made through a custom development.
Virtual Entities documentations:
- Finance and Operations Virtual Entities : Configure Dataverse virtual entities - Finance & Operations | Dynamics 365 | Microsoft Learn
- Link dataverse Account to Sales Data of F&O : Entity modeling - Finance & Operations | Dynamics 365 | Microsoft Learn
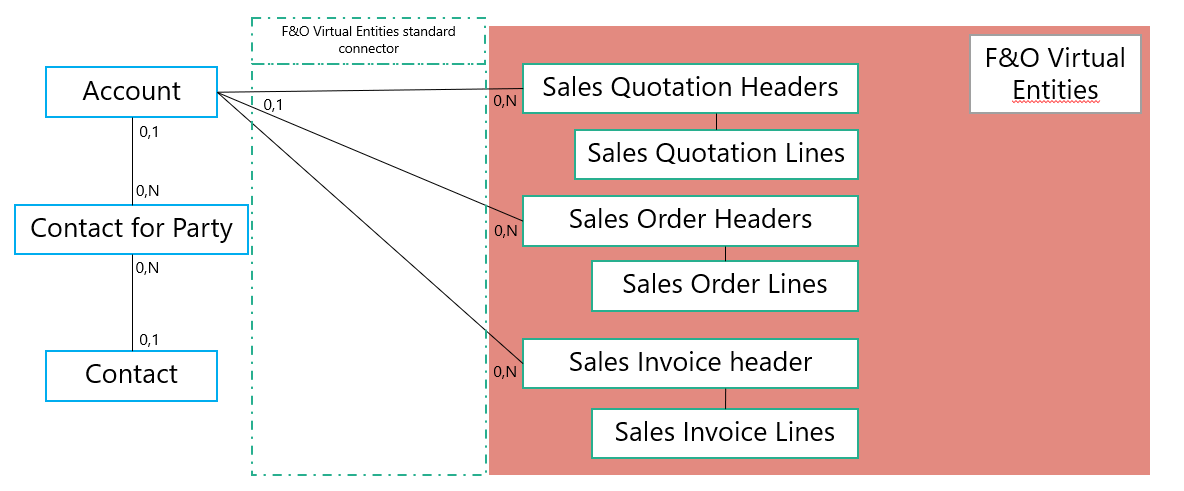
Customer Portal integration with Finance & Operations
There is a scenario that helps the external users accessing the data in F&O via a anonymous access to it.
To create the access, add a new user in FO and give it the "Dataverse Virtual entity anonymous user" role and the appropriate roles to access the desired data. For this example we call it "VirtualEntitiesCRM".
Then go to System Administration -> System parameters -> Power Apps Portals. Fill the "Anonymous access user id" with the user you have just created:

Documentation for access to F&O from the Portal: Power Apps portals with finance and operations - Finance & Operations | Dynamics 365 | Microsoft Learn
At this time, if we add the virtual entity to the portal, it works. So, what is the problem?
Apply the security to filter data
The access to F&O data is made through a anonymous access, which means the ERP is returning ALL the data with no filtering to any customer.
Data access to the portal is managed with Table Permissions which mimics the CRM security roles from a portal user (CRM Contact) perspective.
In our scenario, we need to display the sales record for all the accounts "attached" to the logged in contact. So, it would be something like this:
Let's test the result in our portal:
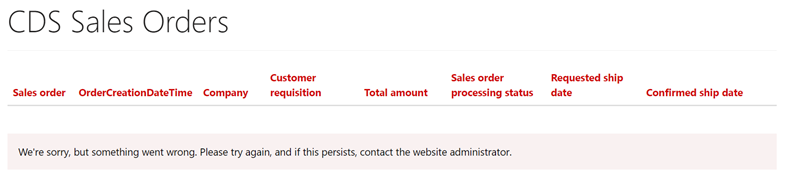
This exact same configuration works with standard CRM entities, but not with virtual ones. So, let's check Virtual entities limitations, in the documentation you can find this sentence:
"•Although you can add virtual table columns as a lookup on a grid or other UI views, you cannot filter or sort based on this virtual table lookup column."
Source : Get started with virtual tables (entities) (Microsoft Dataverse) - Power Apps | Microsoft Learn
How to resolve this?
Main concerns:
- Prevent sensitive data to leak on the web
- Display the appropriate records on the portal
- Keep acceptable responsiveness
Prevent sensitive data to leak on the portal
If we create a view with no filter on the portal, we will get all the data from F&O, so we need to remove any data to be returned to the portal.
This is the best way to do it: Create a view that returns nothing!
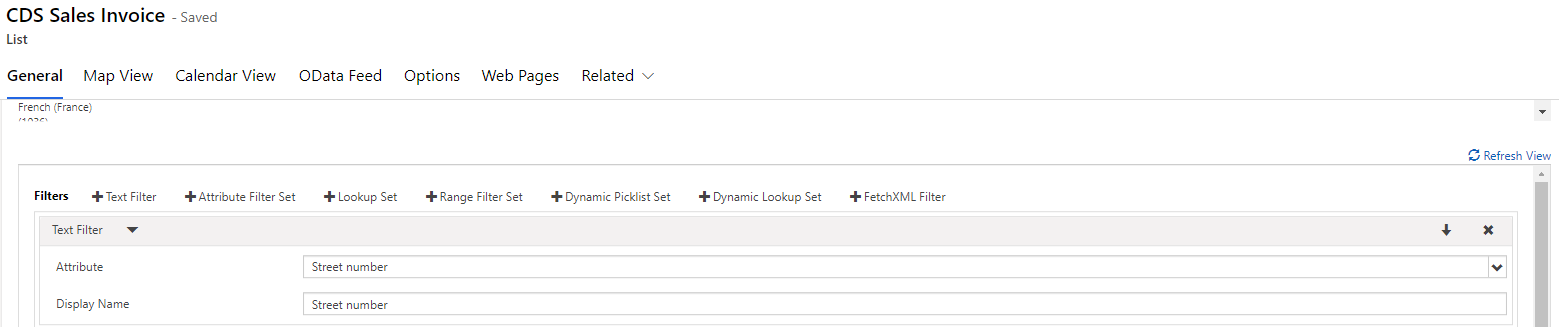
The purpose here is to build a view in which we add a dummy filter criteria. This way, we ensure it does not return anything to a logged in user in the portal. In this example we apply the filter on a field which is never used.
Add this view on the portal page and you are good to go.
Note : This filter criteria will also be used it the last part of this solution.
Display the appropriate records on the portal
Now that we have a view with no data, we need to fill it with a backend process.
The main problem with backend processes is that they run in a user context, not a contact. So, we need to get the logged user context to pass it to our future backend process as it seems not possible to get it natively on the server side.
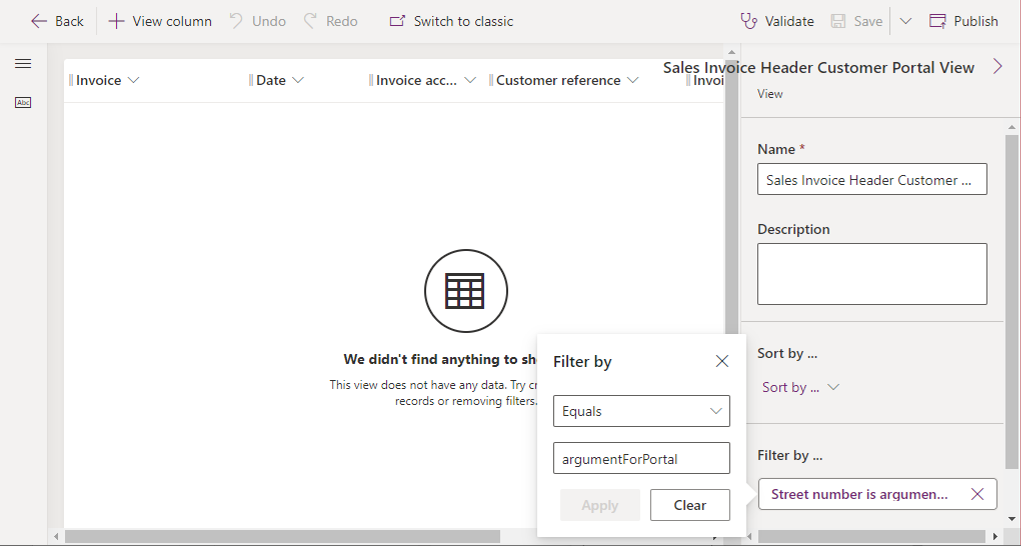
Otherwise, it is possible to get this user ID from the portal and we can send it to the back end with portal filters. So, we will use the field from the previous step to send it via filter and hide it to the portal user:
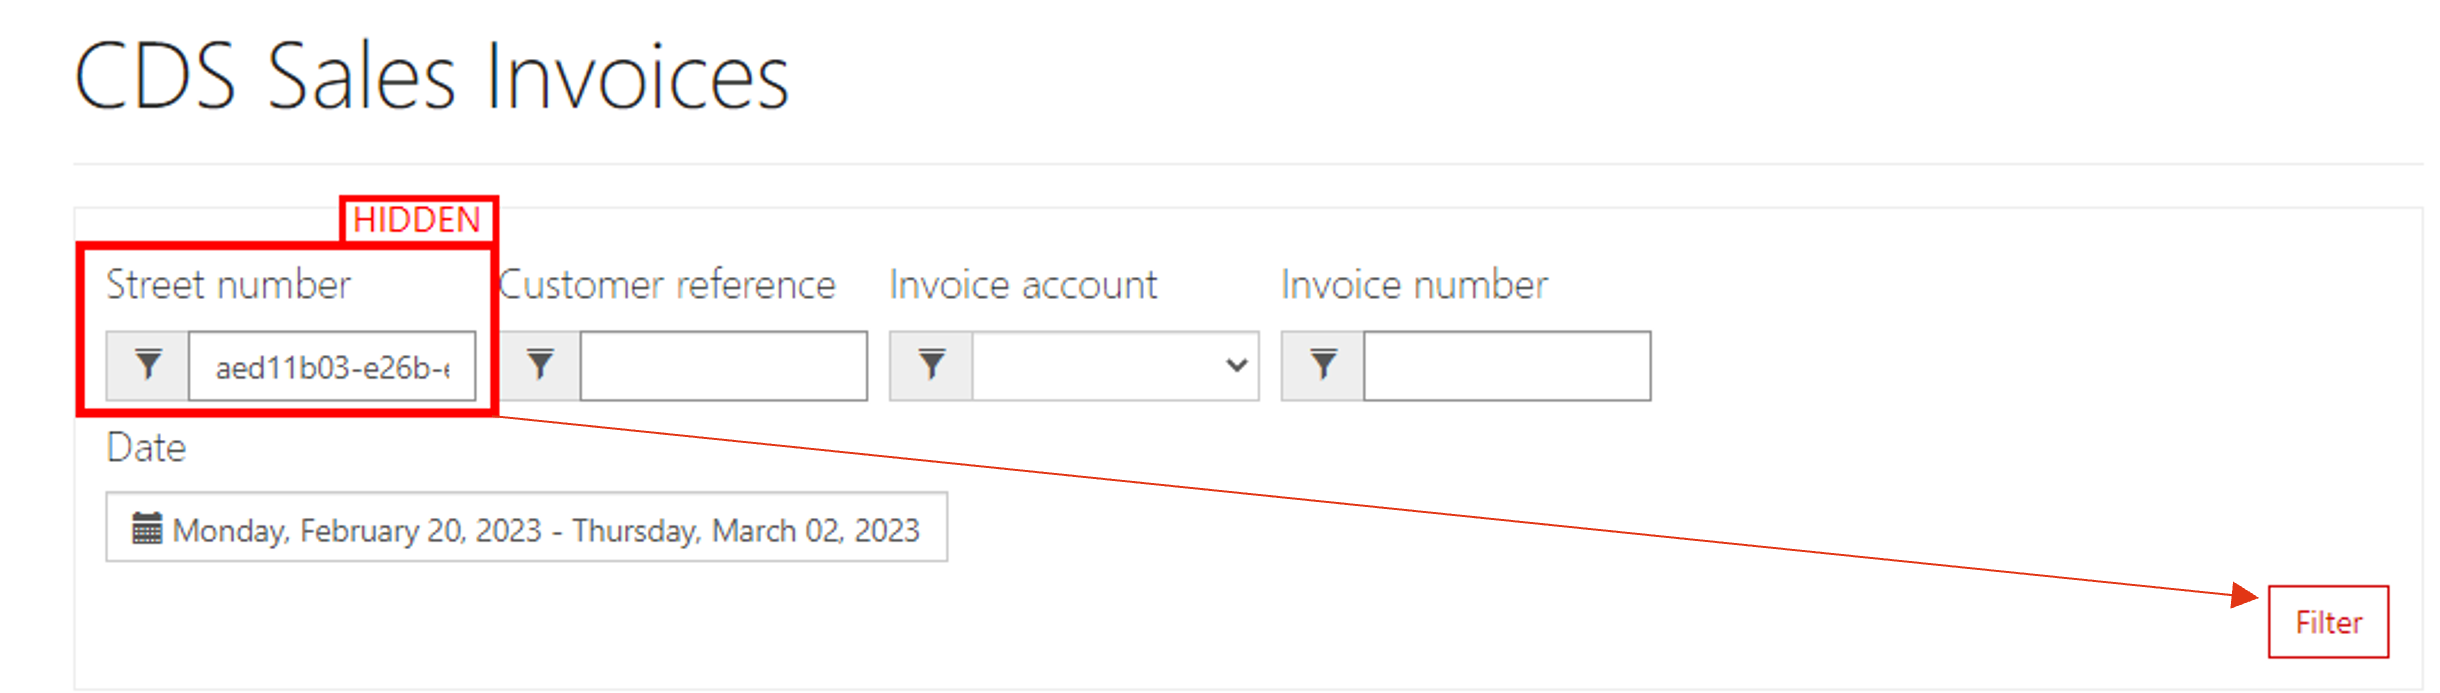
First, add an attribute filter on the Portal list (the one displaying your dummy view on the portal page ):
We will now use the liquid objects from PowerApps portal to get the user ID and set it in our "Street Number" field. To achieve this, in this same list, go to options and add the following code:
//get user id
var username = '{{user.contactid}}';
$("#textfilter_0").val(username);
As we don't want to expose the Contact GUID to the customer, we complete the code to hide the field:
//Hide filter field
$("#textfilter_0").closest("li").show();
$("#textfilter_0").closest("li").parent().parent().hide();
In order to make it transparent for the user, we need to filter the view by this criteria automatically. So, we perform a click by script on load of the page:
$(".btn.btn-default.btn-entitylist-filter-submit").trigger("click");
The full code to achieve this is the following one. A timeout has to be set because the click is sometimes fired to quickly on certain browsers:
$(window).load(function() {
    //fire filter
    setTimeout(function() {

		$(".btn.btn-default.btn-entitylist-filter-submit").trigger("click");

	 }, 1);
});
$(document).ready(function() {
        //Hide filter field
        $("#textfilter_0").closest("li").show();
        $("#textfilter_0").closest("li").parent().parent().hide();

        //get user id
        var username = '{{user.contactid}}';
        $("#textfilter_0").val(username);
}
Filtering with backend process
Now we have a view returning no data and a way to pass the contact GUID value to the backend, let's start to build the backend process to achieve this sequence:
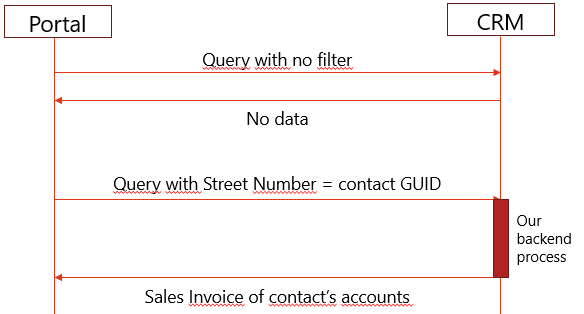
We will use a synchronous pre-operation plugin triggered on the RetrieveMultiple message to recreate the query when the filter is applied on the customer portal.
In our plugin, we will receive a FetchExpression from the portal, it is easier to convert it into QueryExpression to build the new query:
FetchExpression salesQuery = (FetchExpression)context.InputParameters["Query"];

var fetchConversionRequest = new FetchXmlToQueryExpressionRequest()
{
    FetchXml = salesQuery.Query
};
var fetchConversionResponse = (FetchXmlToQueryExpressionResponse)service.Execute(fetchConversionRequest);
var initialQuery = fetchConversionResponse.Query;
First step is to identify that the call to backend is made from the portal, this will allow CRM users to continue working normally with Virtual Entities on their user context. So, we define these variables:
/* Definitions
deterArgument is the dummy filter we have set in the previous steps
orderColumn is used for default sorting of the query
mappingKey is the link from account to the virtual entity
magicTrigger is the bool that will say if we need to recompute the query for portal */
string deterArgument = "", mappingKey = "", orderColumn = "";
orderColumn = "mserp_invoicedate";
deterArgument = "mserp_invoiceaddressstreetnumber";
mappingKey = "mserp_fk_synthinvoicingaccount_id";
bool magicTrigger = false;
Then, we need to know if we are in the context of a portal query or not. If yes we set the magic trigger to yes, else we leave it to false:
///Checking value of filter to determine if we need to overload the RetrieveMultiple request for the portal
if (initialQuery.Criteria.Filters.Count > 0)
{
    List<ConditionExpression> initialConditionList = new List<ConditionExpression>();
    Guid contactGuid = new Guid();
    foreach (FilterExpression fe in initialQuery.Criteria.Filters)
    {
        foreach (ConditionExpression ce in fe.Conditions)
        {
            if (ce.AttributeName == deterArgument) //Checking if the determined field for the filter is set
            {
                var isGuid = Guid.TryParse(ce.Values.FirstOrDefault().ToString().Replace("%", ""), out contactGuid);
                if (isGuid) //Logic is triggered only if we pass a Guid
                {
                    magicTrigger = true;
                    break;
                }
            }
        }
    }
/* Code to continue here */
}
Now, we know that we can start building our query. We need to reproduce the schema we tried with Tables permissions, that's to say : contact -> contact for party -> accounts -> Sales Invoices.
We also reuse the first query to keep the column set from Dataverse, this prevents to modify the code if we need to changes the columns of the view. We do the same for filters from the portal, if they are note related to the dummy filter we have set, we add it to the query:
if (relatedAccountsList.Count > 0)
{
    //Starting the query on the concerned entity
    //Reuse of initial column set to keep any standard modifications in powerapps
    QueryExpression qe = new QueryExpression(entityName)
    {
        ColumnSet = initialQuery.ColumnSet
    };

    //Building account filter for portal
    //"In" operator does not seem to work with virtual entities, so we add several Equals with a OR logical operator
    FilterExpression fe = new FilterExpression(LogicalOperator.Or);
    foreach (Entity acc in relatedAccountsList)
    {
        if (acc["msdyn_associatedaccountid"] != null)
        {
            fe.AddCondition(mappingKey, ConditionOperator.Equal, acc.GetAttributeValue<EntityReference>("msdyn_associatedaccountid").Id);
        }
    }
    qe.Criteria.AddFilter(fe);

    //we also add the other filters that the user could have added in the portal
    foreach (FilterExpression initialFe in initialQuery.Criteria.Filters)
    {
        foreach (ConditionExpression ce in initialFe.Conditions)
        {
            if (ce.AttributeName != deterArgument) //Checking if the determined field for the filter is set
            {
                qe.Criteria.AddCondition(ce);
            }
        }
    }
/* Code to continue here */
}
Important : As written in the comment, "In" operator does not work with virtual entities. If you use it, you will get an error.
Main part of the job is made, but we still need to set an order to the query to give the user consistent results. If there is a defined order in the Dataverse view, we use it. Else, we use the column defined in the orderColumn variable:
    if (initialQuery.Orders.Count == 0)
    {
        OrderExpression order = new OrderExpression
        {
            AttributeName = orderColumn,
            OrderType = OrderType.Descending
        };
        qe.Orders.Add(order);
    }
    else
    {
        foreach (OrderExpression oe in initialQuery.Orders)
        {
            qe.Orders.Add(oe);
        }
    }
The paging is no more managed by the portal with this plugin. So, we need to define it in the code.
Please note that you need to return a FetchXmlRequest or it will not work on the portal.
   //Define paging
   PagingInfo paging = new PagingInfo
   {
       Count = pagingCount,
       PageNumber = initialQuery.PageInfo.PageNumber,
       ReturnTotalRecordCount = true,
       PagingCookie = null
   };

   qe.PageInfo = paging;

   //Portal only works with FetchExpression, so we need to convert the QueryExpression before assigning it to the Input Parameter
   var conversionRequest = new QueryExpressionToFetchXmlRequest
   {
       Query = qe
   };
   var conversionResponse = (QueryExpressionToFetchXmlResponse)service.Execute(conversionRequest);
   var newFetch = new FetchExpression(conversionResponse.FetchXml);

   context.InputParameters["Query"] = newFetch;
And here we are, the query is rebuilt from scratch with all the parameters we need !
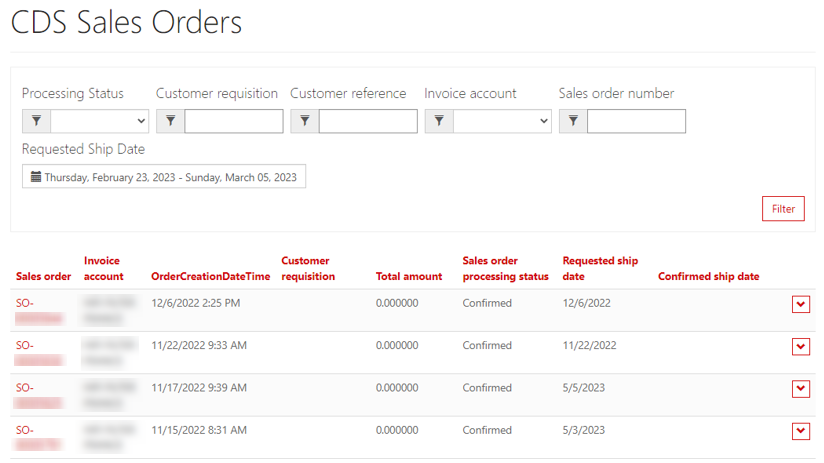
Result
Filtering Dynamics 365 Finance and Operations Dataverse Virtual Entities in Customer Portal
Comments
standout features of Dynamics 365
Wow, Dynamics 365 is truly a game-changer!
One of the standout features of Dynamics 365 is its seamless integration of various business functions. From sales and marketing to customer service and operations, this platform brings everything together in one cohesive system.
Thank you for sharing this informative blog post on Dynamics 365!