Plan
This Chronicle presents the Canvas Apps, one of the three Apps existing in the PowerApps suite developed by Microsoft.
- The First Part introduces PowerApps.
- The Second Part specifically introduces the Canvas Apps
- The Third Part presents the main components encountered when developing a Canvas App.
- The Fourth Part focuses on the Licenses to use Canvas Apps
- The Fifth Part explains how to share a Canvas App to make it available to other users
- The Sixth Part shows different ways to use Canvas Apps
- The Seventh Part reports a concrete case of a project using Canvas Apps
Note: Canvas Apps are a very large subject. The Microsoft Documentation on Canvas Apps is already exhaustive. This Chronicle intends to be a quicker way to understand Canvas Apps. And to gather the experience acquired during projects.
Power Apps Overview
Presentation
Power Apps is a suite of apps, services, connectors and data platform that provides a rapid application development environment to build custom apps for business needs.
There exists three types of Apps in PowerApps: Canvas Apps, Model-driven Apps, and Portals:
- Canvas apps start with user experience, crafting a highly tailored interface with the power of a blank canvas and connecting it to a choice of 200 data sources. You can build canvas apps for web, mobile, and tablet applications.
- Model-driven apps start with your data model – building up from the shape of your core business data and processes in the Common Data Service to model forms, views, and other components. Model-driven apps automatically generate great UI that is responsive across devices. The User Interface of Dynamic 365 uses Model-Driven Apps.
- Portals start to create external-facing websites that allow users outside your organization to sign in with a wide variety of identities, create and view data in Common Data Service, or even browse content anonymously.
Managing Power Apps
The development of Apps is done at this URL: make.powerapps.com
It has two main components:
- Power Apps Studio is the app designer used for building canvas apps
- App designer for model-driven apps lets you define the sitemap and add components to build a model-driven app
Power Apps admin center: admin.powerapps.com
Used to create and manage environments, users, roles, and data-loss prevention policies.
Power Platform admin center: admin.powerplatform.microsoft.com
Used to manage environments, get real-time, self-help recommendations and support for Power Apps and Power Automate, and view Common Data Service analytics.
Canvas App Presentation
Canvas Apps are Business apps created with a low-code tool. They are described by Microsoft in the following way: “Design and build a business app from a canvas in Microsoft Power Apps without writing code in a traditional programming language such as C#. Design the app by dragging and dropping elements onto a canvas, just as you would design a slide in PowerPoint. Create Excel-like expressions for specifying logic and working with data. Build apps that integrate business data from a wide variety of Microsoft and third-party sources. Share your app so that users can run it in a browser or on a mobile device (Smartphones and Tablets), and embed your app so that users can run it in SharePoint, Power BI, or Teams."
More information on the possible ways to use Canvas Apps are given in Section "Overview: where Canvas Apps can be used".
Canvas App Development
This Part presents the main components encountered when developing a Canvas App. It will give you quick marks if you ever land on this tool.
Editor Interface
As said before, Canvas Apps are created following this link: make.powerapps.com.
To create a new Canvas App: on the Menu on the left: Go to Apps. Click New app -> Canvas. A form opens. It allows to choose to create a Canvas App from a blank canvas or from a Template. One can also choose either a Phone or a Tablet layout. One main difference between the two layouts is that it is possible to set a custom height and width for the App for the Tablet layout but not for the Phone Layout.
After the App is created, the following window opens:
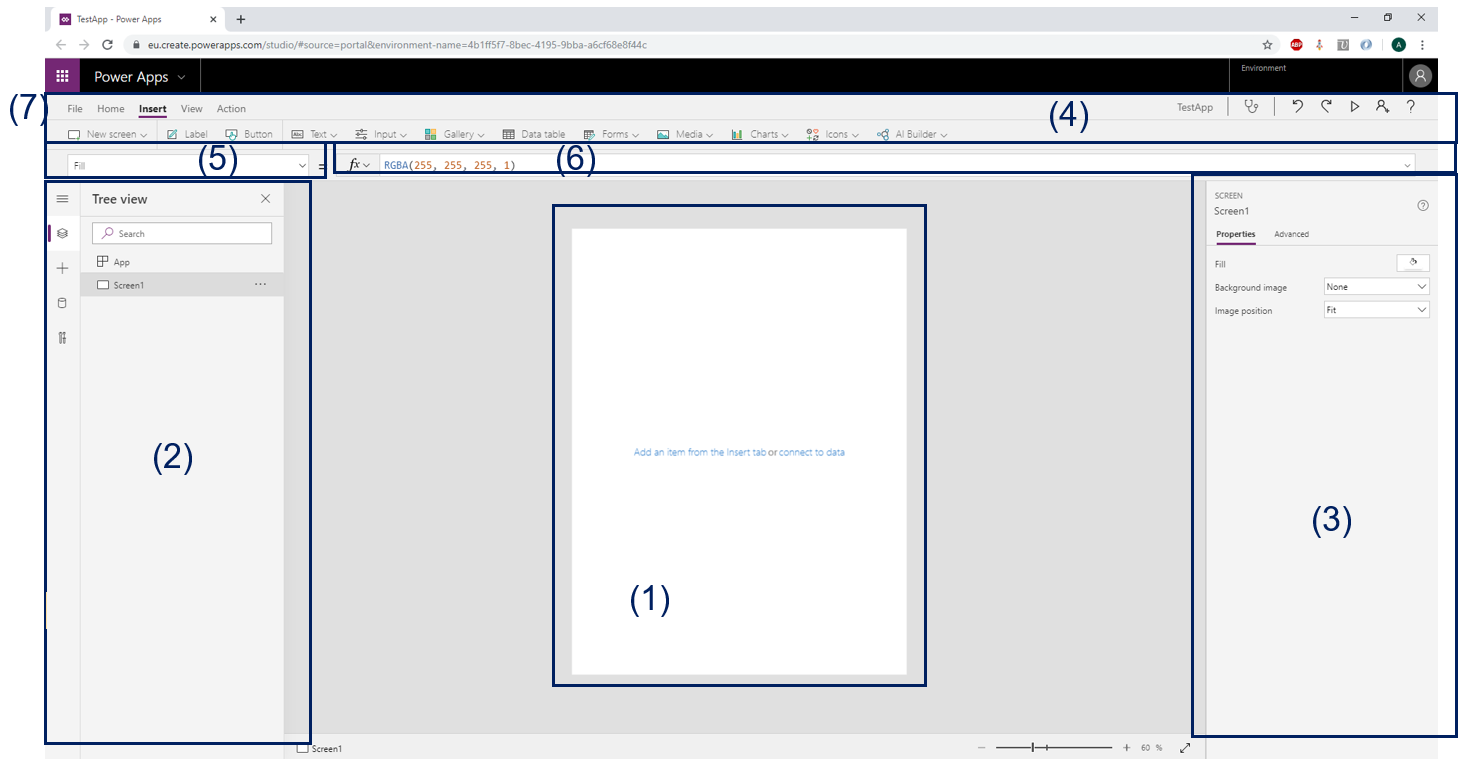
The centre of the window (1) contains the layout of the Canvas App.
The Menu on the left (2) can display a Tree of the elements in the App as well as the different Data Sources that are available.
The Menu on the right (3) allows to configure the properties of the element that is selected on the Canvas App
The Menu on the top (4) allows to insert elements in the Canvas App, and also change some of their properties
This list (5) allows to choose a property or an action of an element that is selected in the App
This bar (6) contains a formula associated to the property or the action that is selected in (5)
This “File” Tab (7) provides several functionalities:
- Manage Connections to Data Sources
- Manage Flows
- Settings: Name & Icon of the App, Screen Size & Orientation, and all Advanced Settings
- View of first records in the Collections
- View of variables and their values
- Media: used to import pictures, videos and audios into the App
More information will be given on these things later in the Chronicle.
Canvas Apps Language - Presentation
To define the logic of the application, the creator of a Canvas App has to write formulas using a programming language. The formulas used can make think of the ones in Microsoft Office Excel. The formulas are written for properties of the elements on the App, or for triggers linked to actions performed on these elements. When a modification occurs in the App, the properties containing formulas are directly updated, just like in Excel.
To give an overview of the language, below is a part of a formula used in the Canvas App (client name blurred):
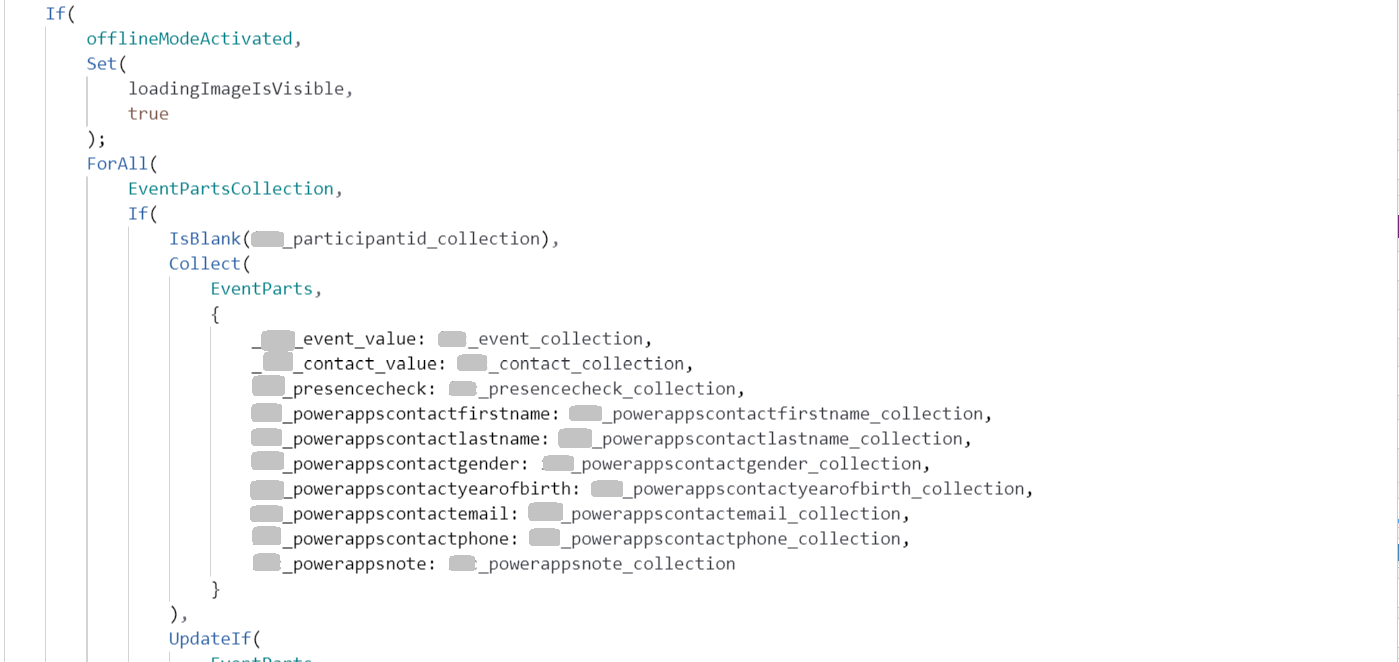
Like most programming languages, it contains Conditions (If) and Loops (ForAll). Some of the most useful functions will be mentioned in this Chronicle.
Functions are separated with semi-colons. Inside a function, the arguments are separated by commas.
By default, the expressions in the formulas are sequentially executed. It is possible to execute some expressions in parallel by using the Concurrent function. The use of parallelism can save a significant amount of time for instance when using it for a Data transfer.
The language doesn’t provide Functions nor Classes. As will be seen later in the Chronicle, I personally found that the code lacks a lot of structure because of this and it adds a lot of complexity to the App.
The whole reference for the programming language in Canvas Apps can be found here: https://docs.microsoft.com/en-us/powerapps/maker/canvas-apps/formula-reference
Triggers
There are a few triggers in Canvas App that can launch the execution of a formula. Here are the main ones:
- OnSelect: Available on buttons and many controls. Runs the formula when the element is selected
- OnChange: Available on Lists. Runs the formula when the user changes the option selected in the List
- OnStart: Triggers the formula when the Canvas App starts
- OnTimerEnd: Available for Timers. Executes the formula when the Timer ends
- OnTimerStart: Same but when the Timer starts
Navigation
Screens
The Canvas App can have several screens. New screens can be added in the App, in the tab Home -> New Screen. The navigation between the screens is made using the function Navigate. It can for instance be used on the OnSelect property of a button. Then, when the button is selected, the App will navigate to the specified screen.
Add a Gallery
Galleries are the equivalent of Views in a Model-Driven App. There are used to list the records of an entity. The creator can choose the fields he wants to display. Unlike a Model-Driven App, the creator can here customize all the design.
To add a Gallery to the App, go to Insert -> Gallery.
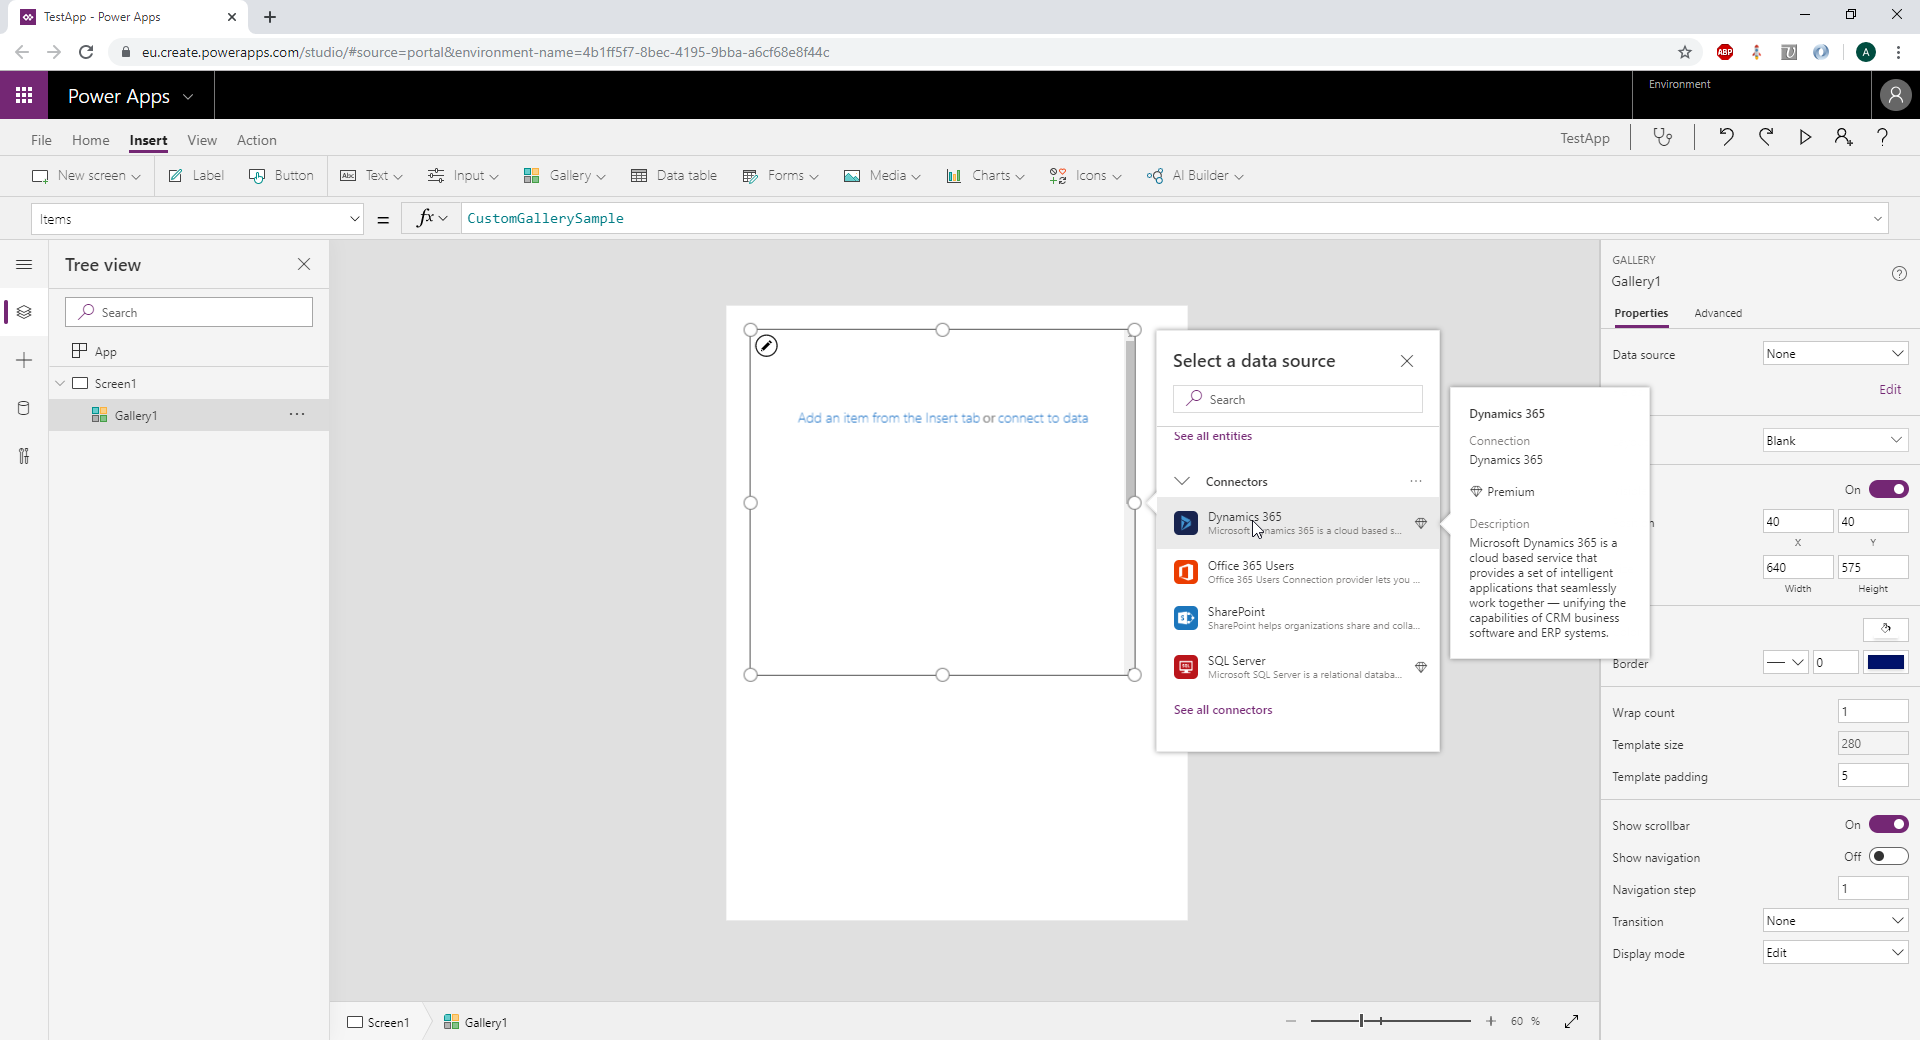
Then, on the element that appears on the screen, click add a Connector and choose a Data Source. For instance, Dynamics 365. Then, choose the Environment to work in, and select an Entity.
The Gallery has one section per record of the Entity. In the Editor, the modifications are done in the first section of the list. All other sections follow the same structure as the first one. Add a Label in it. Select the label object. In the Formula bar, select the property “Text”, and set the Formula to ThisItem.fullname. It now displays a list of the names of the contacts:
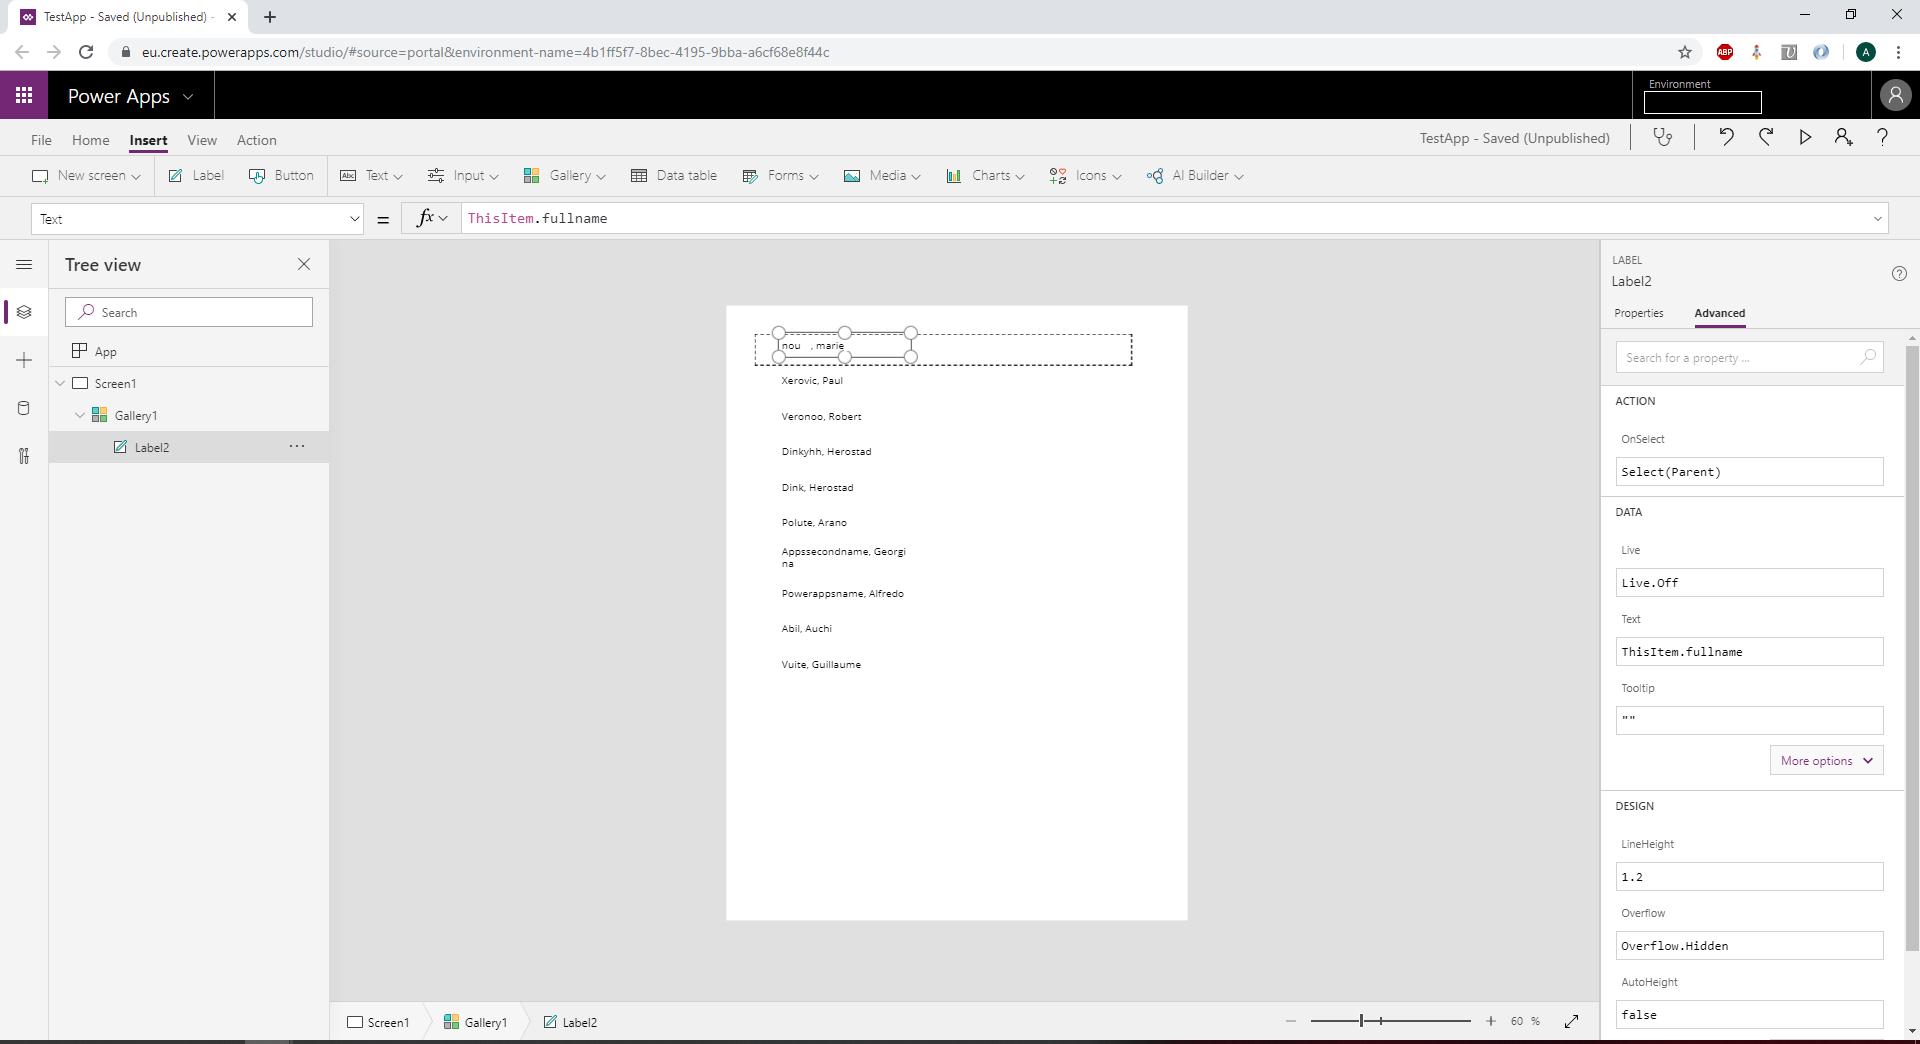
Other fields can be added in the sections, as well as icons or images. Below is a little improvement where the mail address, separating lines and an icon were added:

Add a Form
The Forms in a Model-Driven App are called the same in Canvas App. They allow to display data of a particular record and to update this Data. They can also be used to create a new record.
The main functions used for Forms are:
- EditForm: Edit the data of a record
- NewForm: Create a new record
- SubmitForm: Submit the form
- ResetForm: Reset the form to his previous state
Controls
This Parts presents some of the main controls available in the Canvas Apps.
Buttons
Buttons are quite simple elements. They have an OnSelect trigger that allows to runs a formula when they are selected.
Inputs
The Application can take as inputs:
- Text Boxes
- Lists
- Checkboxes
- Date pickers
- Audio from microphones
- Video from Camera
- Pen input: the user can write on the screen. The writing is kept as an image
Outputs
The Application can show:
- Images
- Icons
- Charts
- Power BI tiles
- Videos
- Audios
Designing the User Interface
Overview
Designing the User Interface in PowerApps is extremely simple. It is very similar to the edition of slides if Microsoft PowerPoint. Elements can be designed with Drag&Drop and selections of properties in menus. To make a more precise design it is also possible to fill the properties of an element with a number: for instance the number of Pixels for the height of an element; the hexadecimal code of a color for the background of an element, etc
Example of properties:
- Height, Width, Size, x-Position, y-Position, Padding
- Visibility, DisplayMode
- Border thickness
- Color
- etc
A property field can be filled with a formula. This allows to change the design of the elements on the App depending on the current context of the App. For instance, the creator of the App can write a formula to hide a button if its action has no meaning in the current context.
Responsiveness
It is possible to have responsive layouts in Canvas Apps, so that the app adapts to the actual space in which it is running. It can be activated in the Advanced Settings by turning off the app's "Scale to fit" setting.
The responsive design can also be customized by writing Formulas based on the height and width of the device. The documentation of Microsoft can be found here : https://docs.microsoft.com/en-us/powerapps/maker/canvas-apps/create-responsive-layout
Data Manipulation
In a Canvas App, the formulas can directly refer to the Table of a Data source. Very often, the creator of the Canvas App will want to create new Tables and manipulates theses Tables. In Canvas Apps, these are called “Collections”:
Collections are a special kind of data source. They're local to the app and not backed by a connection to a service in the cloud, so the information can’t be shared across devices for the same user or between users.
The main functions to manage Collections are:
- Clear: Clear a Collection
- Collect: Add Data to a Collection or a Data Source
- ClearCollect: Clear a Collection and then add Data to it
- Update/UpdateIf/Patch: Use to Update a Collections or a Data Source
- LookUp: Select a record in a Collection or a Data Source
- Search/Filter: Select a set of records in a Collection or a Data Source
Variables
It is possible to create variables in Canvas Apps. Variables can be global or contextual. Global variables can be used anywhere in the Canvas App. Context variables can be used only on a precise screen.
The functions to set variables are:
Set: Set a value to a Global variable
UpdateContext: Set a value to a Context variable
Define Custom Functions
Writing custom Functions is not possible in Canvas Apps, which is really a significant drawback. However there is a way to imitate the behaviour of a function:
Create a Button. Write a code on its OnSelect trigger. From somewhere else, use the Select function on this Button. It will call the code written in the OnSelect trigger of the Button.
However, as said in the documentation: “Select queues the target OnSelect for later processing, which may happen after the current formula has finished being evaluated. Select doesn't cause the target OnSelect to evaluate immediately, nor does Select wait for OnSelect to finish being evaluated.” Basically, this means that the sequential order in the Formulas is not maintained with the Select function, which is not convenient in many use cases.
Signals
The signals in the Canvas Apps return information about the environment of the device. Signals are values that can change at any time, independent of how the user may be interacting with the app. Formulas that are based on signals automatically recalculate as these values change.
The available signals in Canvas Apps are:
- The Acceleration signal returns the device's acceleration in three dimensions relative to the device's screen.
- The App object includes a signal that indicates which screen is showing.
- The Compass signal returns the compass heading of the top of the screen. The heading is based on magnetic north.
- The Connection signal returns the information about the network connection. For instance, whether a Network is available or not.
- The Location signal returns the location of the device.
Offline Mode
PowerApps provides functionalities to create an Offline mode in the Canvas Apps.
Two functions combine to form a simple mechanism to store small amounts of data on a local device:
SaveData: Saves a Collection in a local storage using a Name provided as argument
LoadData: Retrieves the Data in the local storage using the Name provided, and writes the Data in a Collection.
The Signal “Connection” mentioned previously can be very useful in this case, as it allows to know if the device is connected to a Network or not.
Unfortunately, it is not possible to trigger some expressions when the value of Connection.Connected changes. To catch a change in this value, a workaround could be to create a Timer with a certain duration and on the event “OnTimerEnd”, to check the value of Connection.Connected and then call a certain logic.
The available memory with this Offline mode is around 30-70 MB. Some data might be lost above this amount.
The Offline mode is available for Smartphones and Tablets but doesn’t work in a Browser.
The section "Project Feedback" provides information about a project made that contained an Offline mode. It explains some main points of the development of the Canvas App and presents some lessons learnt with this project.
Artificial Intelligence
Business Card Reader: Scan a Business Card and extracts information from it. This requires an AI builder license to be used.
Form Processor: Detects and Extracts text in documents. Requires training on an AI model
Object Detector: Detects objects in Images and draws bounding boxes around them
Receipt processor: Scan a receipt and extract information from it
Text recognizer: Extract printed and handwritten text from images
The trainings do not require to create a model. The models already exist but they need to be trained on a Database provided by the creator of the App.
The Canvas App can also connect to the Text Analytics API of Azure cognitive Services. This API enables to detect sentiment, key phrases, topics, and language from text.
More details can be found here: https://docs.microsoft.com/en-us/powerapps/maker/canvas-apps/cognitive-services-api
Licenses
There are 2 pricing plans for PowerApps:
- License to run single apps
- CHF 9.80 /user/app/month
- Allow individual users to run applications for a single business scenario based on the full capabilities of Power Apps.
- License to run unlimited apps
- CHF 39.40 /user/month
- Equip users to run unlimited applications based on the full capabilities of Power Apps.
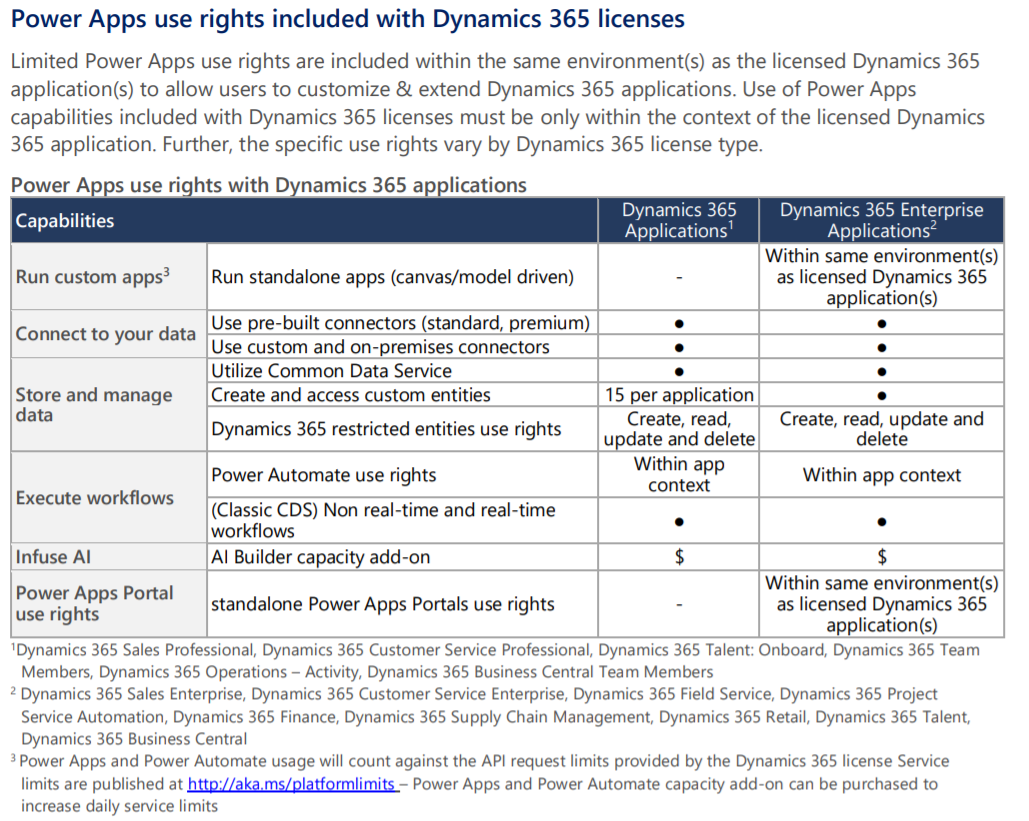
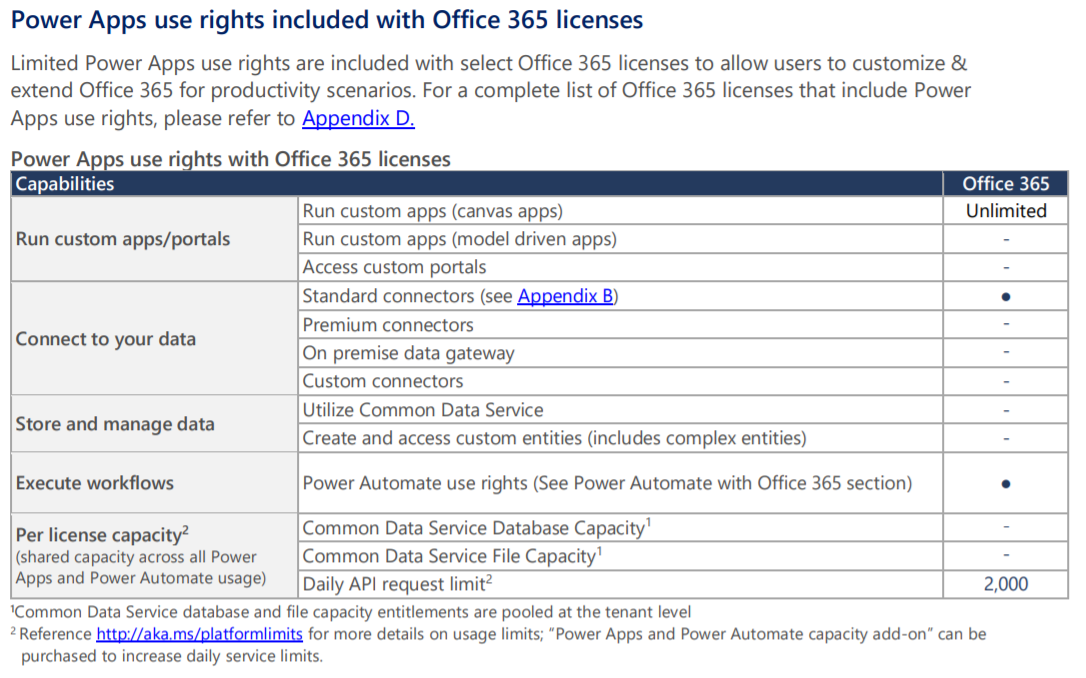
The use rights of PowerApps are included in other licenses, such as licenses of Office 365 and Dynamics 365. For instance, the licenses of Dynamics 365 give the following rights for the utilisation of PowerApps:
One important feature to take care of concerns the Connectors used in the Canvas App. A Connector is the name given to the link binding a Canvas App to a DataBase or a Service. Power Apps has connectors for many popular services and on-premises data sources.
Is it possible to create custom Connectors. The out-of-box Connectors can be of two types: “Standard” and “Premium”. Some licenses provide use rights to “Standard” licenses but not to “Premium” licenses. So this has to be studied carefully when choosing the License.
Examples of “Standard” Connectors: OneDrive For Business, SharePoint, Outlook.com
Examples of “Premium” Connectors: Dynamics 365, Salesforce, SAP ERP
Details about the Connectors can be found here: https://flow.microsoft.com/en-us/connectors/
As shows the previous table, the license of Dynamics 365 grants right to use “Premium” Connectors. However, as shows the next table, the license of Office 365 doesn’t provide an access to the “Premium” Connectors:
All the details for the licenses of PowerApps can be found in the Microsoft Power Apps and Power Automate Licensing Guide: https://go.microsoft.com/fwlink/?linkid=2085130
As licenses plans often change, it is important to check the Licensing Guides regularly.
Share Canvas Apps
The person who creates a Canvas App is the owner of the App. After creation, he is the only person who has access to it. To make the App available to other people, the App has to be shared with these people. The owner can choose to allow or not these people to share themselves the App with others. To be able to share the App, the person must also have the permissions on the data used in the Canvas App.
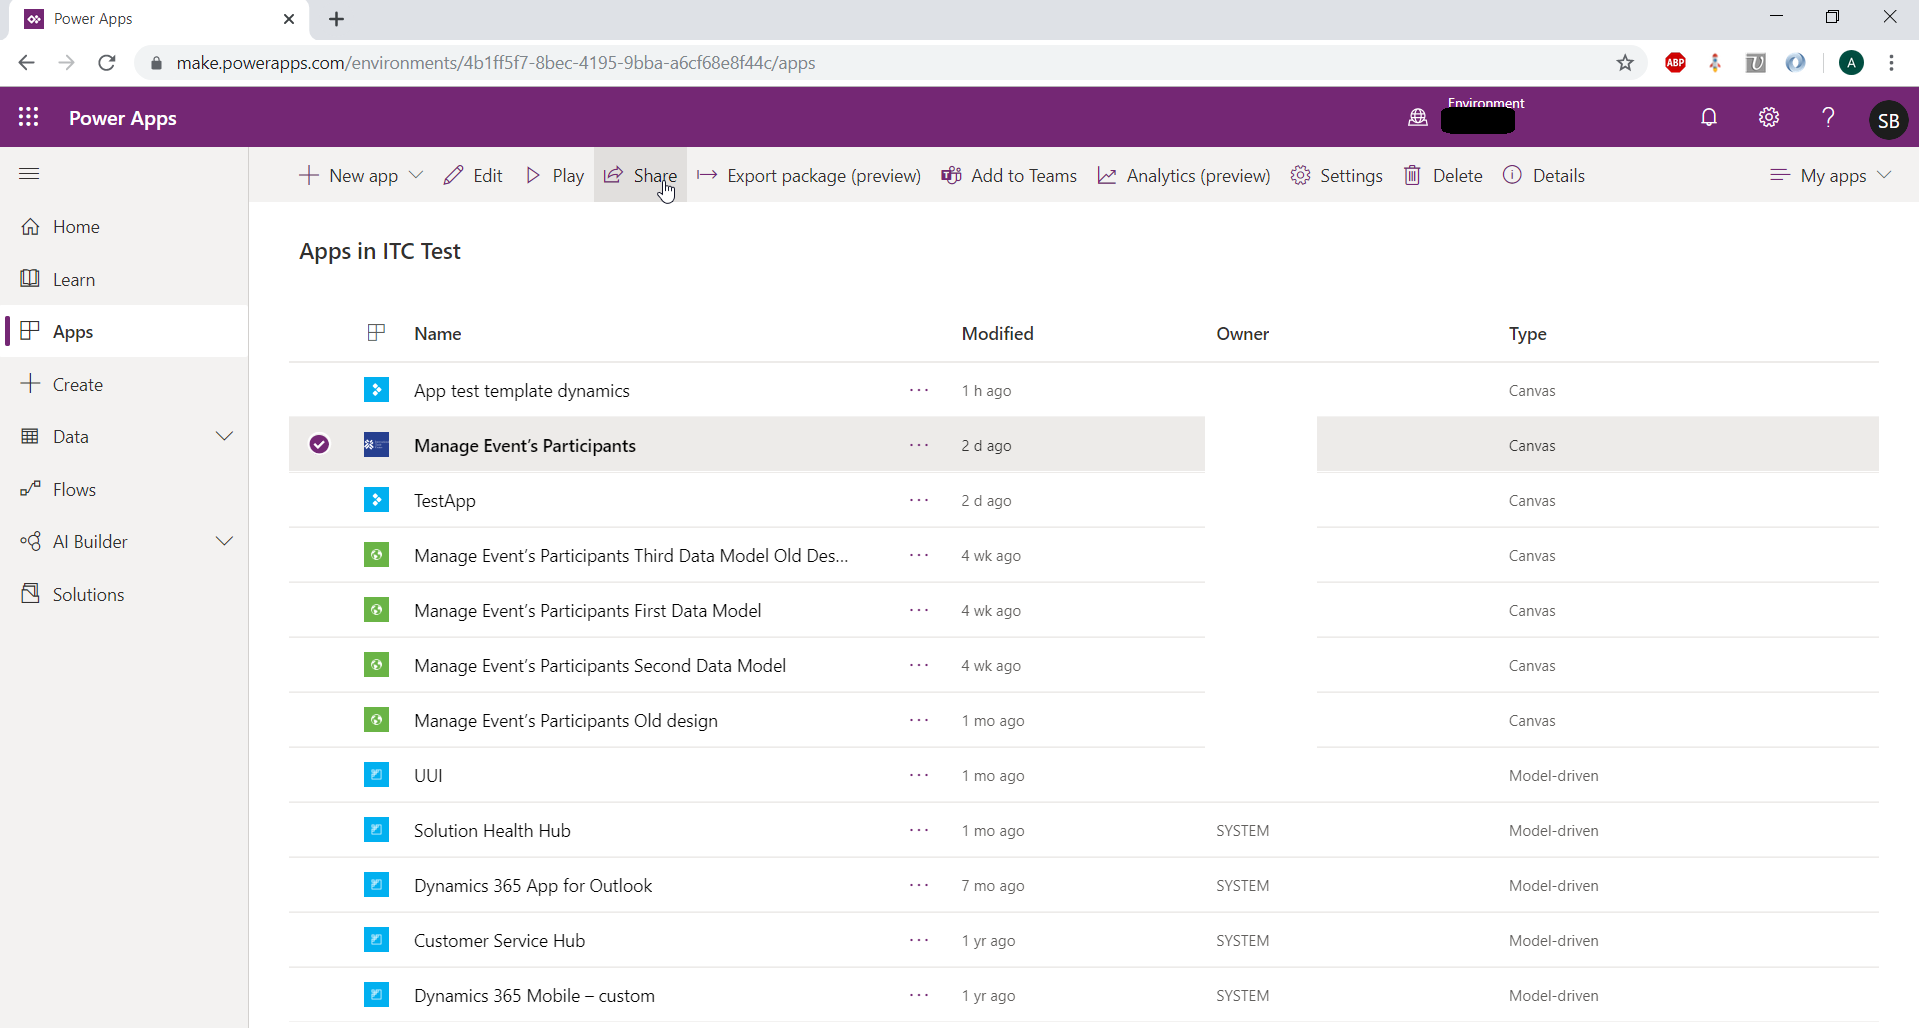
To share an App, go to make.powerapps.com. Select “Apps” on the menu on the left. Select the App. And click “Share” on the menu on the left:
Overview: where Canvas Apps can be used
Canvas Apps can be used in many tools:
On Smartphones and Tablets
Download the free Application PowerApps on iOS and Android. When opening the Application, the user has to sign in with his credentials. Then, the user sees a list of the Canvas Apps that he owns or that were shared with him.
He can then select the Canvas App that he wants to use.
In Model-Driven Apps
When editing a Form of a Model-Driven App, it is possible to insert a Canvas App. But note that this is only available in the UUI.
In a Model-Driven App, the authentication in the Canvas App is automatically made. It authenticates with the credentials of the user of the Model-Driven App. So, the Canvas App has to be shared with all the users that are expected to use it.
Note that a Canvas App can be put in Solutions.
In Power BI
It is possible to embed a Canvas App into a Power BI report. To do so, a visual of Power BI called “PowerApps” is used. The visual can be inserted in the report like any other visual. Then, the Canvas App to be used in this visual must be selected.
One great functionality is that it is possible to send data from Power BI to the Canvas App. This allows to display data in the Canvas App that corresponds to the Filters activated in Power BI. This creates a true interaction between the Power BI report and the Canvas App. To retrieve and manipulate this data in the Canvas App, an object called “PowerBIIntegration.Data”.
Like in Model-Driven Apps: the authentication in the Canvas App in the Power BI report is made using the credentials of the user. So the App has to be shared with the user.
More details can be found here: https://docs.microsoft.com/en-us/powerapps/maker/canvas-apps/embed-powerapps-powerbi
In Websites as iFrames
The Canvas Apps can also be embedded in any Website as iFrames.
An authentication must be made in the Canvas App. The developer of the Website can choose to let the user authenticate by himself with his credentials.
It is also possible to handle the authentication automatically by writing code using the Azure Active Directory Authentication.
SharePoint
Canvas Apps can be integrated in SharePoint.
Project Feedback
This section describes a project of Canvas App made for a client. One main specificity of the Canvas App is that it had to implement an Offline mode. The client will be called Company AAA here.
Project Presentation
In this project for Company AAA, ELCA has put in place new developments on the CRM Dynamics 365.
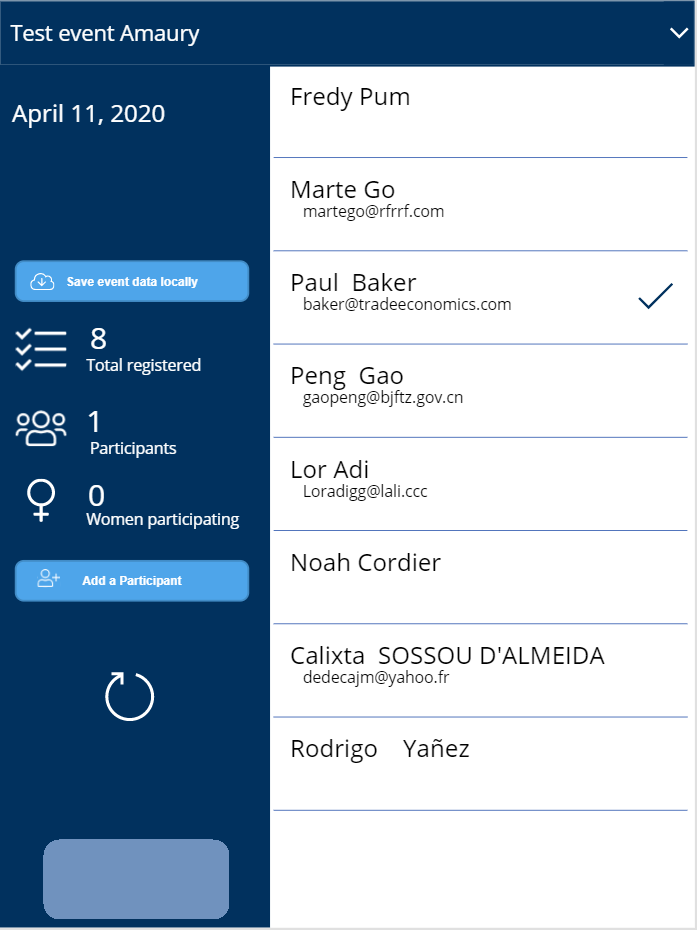
Company AAA organises events (like conferences) in many countries. Among other things, the new developments concerned the management of these events and of the participants to the events. Company AAA also wanted to be able to manage this on an application on a Tablet, directly during the event or a little before, while travelling for instance. Many events occur in places where networks can’t be reached so the Application requires an Offline mode.
3 main Entities in the CRM are implicated in this Business:
- Events: The events of Company AAA
- Contacts: People in contact with Company AAA. Participants to the Events are Contacts
- EventPart: The relation between Events and Contacts is N:N. So, this entity was created to store the relationship existing for a Contact that participates to an Event
With this Application, Company AAA wants to be able to:
- Select an Event among all existing Events
- Have the list of all Contacts participating to the selected Event
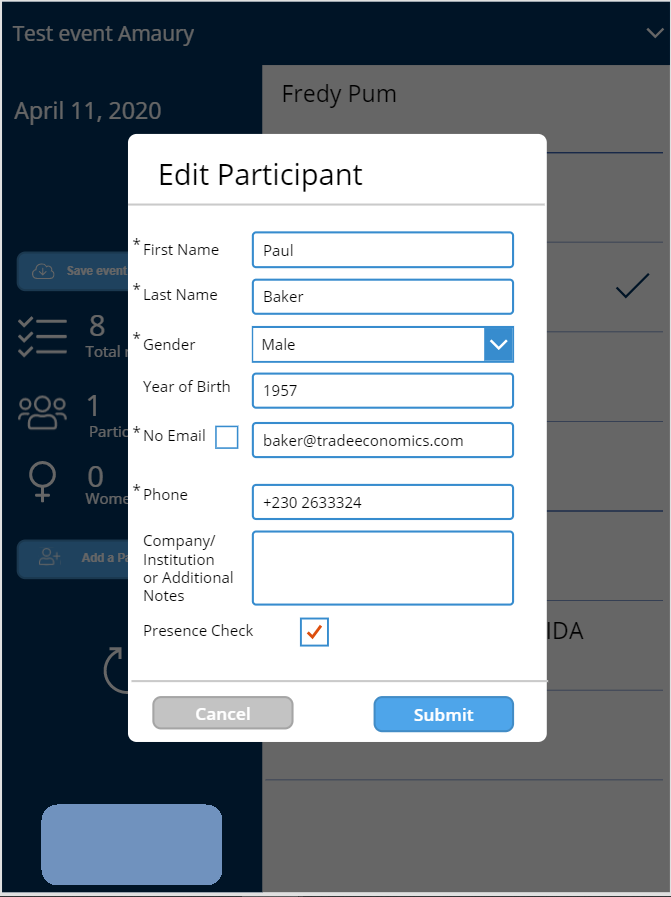
- Be able to modify the information of the Contact, and specify if he was indeed present or not to the Event
- Be able to create a New Contact and add him to the Event
- When Online, be able to add an existing Contact to the Event
When Offline, a Contact and its participation to an event must be stored. It is necessary to track if a record is new or already existing (and to keep the GUID in this case).
Developing an application from scratch can be long. A Model-Driven app can be used on a Tablet, but the customisations possibilities were too limited for this use case. So it was deciced to develop the application using the Canvas Apps ! The Offline mode was clearly the main challenge of this Application.
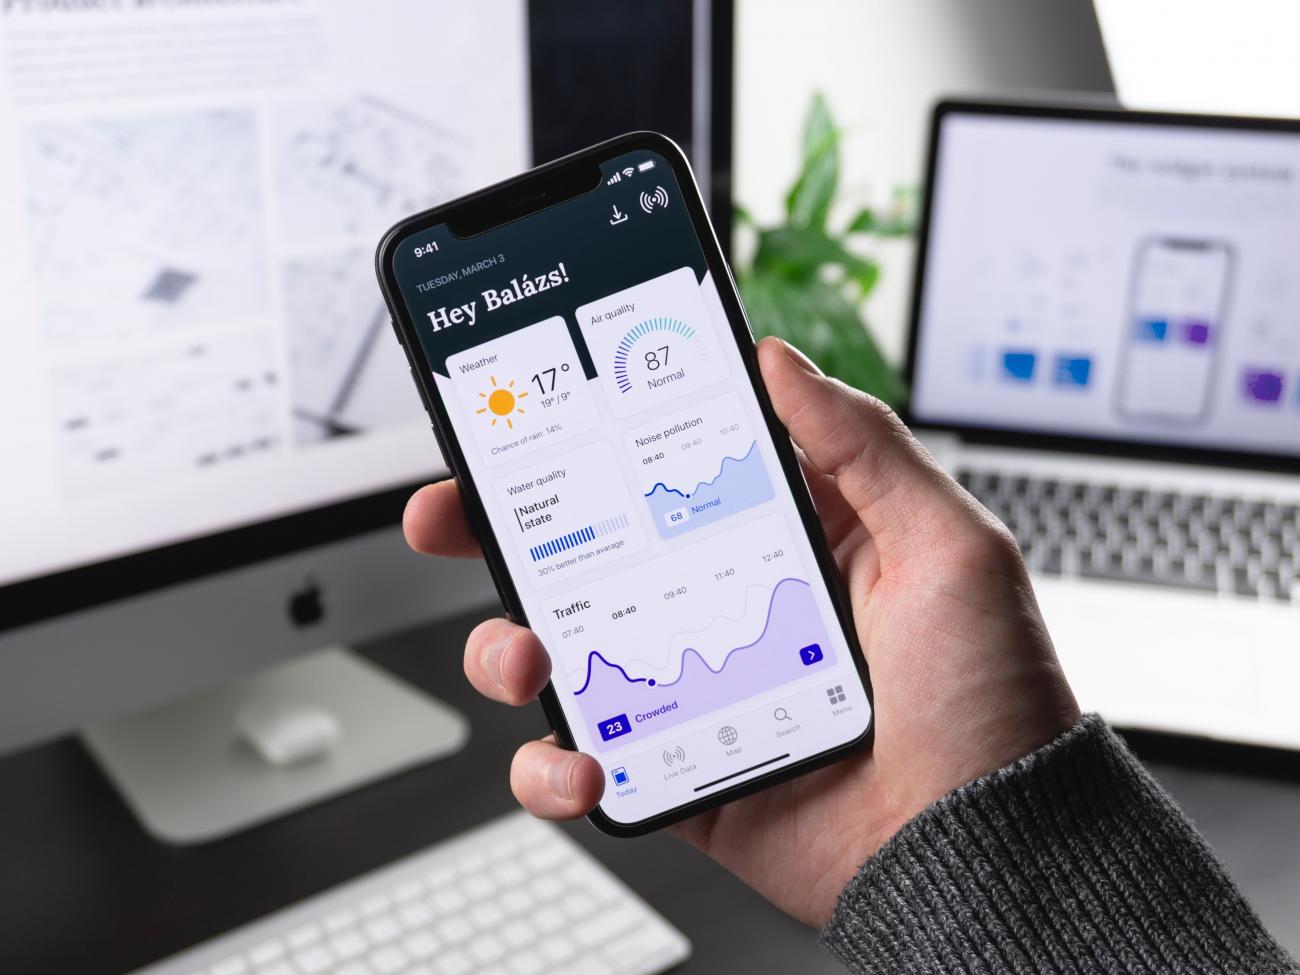
Here is an overview of the final interface of the Canvas App that has been developed:
Presentation of Offline specifities
This Part will explain shortly how the Offline mode was handled in the Canvas App.
When using Canvas App, it is possible to handle data by referring directly to the Data Source. As mentioned before, it also possible to create Collections to manipulate the Data of the Source.
Data Manipulation
When the device is Offline, it is not possible to refer directly to the Data Source. Only Collections can be used. In consequence, the App has been designed to manipulate (almost) only Collections. When Data is uploaded from a Data Source into the Canvas App, this data is directly inserted into a Collection.
Data Consistency in Offline mode
When switching between online and offline mode, data must be synchronised between the Cloud and the local storage. The user has to click on a button to execute the synchronisation. He has to make sure that he has a steady network when making the synchronisation. If the synchronisation was automatic we were afraid that there might be issues with intermittent networks.
Also, as the offline mode only uses the local device, it is faster than the online mode. So it can be more convenient to use even when some network is available.
Use of resources external to Canvas Apps
The first specifications of the App involved 7 entities: Events, EventParts, Contacts, Projects, Accounts, Countries, Notes.
Managing all these Entities in Offline mode appeared to be close to impossible due to the lack of functions and structure in the code of the App. Remember that to make it easy, the code kind of look like Excel formulas!
It was then decided to remove the Accounts and the Countries from the App, at least in a 1st version. Events and Projects are read-only entities in the App so there are not too hard to handle.
At this point, 3 entities could be modified, and 2 entities were read. Again, it appeared to be extremely complex to handle in the App in Offline mode.
We found a solution to overcome this. Instead of replicating the data model of the Source in Collections of the App, only one collection was used to track all the changes made on the App in Offline mode. When switching to Online mode, this Collection updates or creates records in the Entity EventPart. Then, workflows in Dynamics 365 are launched to dispatch the data contained in the EventPart to Contacts and Notes.
In the Data model, EventPart has a N:1 relationship with Contacts. The relationship had to be in this sense to be able to update the Entity Contact from a Workflow.
In fact, only two collections are used in the App. One Collection stores data about the selected Event and the Porject it is related to (called EventInfoCollection in the next Part). Another Collection stores the data about EventParts, Contacts and Notes (called EventPartsCollection in the next Part).
So, the key to solve the complexity of the App was to consider an EventPart and a related Contact as a single record in the Data model of the App. And to dispatch the data in the right records in Dynamics a using Workflows.
Design of the App
The Design of the App was elaborated by a Professional Designer at Elca, using Adobe. At that time, we still had many unknowns about the functionalities and limits of Canvas Apps. So it took some time to find a design that could fit well the needs and the constraints.
The interface finally looks great thanks to the help of the professional designer. It adds a lot of value to the Application.
In the end, we found that we had not been really limited by the visual customisation capabilities of Canvas Apps!
Lessons Learnt - Conclusion
The Canvas App allows to create Business Applications with a low-code platform and a drag & drop interface. It makes the development of Business Applications available to a large audience! It not necessary to have an advanced technical knowledge and to know programming much. They can save a huge amount of time compared to an application coded from scratch. The design of the Canvas App can be customised really well and easily.
However, it is very important to keep in mind that Canvas App can become very hard to develop for applications which involve quite complex processes, or complex features such as an Offline mode. In my opinion, it can even become impossible to develop in certain cases. One of the main reasons for this is that the code lacks structure (for instance it has no functions or classes)
A key to make a Canvas App work in complex use cases can be to use external resources (such as Workflows of Dynamics 365) to move some advanced logic outside of the Canvas App.
So, my point of view about Canvas Apps is that they are great for simple applications. But in quite complex use cases, they should be avoided and a traditional fully coded application should be developed instead.