Introduction
Canvas App embedded Model-Driven App : As you probably know, Microsoft invests a lot in low-code tools, for instance in the Power Platform. Microsoft also works a lot on a better integration between these tools.
Which leads us to the subject of today: the integration of a Canvas App into a Form of a Model-Driven App.
Today, you may consider using custom Web Resources in your Form to meet precise needs.
You will see here how Canvas Apps might be an alternative to these. This alternative uses very little code. It might save time, money, and be a solution manageable by a wide audience. So many potential gains in view!
To learn more about Canvas Apps, you can have a look at this Chronicle: Power Apps: Presentation, tutorial and feedbacks of Canvas Apps
So in this Chronicle, we will study the integration of a Canvas App into a Form of a Model-Driven App!
We will rely on a small use case and see how to implement it in a shape of a tutorial. We will explain the different steps and give some useful insights.
Licensing
I just start this Chronicle with a quick reminder on Licenses.
With a Dynamics 365 license, you have access to all standard connectors of Power Apps and also the Premium connectors in the context of the CRM (like Dynamics 365 connector, Common Data Service connector).
So, if you use this integration only with the data of the CRM, you won't need additional licenses.
You might only need an additional license if your Canvas App uses Premium connectors not in the context of the CRM.
Use Case
In the Chronicle we will follow a quite simple use case.
Our company uses the Opportunities entity. This entity is linked to a Contact and to an Account.
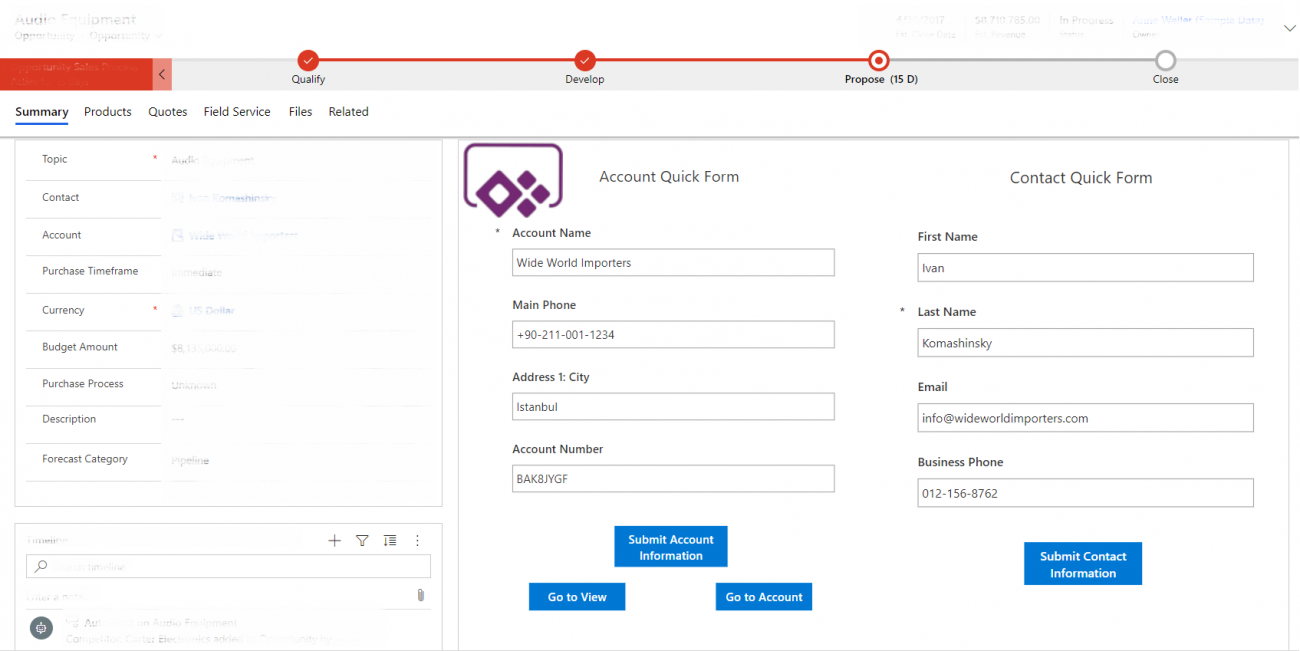
We would like to have an editable form for Contact and Account entities directly in the Opportunity Form. It would simplify the user experience as he would be able to edit these entities in a single web page.
Dynamics 365 provides Quick View Forms. These allow to see information from a related entity, but not to edit it.
A commonly used solution to edit data for a related entity is to create a custom web resource.
But here, we will use embedded Canvas Apps !
Our company also wants to display a Power BI dashboard in the Form, to see information about the Opportunity. It will also be done using the embedded Canvas App!
Step-by-step embedding of the Canvas app
In this part, we will see in a form of a tutorial how to embed a Canvas App in a Model-Driven App.
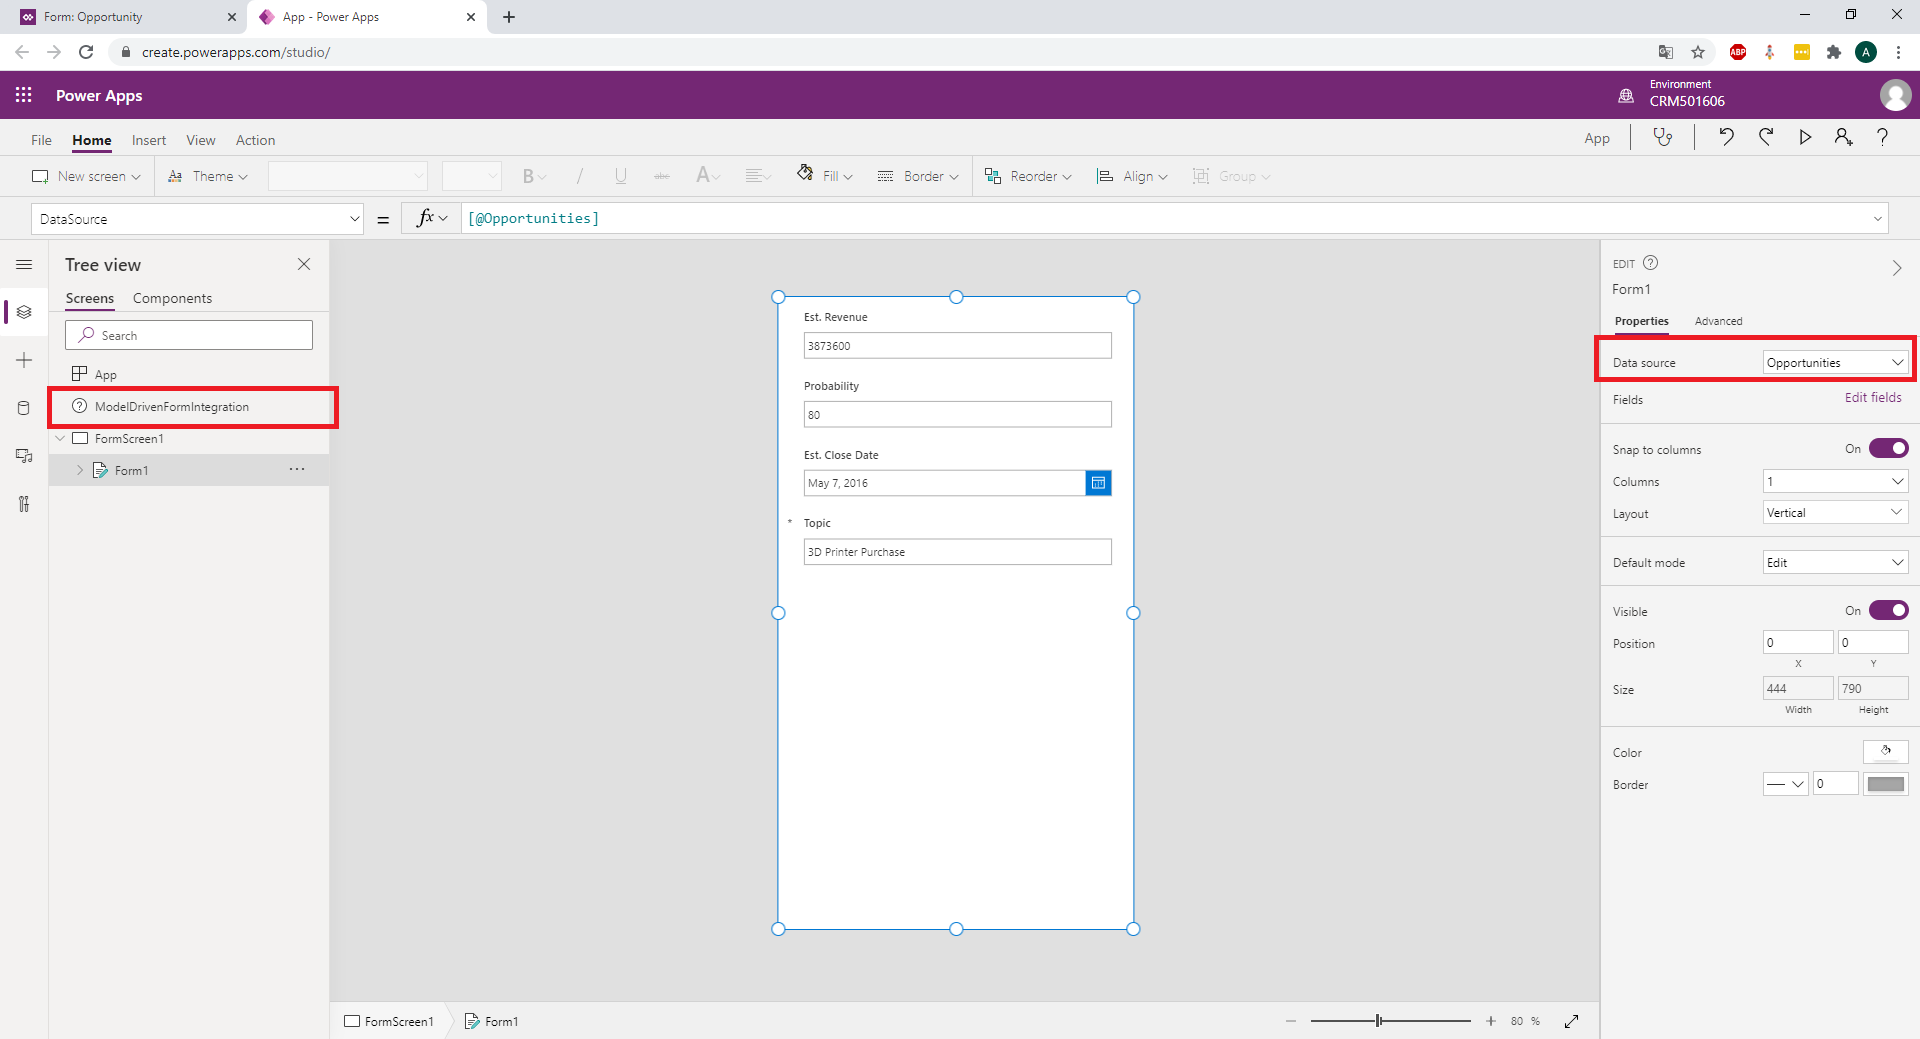
First, go to the Power Apps portal at make.powerapps.com. Open the Form in which you want to embed the Canvas App and click button "Switch to classic". The embedding can't be done yet in the new customisation interface.
In the Form, add a field at the place where you want to display the Canvas App. You must take a field that will have a value for sure. If it doesn't have a value, the Canvas App will not refresh in response to any change in data on the host model-driven form.
In our case, we will use the "Topic" field of the Opportunity, since it is a mandatory field.
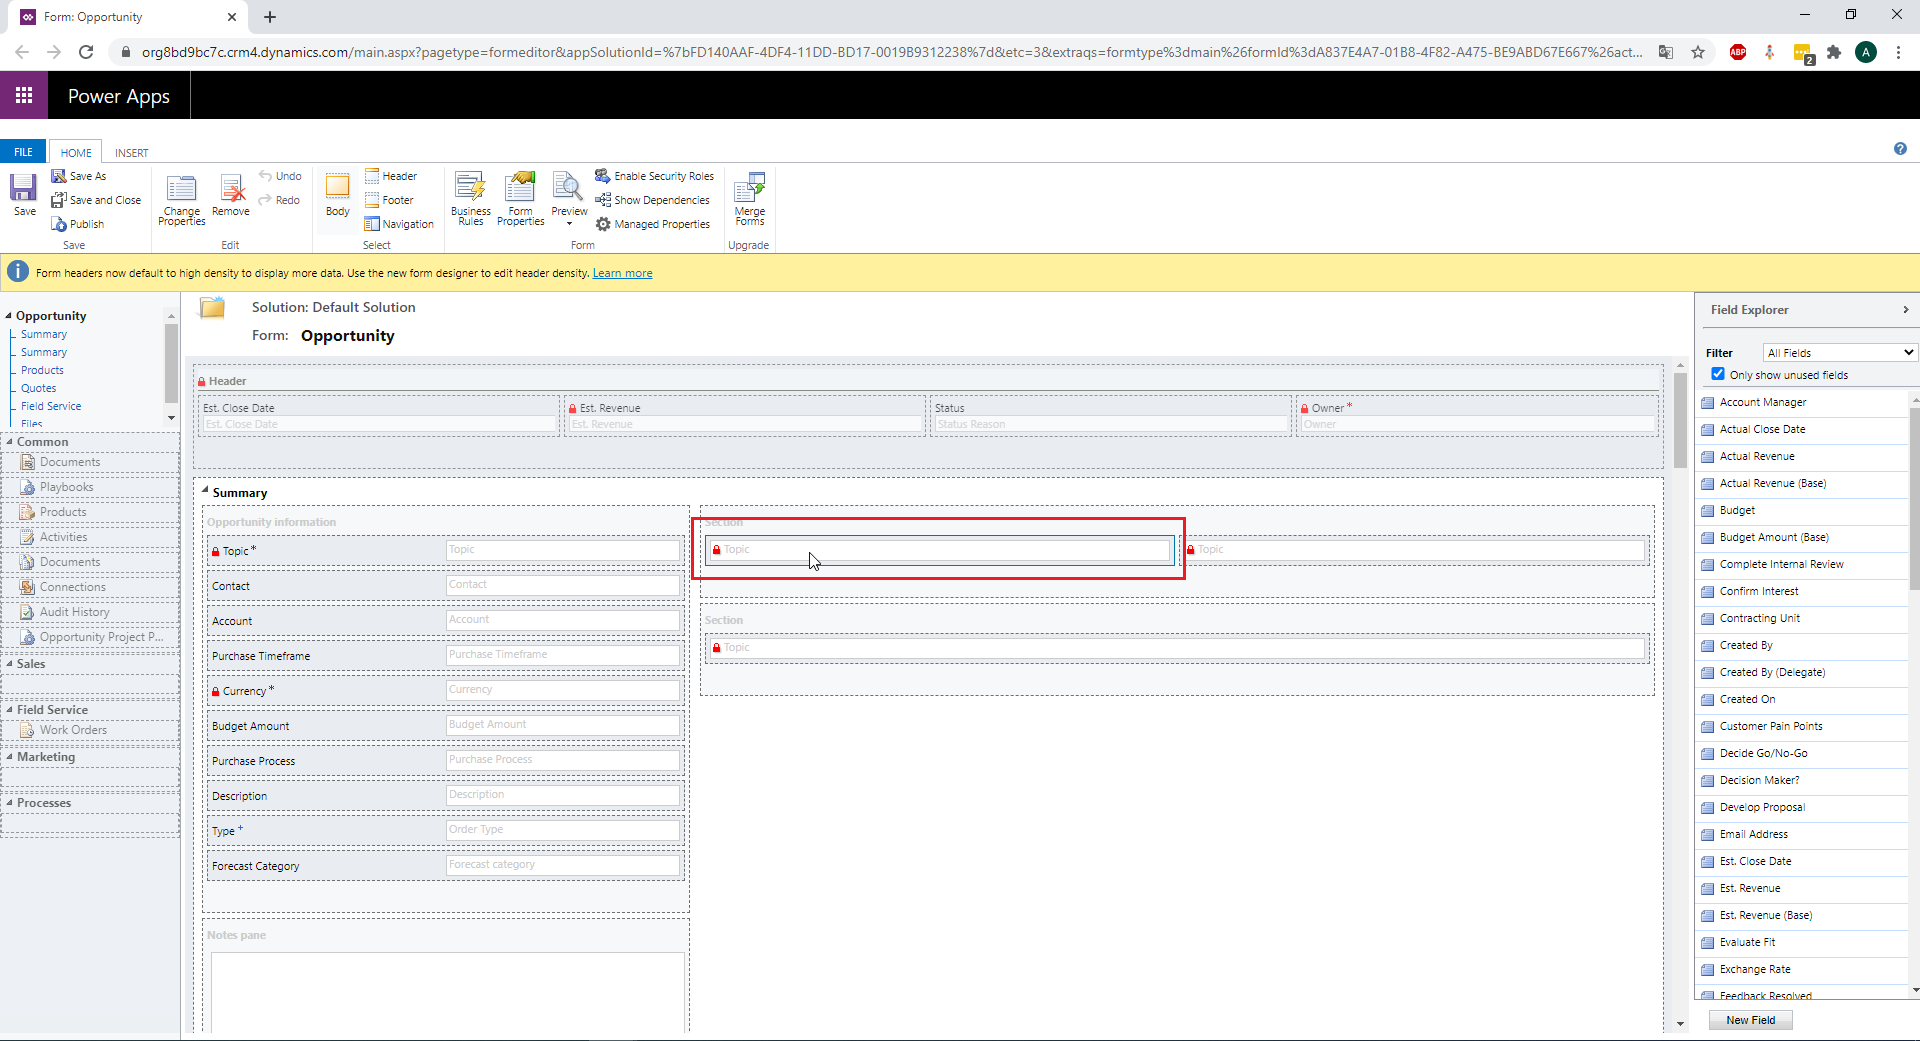
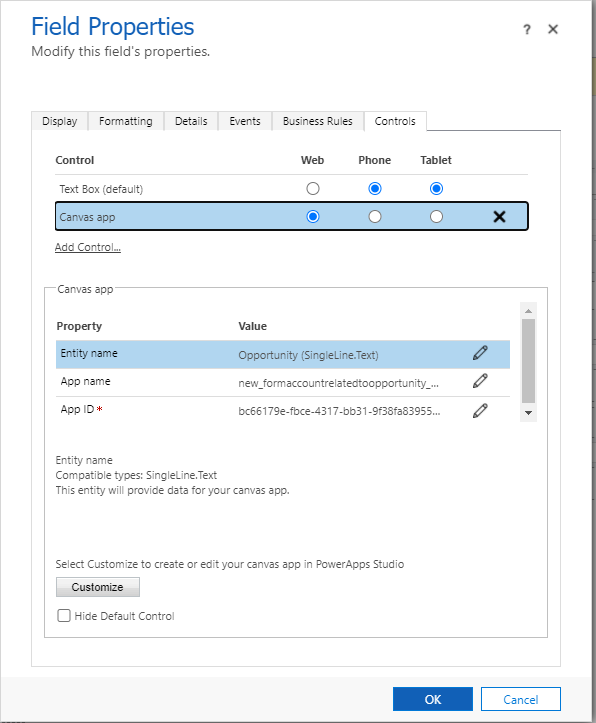
Double click on the field to open its properties, and go the "Control" tab. Click "Add Control":
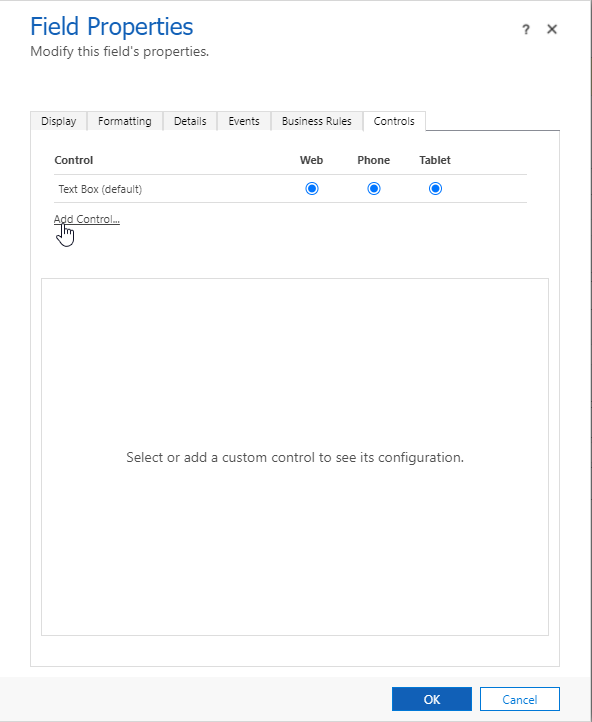
In the list, select "Canvas App". The control will will added under the section "Control". Select the "Canvas App" Control for the Web client type:
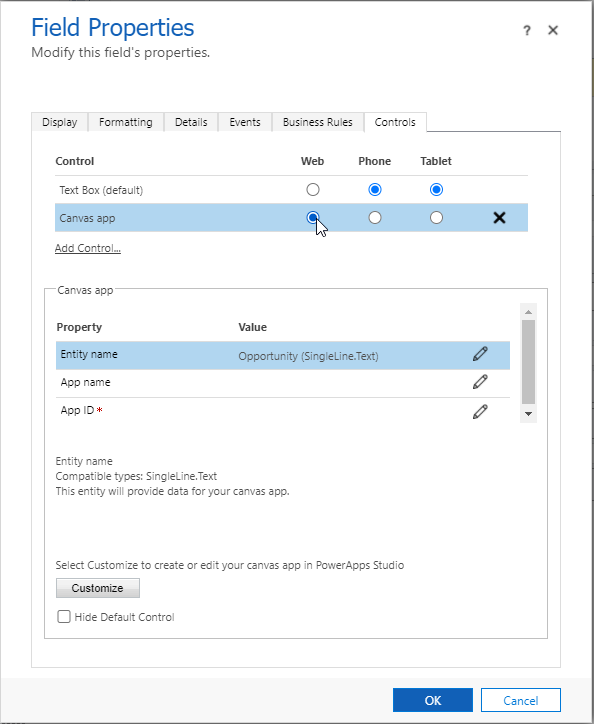
The embedding is not possible yet for the Tablet and Mobile client types. So don't select the "Canvas App" control for these two.
In the section "Canvas App" below, you have three parameters. "Entity Name" is set to the Entity of the Form on which you are adding the Canvas App.
"App name" and "App ID" are the name and the ID of your app. They will be automatically filled when you create the App. If you already have an App (created for the embedding), you can add its name and ID there directly. You can get the ID of your app in the Details page in the Power Apps Portal.
If you are creating a new App, click the button "Customize". It will open a new App in the Power Apps edition Portal:
Note that a Control called "ModelDrivenFormIntegration" is automatically added to the Canvas App. This control allows to interact with the host Model-Driven App. We will study it in the next part of the Chronicle.
For this embedding, it is important to create the Canvas App as described above. Otherwise, this control won't exist and there would be not interaction with the host Model-Driven App.
Note also that a Data Source and a default Form (for the entity on which the Canvas App is embedded) were automatically added to the App.
You can now click "File" -> "Settings", give a name to your App and save it. When you save it the first time, it is also published.
If you go back to the Form editor, you will see that the properties of the Canvas App Control were automatically filled.
The name I gave for our App is "Form Account related to Opportunity". The "App Name" parameter is a technical name created from it, called new_formaccountrelatedtoopportunity_d3804.
You can now click "OK", save your form and publish it.
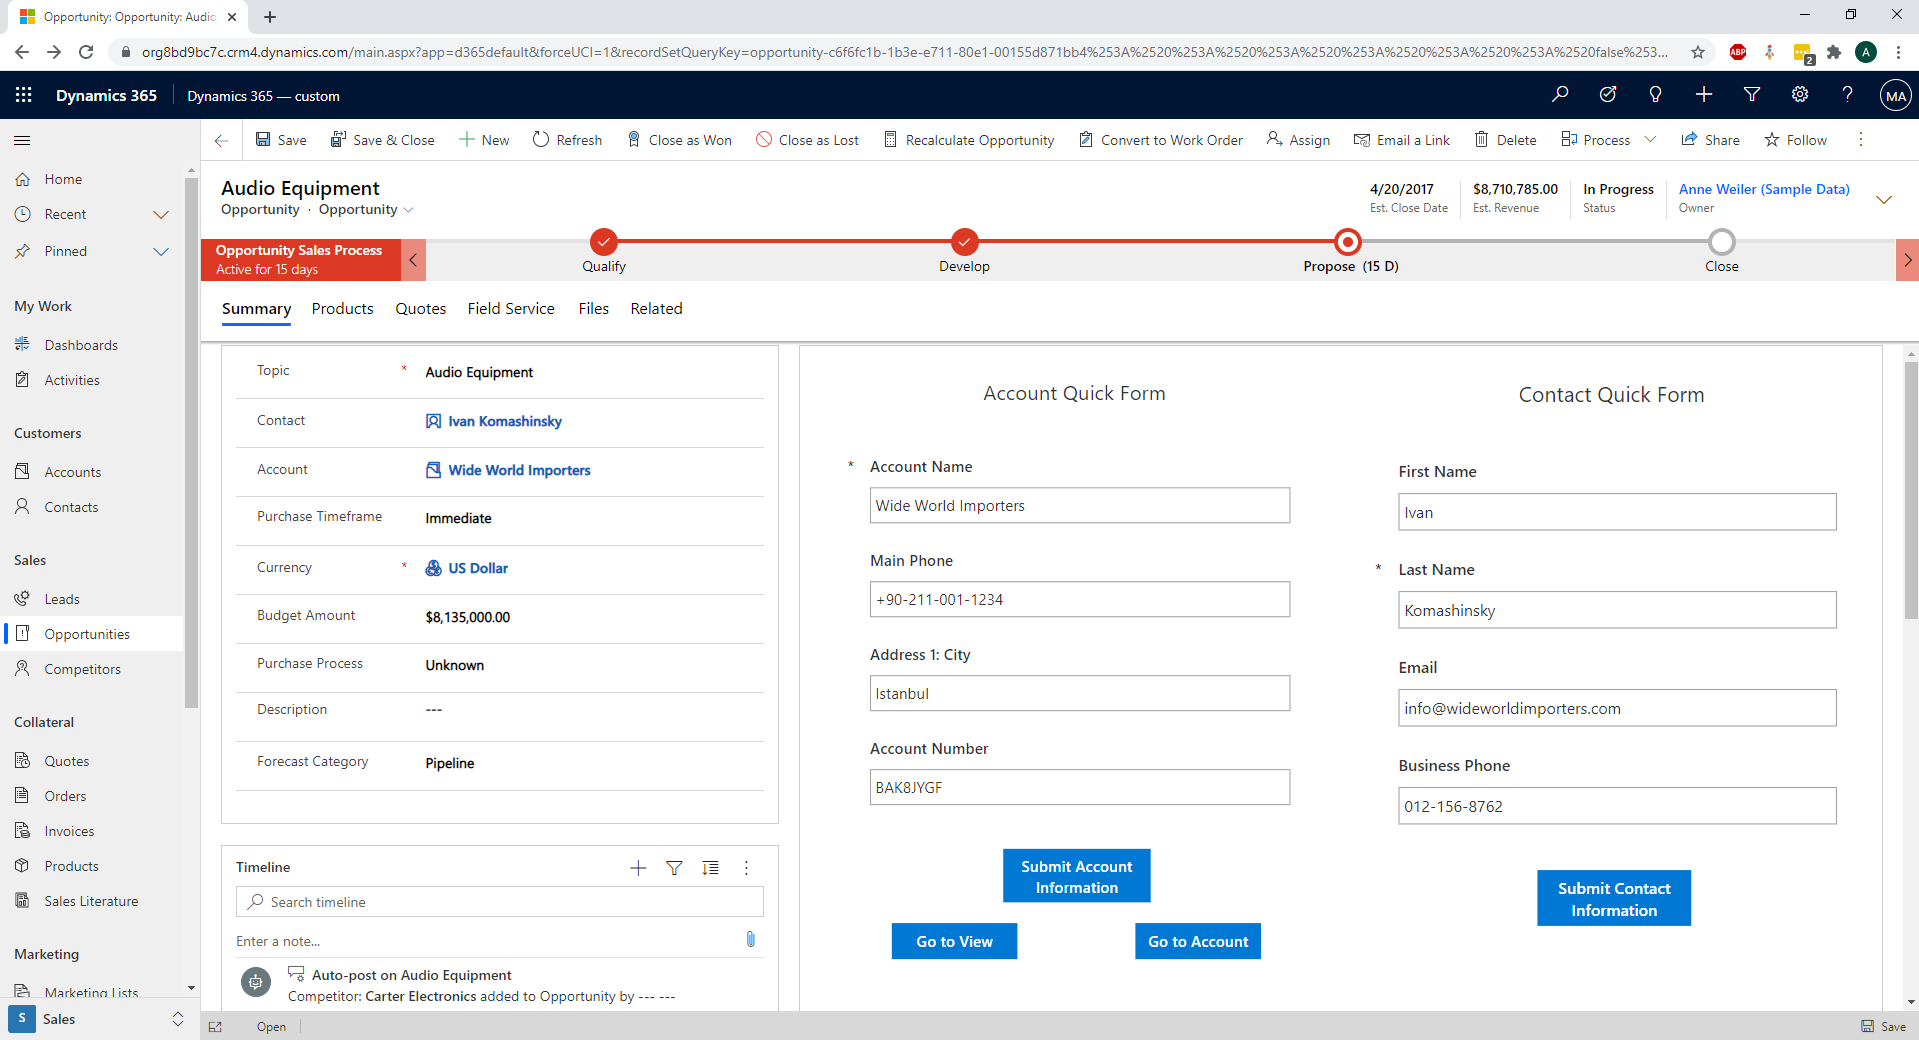
Now, let's have a look at our Opportunity Form:
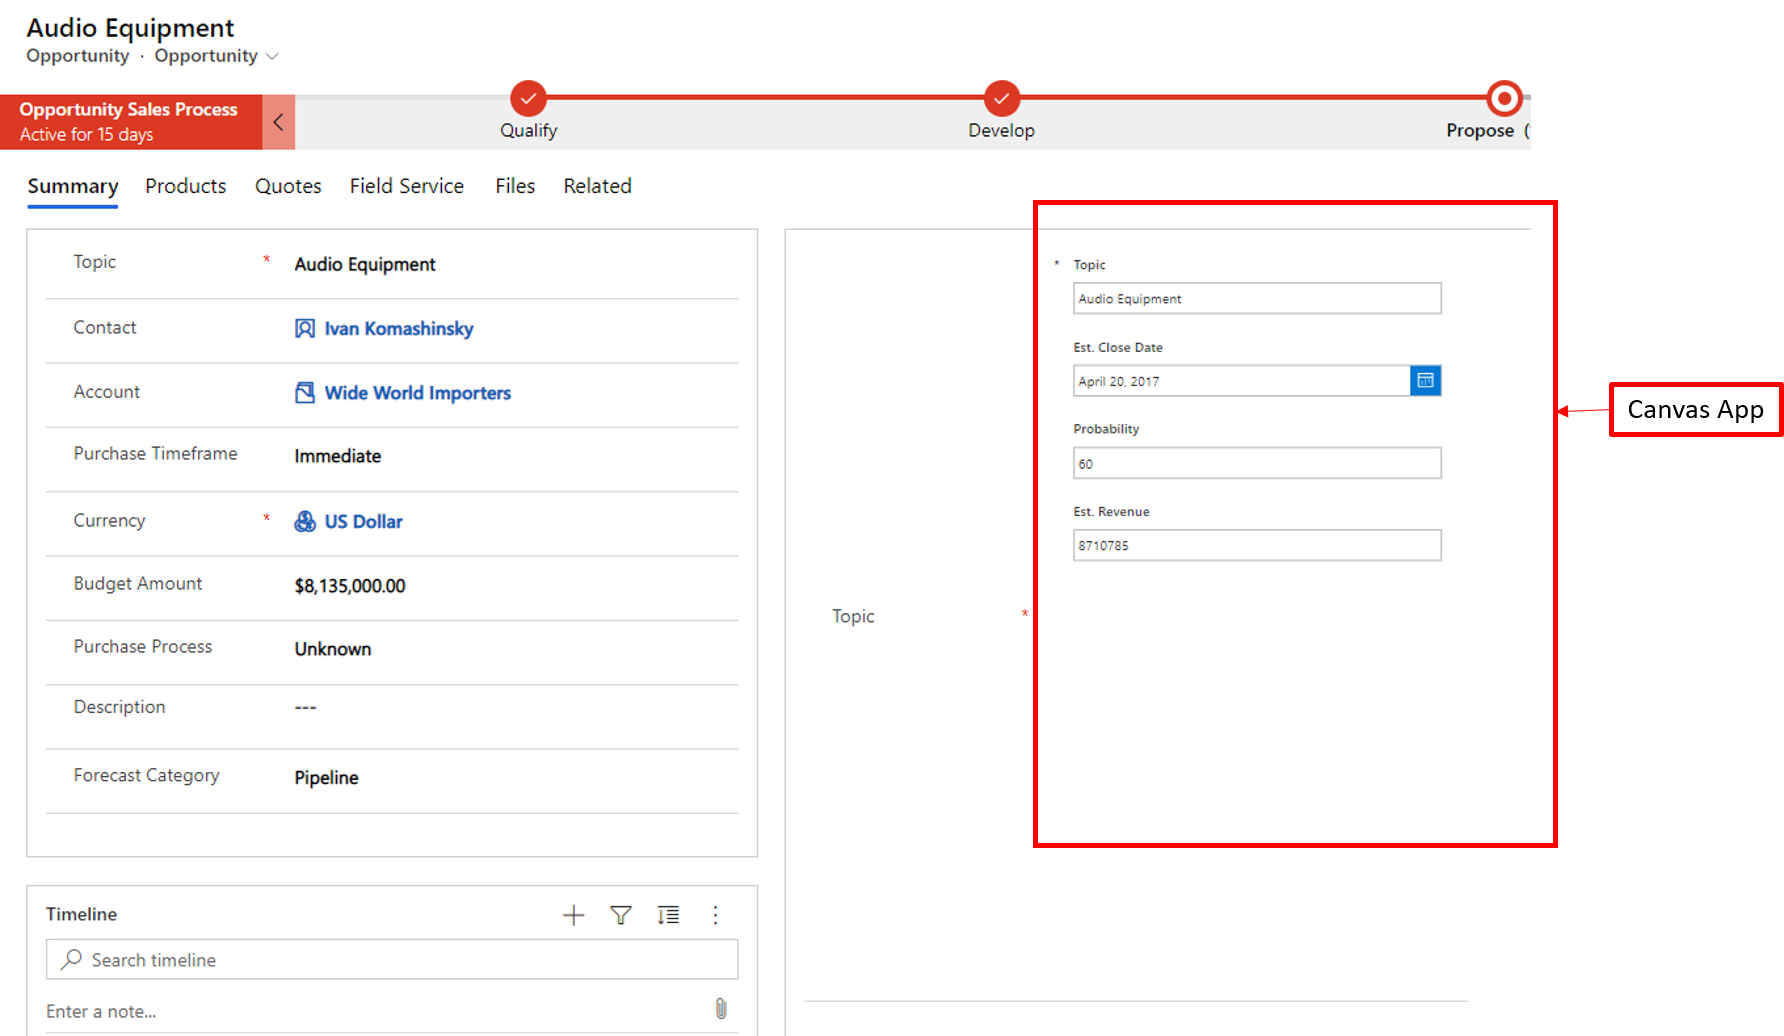
The Canvas App is displayed in the Form.
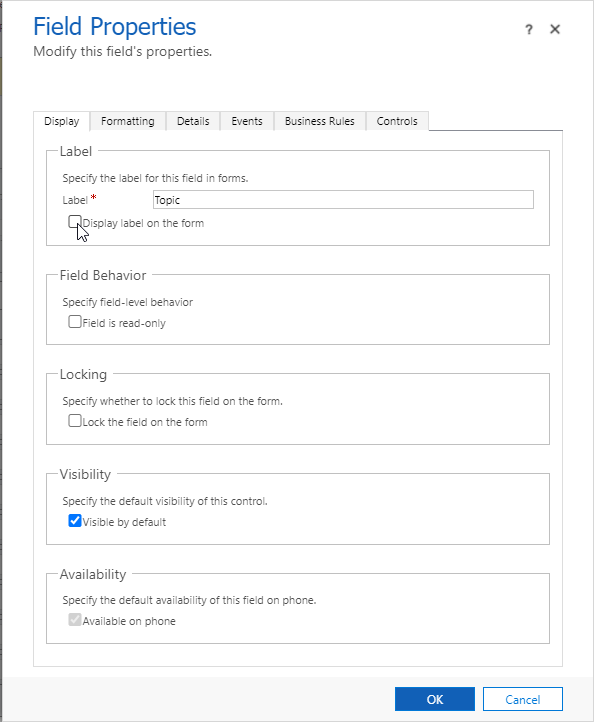
You can see that the Label (here "Topic") of the field is displayed. You can hide it on the Form editor:
To edit the Canvas App, you can either:
- Go to Power Apps Portal, find you app and click "Edit"
- From the editor of your Form, go to the field properties for your App, and click "Customize" in the "Controls" tab.
Important: The Embedded Canvas App must be shared with all the users of the host Model-Driven Apps. Otherwise, they won't see it.
So, here we are, we have embedded a Canvas App in a Model-Driven App!
Now, let's have a look at the specificities of this integration.
Specificities of the Integration
The specificities of this integration rely in the interaction between the host Model-Driven App and the Canvas App. The possible interactions go through the "ModelDrivenFormIntegration" control, which we have mentioned earlier.
In this part, we will present its functionalities. We will not dig into the technical reference. But you can look at these two pages to have the precise reference of the control:
https://docs.microsoft.com/en-us/powerapps/maker/model-driven-apps/embedded-canvas-app-actions
We will give a few examples for these functions in the next part.
When this function is called, the Form is closed and the page automatically navigates to the Form of a precise record. This record can belong to any Entity. So this function takes as inputs the name of the Entity, the name of the Form to open, and the ID of the record to open.
Similarly, this function allows to navigate to a View.
- OpenQuickCreateForm(entityName)
This function remains in the current Form, and opens the Quick Create Form of an Entity.
- RefreshForm(showPrompt)
This function allows to refresh the data on the host Model-Driven App. It can be used instead of the "Refresh" button on the Command Bar. The interest could be to provide a deeper integration of the Canvas App into the Model-Driven App.
-
SaveForm()
This function allows to save the data on the host Model-Driven App. This one could also be used instead of the "Save" button on the Model-Driven Form.
-
DataSource
This property allows to select the Data Source of the control. It should be let to the Entity of the host Model-Driven Form.
- Item
This property allows to access the record of the Form opened in the Model-Driven App. It is very important as it is used in the Canvas App to display information related to the opened record.
- OnDataRefresh
This event evaluates when data is refreshed in the Model-Driven Form.
- Data
This property is read-only. It is used by the framework to send some key data from the host Model-Driven Form to the embedded Canvas App. It should not be used. The item property should be used instead.
Application to a use case
Now, let's see how to apply these functions to our use case.
We want a result of that kind:
With on the middle/right part of the form: one Canvas App to edit the information about the related Account. And one Canvas App to edit the information about the related Contact.
First, we can delete the Opportunity Form that was created by default in the App, as it won't be useful in our use case.
And let's create a Form for our Account: choose the Accounts in the Common Data Service data source.
The "Item" property must be the Account related to the Opportunity. This can be done as below:
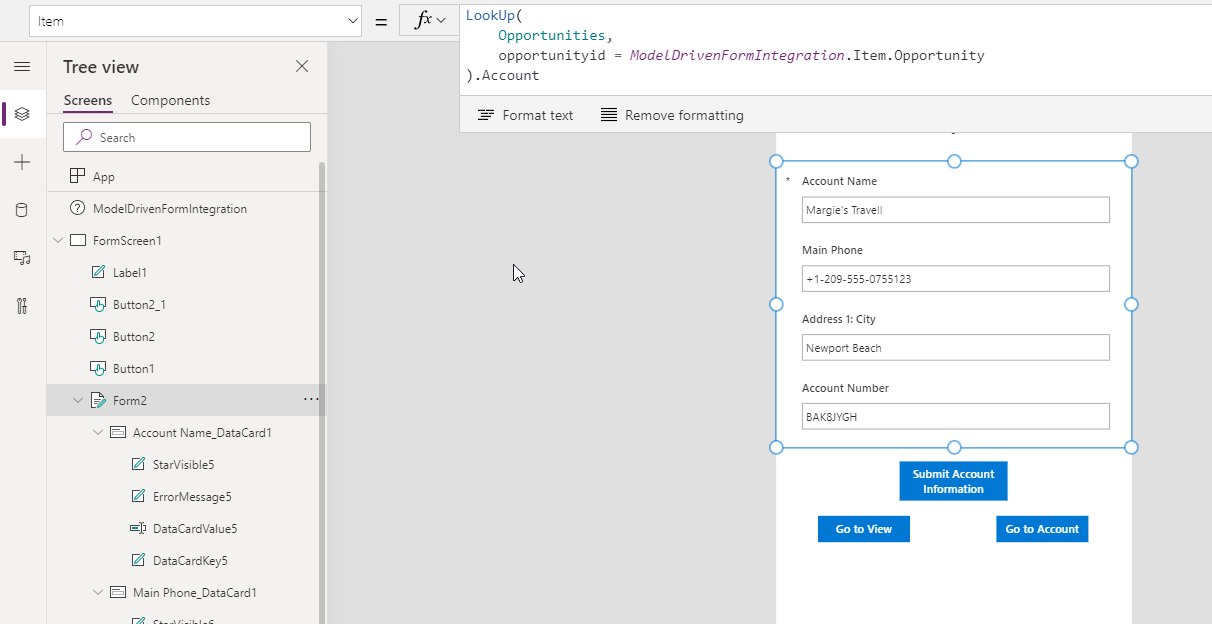
A limitation of the "ModelDrivenFormIntegration" control today is that we can't get the Account directly from this. The below formula won't return the Account record:
ModelDrivenFormIntegration.Item.Account
Instead, this workaround must be used:
We access the GUID of the Opportunity record in the Canvas App with the following formula:
ModelDrivenFormIntegration.Item.Opportunity
And we use the LookUp function to retrieve the open Opportunity, and from it it is possible to retrieve the Account record:
LookUp(Opportunities,opportunityid=ModelDrivenFormIntegration.Item.Opportunity).Account
Now, we can add the fields we need in our Form.
We also add a button to submit the information entered for the Account:
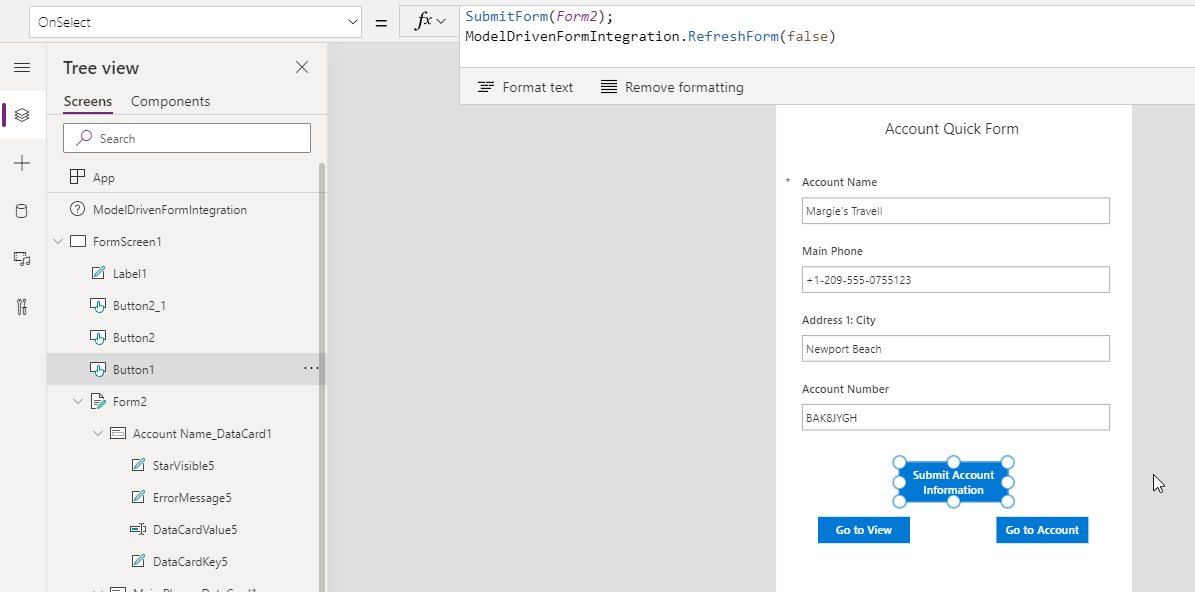
And we set the OnSelect event of this button to the following formula:
SubmitForm(Form2);
ModelDrivenFormIntegration.RefreshForm(false)
We first submit the Form to update the Account information. And then we use the "ModelDrivenFormIntegration.RefreshForm" function to refresh the data on the host Model-Driven App to see the change.
It could be interesting to not use a button. A way to do it would be to set this formula on the "OnChange" event of the input controls used in the Form, as below:
To go a bit further in this integration, we add a button "Go to View". When clicked, it closes the Form of the Opportunity and navigates to the View "All Accounts":
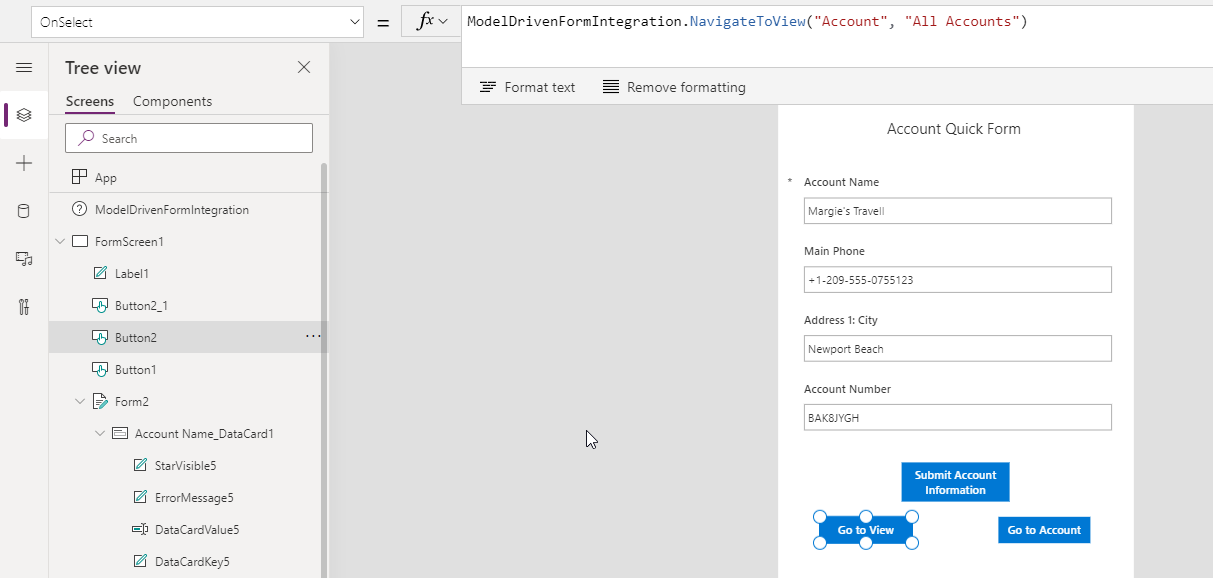
We set the "OnSelect" Event of the button to the formula:
ModelDrivenFormIntegration.NavigateToView("Account", "All Accounts")
Here we use the "NavigateToView" function of the "ModelDrivenFormIntegration" control. We specify that the target View belongs to the Account entity. And that the target View has "All Accounts" for name.
Let's also add a button "Go to Account". When clicked, it closes the Form of the Opportunity and navigates to the Form of the related Account:
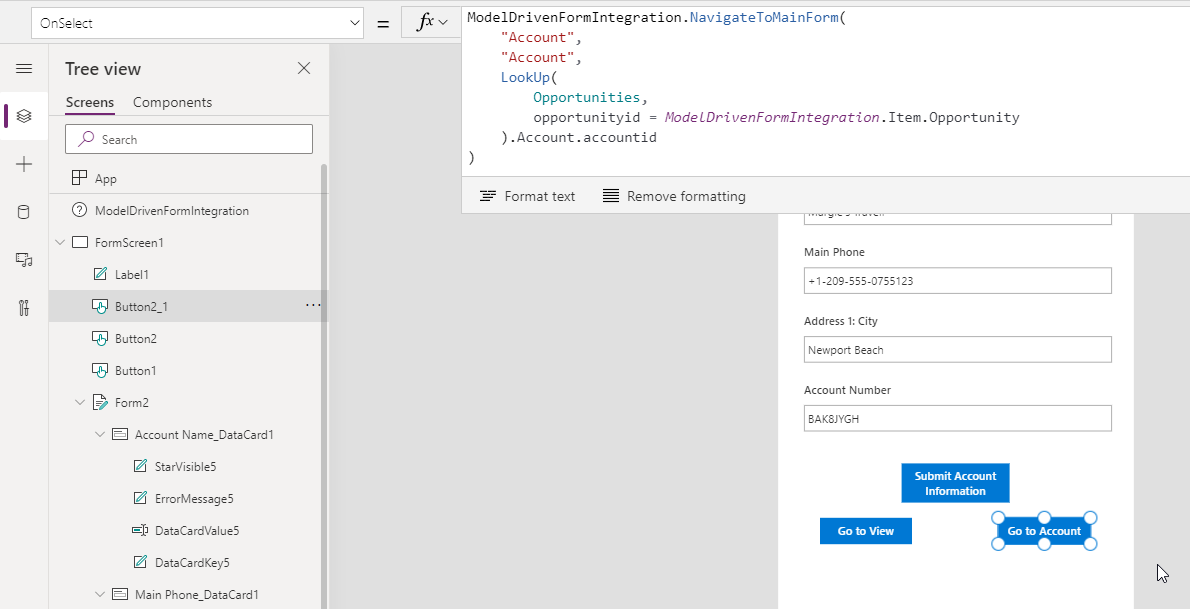
We set the "OnSelect" Event of the button to the formula:
ModelDrivenFormIntegration.NavigateToMainForm(
"Account",
"Account",
LookUp(
Opportunities,
opportunityid = ModelDrivenFormIntegration.Item.Opportunity
).Account.accountid
)
We use the "NavigateToMainForm" function of the "ModelDrivenFormIntegration" control. We say that the target Form belongs to Account entity, that it has "Account" for name. And finally we specify the ID of the related Account with this formula:
LookUp(
Opportunities,
opportunityid = ModelDrivenFormIntegration.Item.Opportunity
).Account.accountid
We have said before how to retrieve the Account record. In this formula we just add the "accountid" attribute to get the GUID of the Account.
We can proceed similarly for the Form editor of the related Contact.
Note that the performance of the embedding looks good. The Canvas Apps load in just a few seconds.
And now we have already a very useful embedding!
Power BI Embedding
Now, let's have a quick view to a nice feature: adding a Power BI tile into a Canvas App.
It is possible to add Power BI tiles in a Canvas App. If you want to add a report, you can first convert it to a tile with the button "Pin to a dashboard" in the Power BI Service:
Create a new Canvas App for your Opportunity Form as we have seen before. (you could also add the tile in one of the previous Canvas Apps).
To add the Power BI tile to the Canvas App, go to the "Insert" tab and click "Charts" -> "Power BI tile".
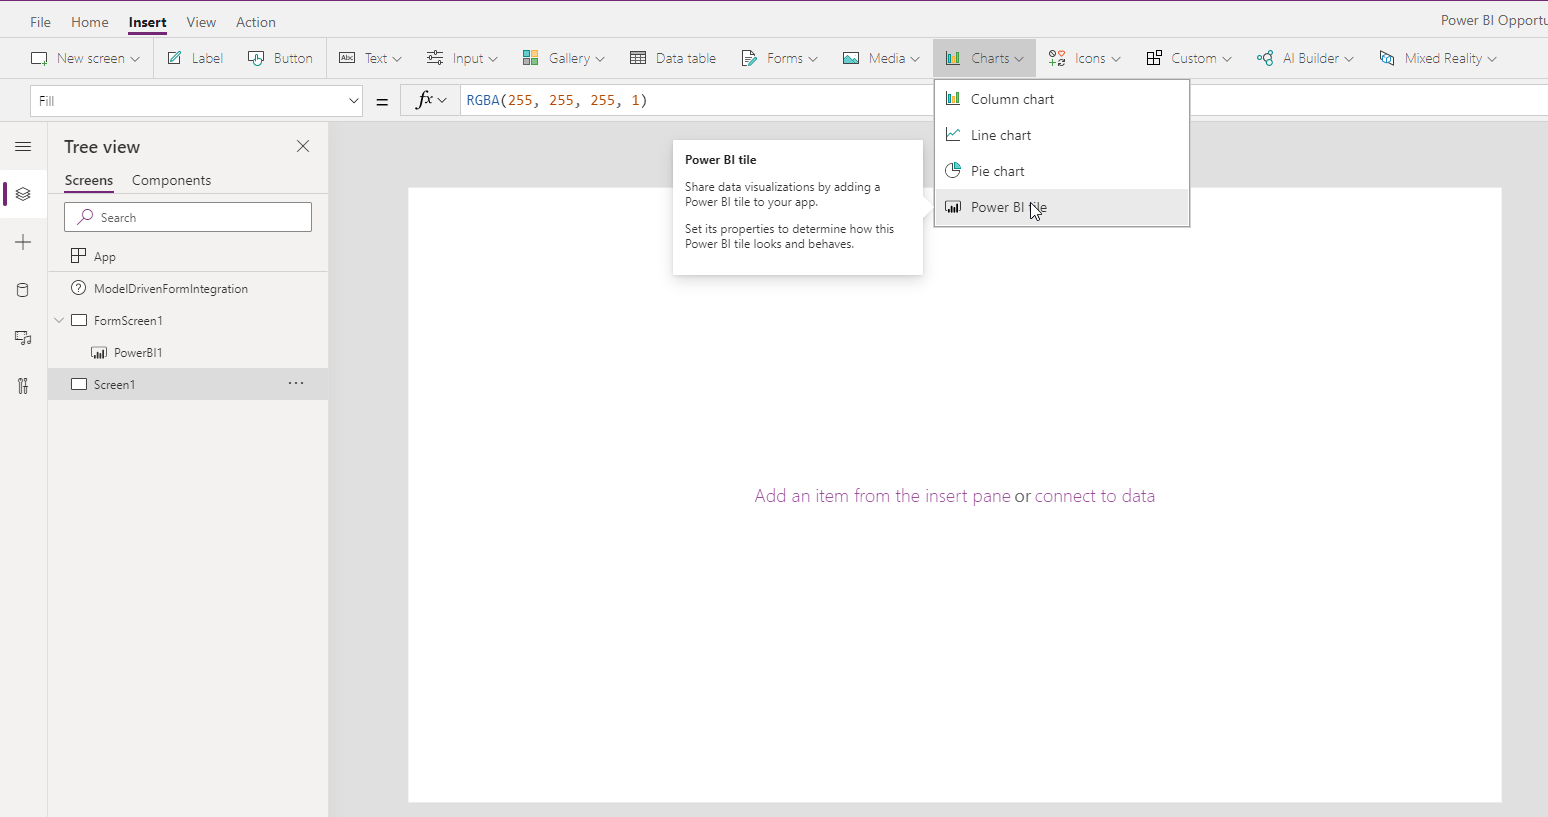
Select the Workspace and the Dashboard in which the tile is contained, and select the tile. Save your Canvas App and publish it.
The Power BI report is now displayed in your host Model-Driven App!
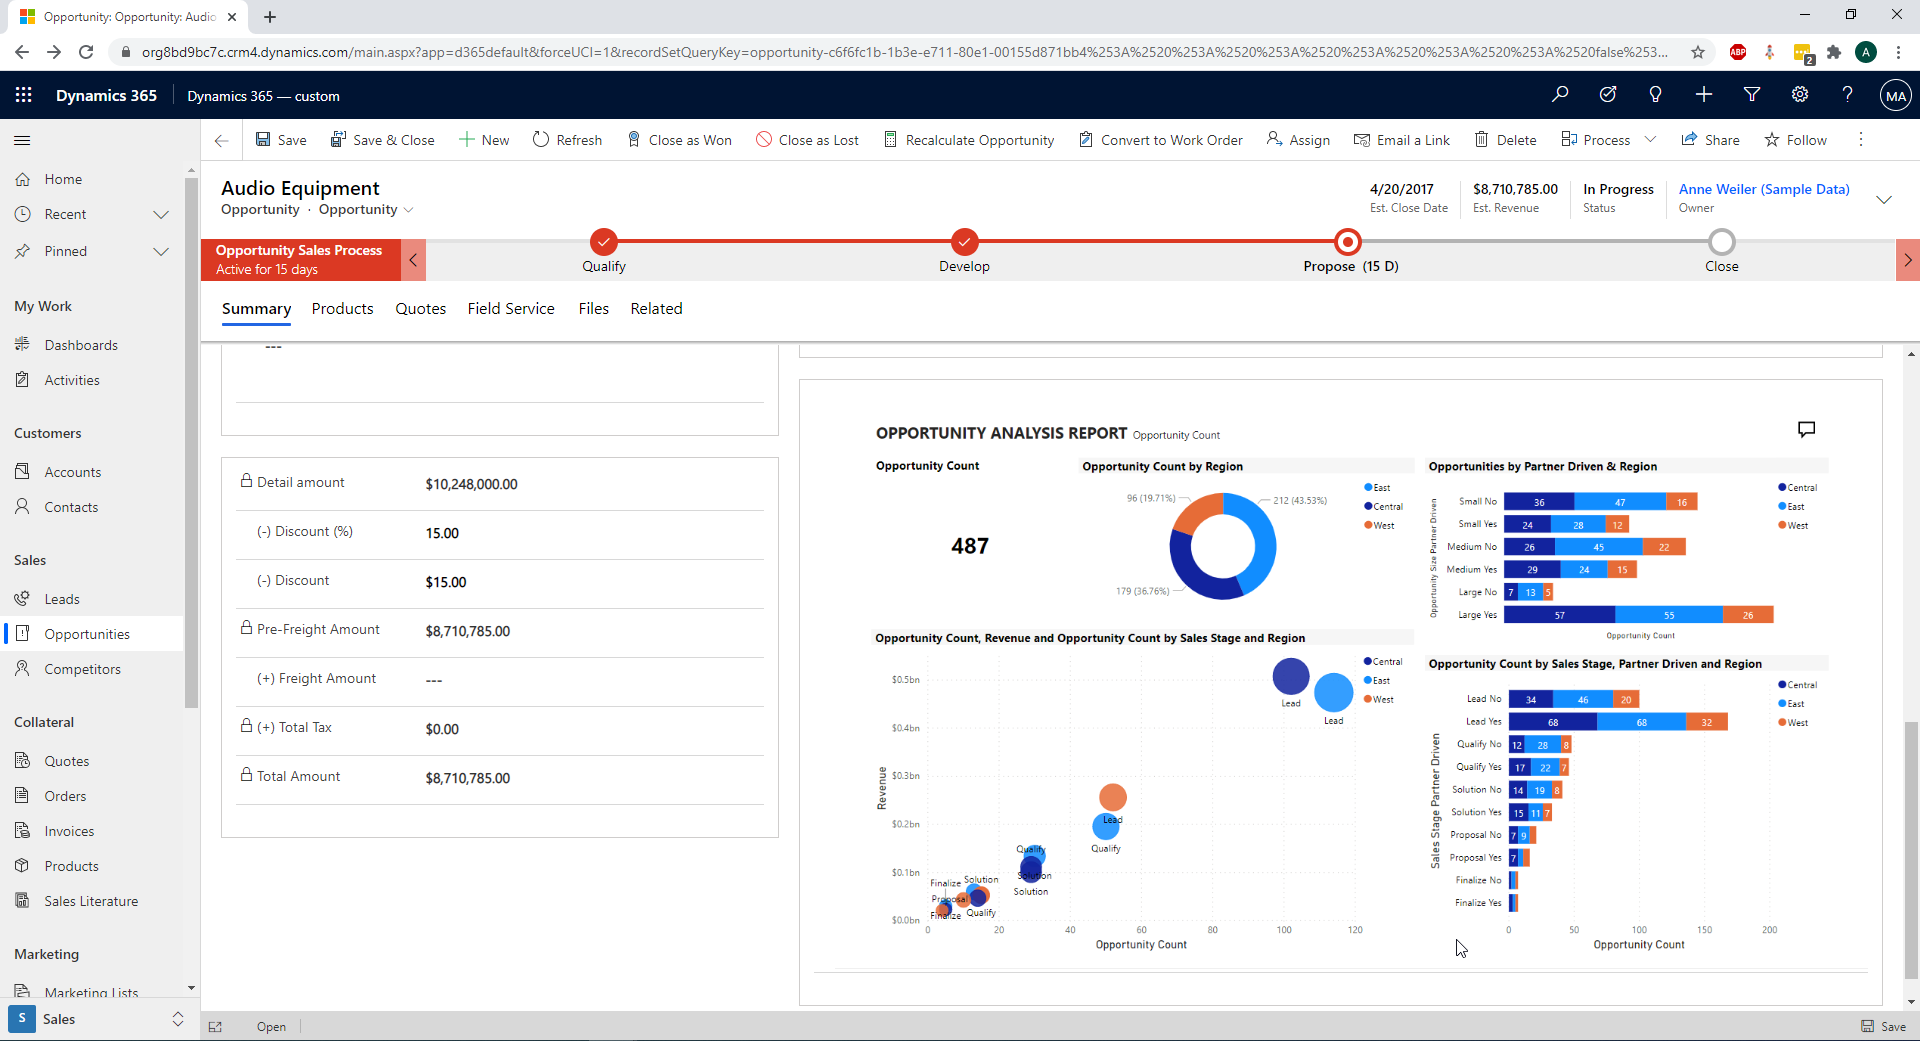
Note that for this example, I am using a sample report provided by Microsoft on the Power BI Service.
A very important point, which I prefer to underline, is that this is not an image. This is really a Power BI tile, so you can interact with it, filter it as you wish, etc. Here is a printscreen below where I only selected the Opportunities from East region. The whole Power BI tile is then filtered on the East region:
The Power BI dashboard containing the tile must be shared with all the users that want to see it (in addition to the sharing of the Canvas App). This requires a Power BI pro license per user (10 CHF/month)
This integration seems to work surprisingly well. The Power BI tile loads quickly. This is an interesting way to integrate a Power BI report/dashboard to a Model-Driven App.
You can compare it with other Power BI integrations in this Chronicle: Study of Power BI embedded integration in Dynamics 365.
It is also possible to filter the Power BI tile on a precise record (for instance the record open in the host Model-Driven App). More can be found about it in this page:
Possibilities
In this Chronicle, we have shown a use case where we can edit related entities directly in a Form. And where a Power BI report could be added.
Yet, there are infinite other use cases. Canvas Apps are really a powerful tool and they may very often be used instead of web resources.
All the things that you can do in a Canvas App could be used in this integration.
You could show/edit any record, show tables of records, charts, photos, videos, audios, pen inputs, timers, sliders etc
Limitations
Let's just mention a few limitations here:
- This embedding is available only in the UUI
- For the moment, it can only be set in the classic interface of the customizations
- Maximum 3 Canvas App can be displayed at the same time on a Form of the Model-Driven App
- The integration is not available for Tablet and Phone client types
Conclusion
This integration is really nice. It performs well and is very easy to set up.
It leverages the power of the Canvas App for the Model-Driven Apps in very little time.
You won't need additional licenses if you use only data from the CRM or from Standard connectors.
It is also an interesting alternative to integrate a Power BI dashboard/report into a Model-Driven App Form. This would need a Power BI Pro license per user, to share the dashboard with them.
This integration is a very interesting alternative to custom Web Resources!
Canvas App embedded Model-Driven App