Introduction
Microsoft released in 2024 Dataverse low-code plugins. The promise was great : writing plugins using low-code tools. No need to have development skills and use a development environment as Microsoft Visual Studio, write C# code and register plugin in your environment.
There are two types of low-code plugins supported in Dataverse : instant and automated. The difference is the trigger. For instant low-code plugin the trigger is manual, the plugin must be explicitly called (for example from a Power Automate flow). Automated low-code plugins work like classic plugins : the trigger is a Dataverse table event. For example you can create an automated low-code plugin on Create event for Account table. Low-code plugin feature is still in preview.
Then Microsoft has introduced Power Fx functions (eventually renamed Dataverse functions). Functions are a low-code/no-code way to write reusable logic directly within Dataverse. Functions use Power Fx to execute a set of commands within Dataverse that run on the server-side. The trigger is also manual, so a function must be called explicitly .
The situation is therefore somewhat confusing as instant low-code plugins resemble Dataverse functions and both features are available in preview.
Technically functions and low-code plugins are 2 different tools, with their own Microsoft Learn Docs having their own sections.
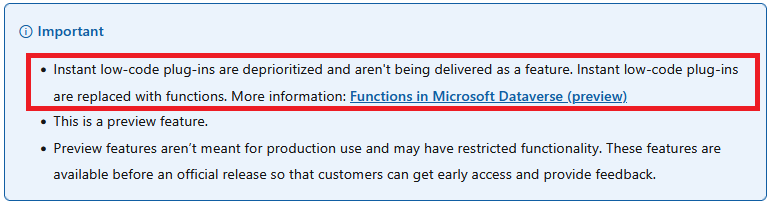
Officially instant low-code plugins are deprioritized and are replaced with Dataverse functions. Automated low-code plugins are still available. You can find more information here : Use low-code plug-ins in Dataverse
In this article we will first briefly examine low-code plugins. We won't go into detail because, as we will see, they don't really work.
Then we will examine Dataverse functions in detail.
Low-code plugins
Let's briefly talk about low-code plugins.
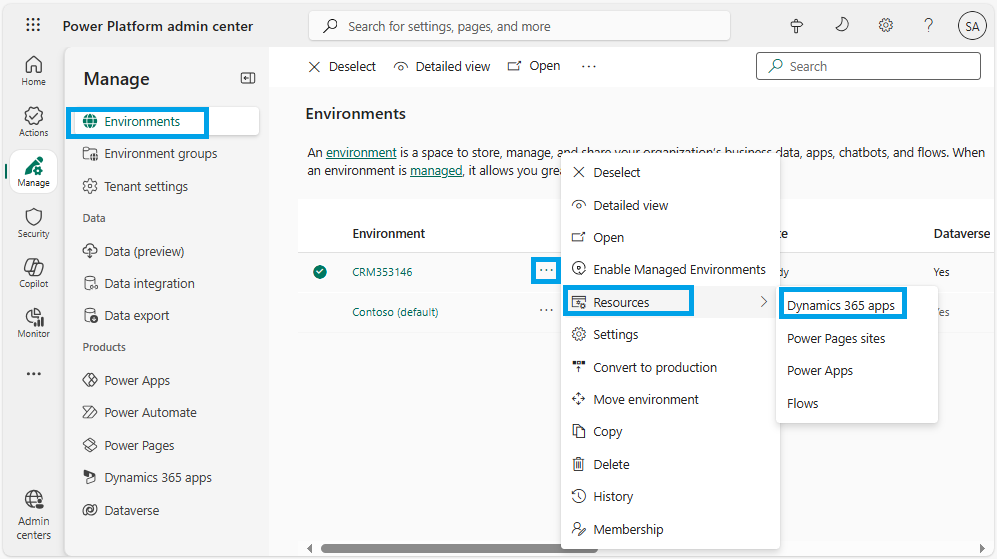
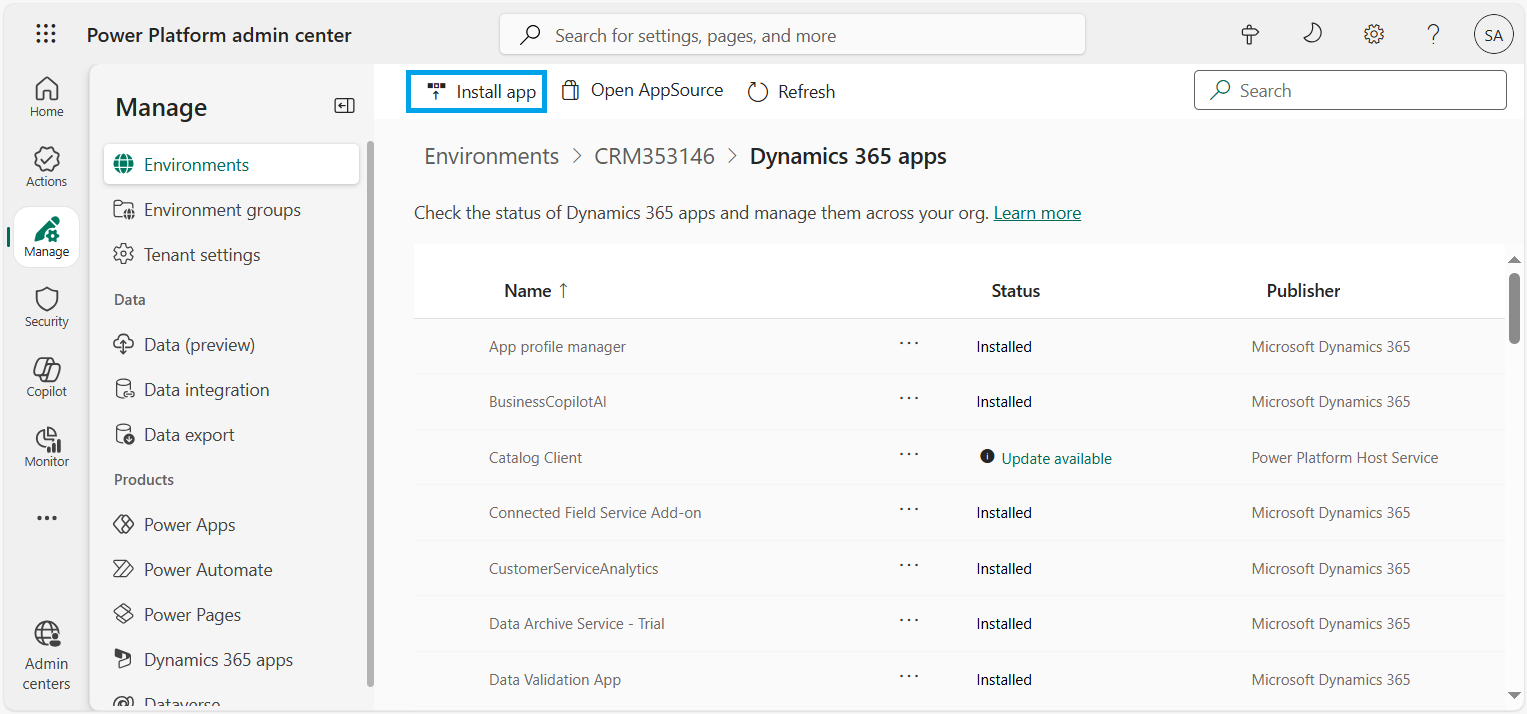
To access low -code plugins interface you need to install a model-driven app called Dataverse Accelerator:
- Go to Power Platform Admin Center
- Click on Environments on the left pane.
Then click on the ellipsis (...) next to your environment, select Resources and then Dynamics 365 apps
- Click on Install app on the command bar
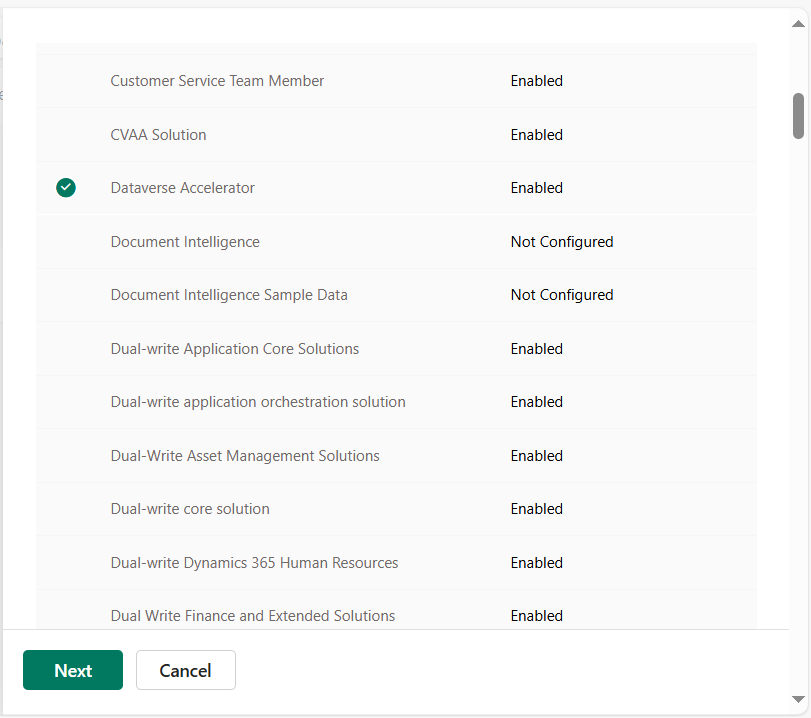
- Select Dataverse Accelerator in the list and click on Next
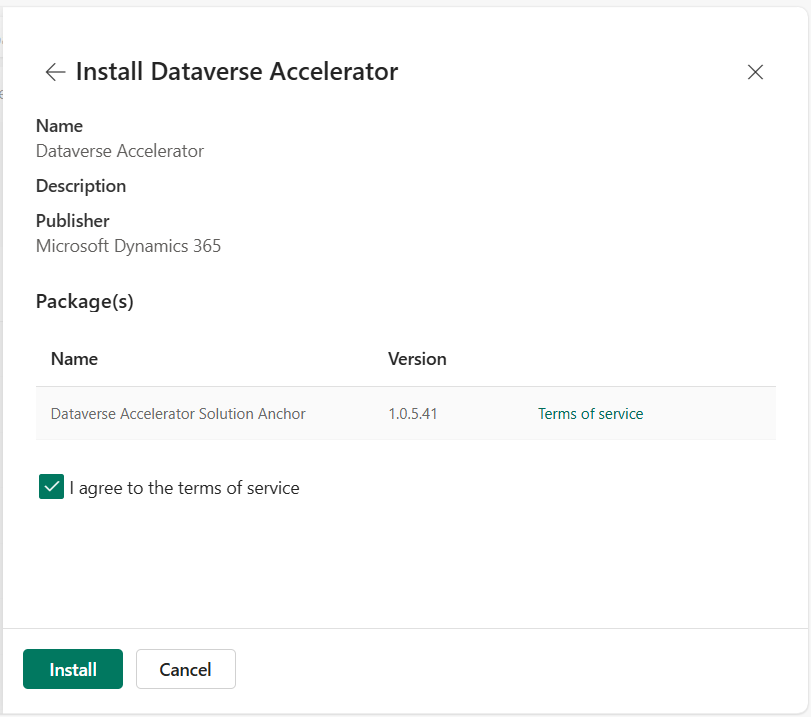
- Check I agree to the terms of service and click on Install
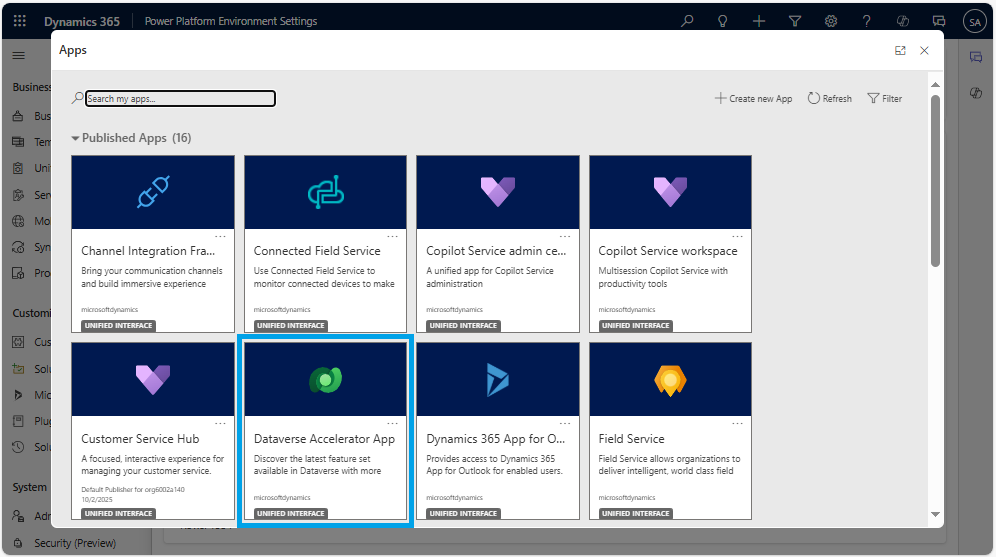
- Once the installation is complete Dataverse Accelerator app is available in the list of apps
Now you can play the app and you will see the interface below:
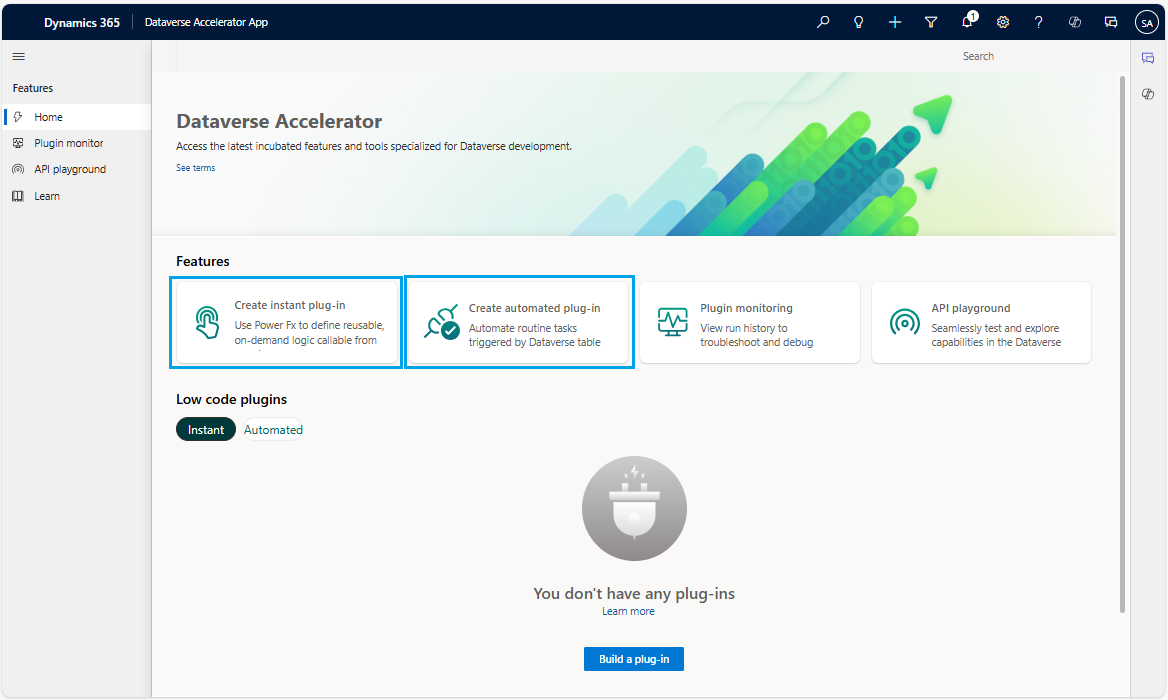
As explained in the introduction there are two types of plugins : instant plugins that must be called explicitly and automated plugins that are triggered by an event on a table.
There is a button to create an instant plugin and another to create an automated plugin. Note that it 's a bit strange to have the option to create an instant plugin as this feature is deprioritized and replaced by Dataverse functions.
Then if you click on either of the two buttons ... nothing happens and the screen remains blank. I tried with several Dataverse environments located in different regions (US, Western Europe) with the same result : a blank screen.
This problem is understandable for instant plugins as they are replaced by functions. But regarding automated plugin it's a problem : it's impossible to create an automated plugin.
It was working a few months ago (but buggy as hell), but as of the date of writing this article (October 2025), it no longer works.
Maybe it will work again in the future or maybe Microsoft will remove this feature.
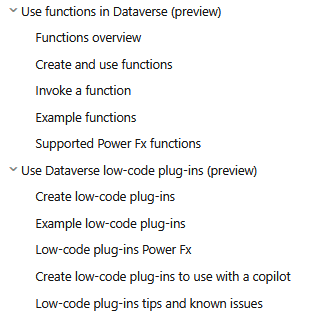
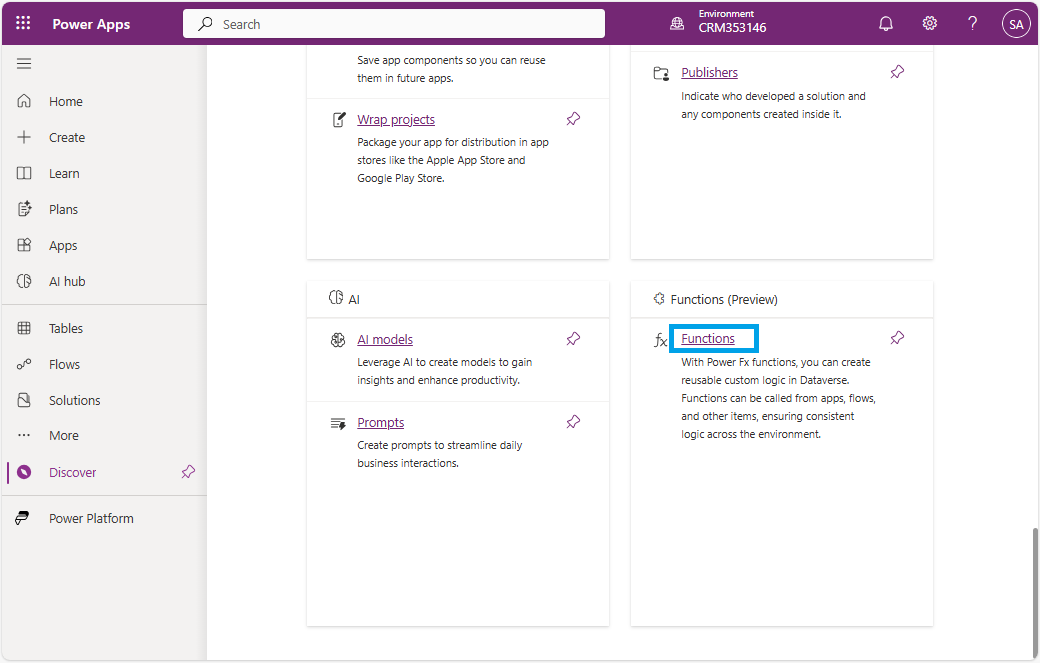
Dataverse Functions
Introduction
Functions are a low-code/no-code way to write reusable logic directly within Dataverse (running server-side) without having to write C# code or deploying plugins.
Functions can have parameters: parameters allow you to pass information between the function and the context that runs it, making it easier to design business logic that can be reused in varying situations. Input parameters are used to provide data to the function, and allow you to control how the function behaves by passing in different values you specify in the Power Fx formula. Output parameters allow you to retrieve the results of a function for further use in your program.
How to create a function
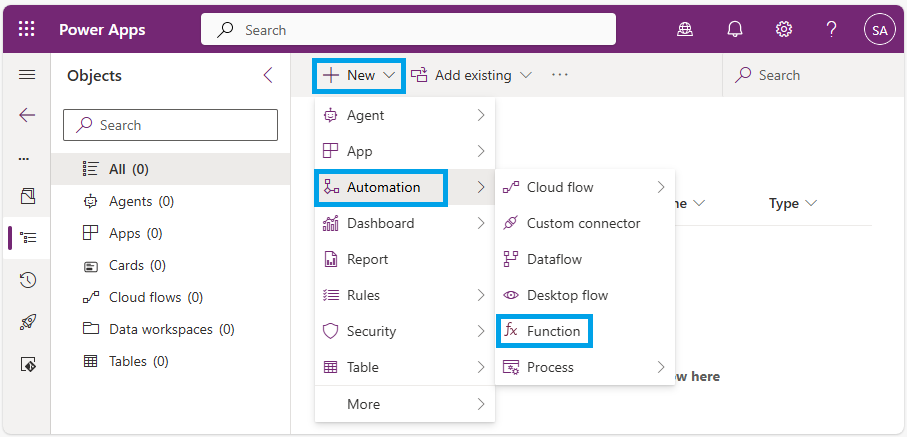
- Open Power Apps Portal and select your environment
- Open the solution where you want to build a function
- Click on New --> Automation --> Function
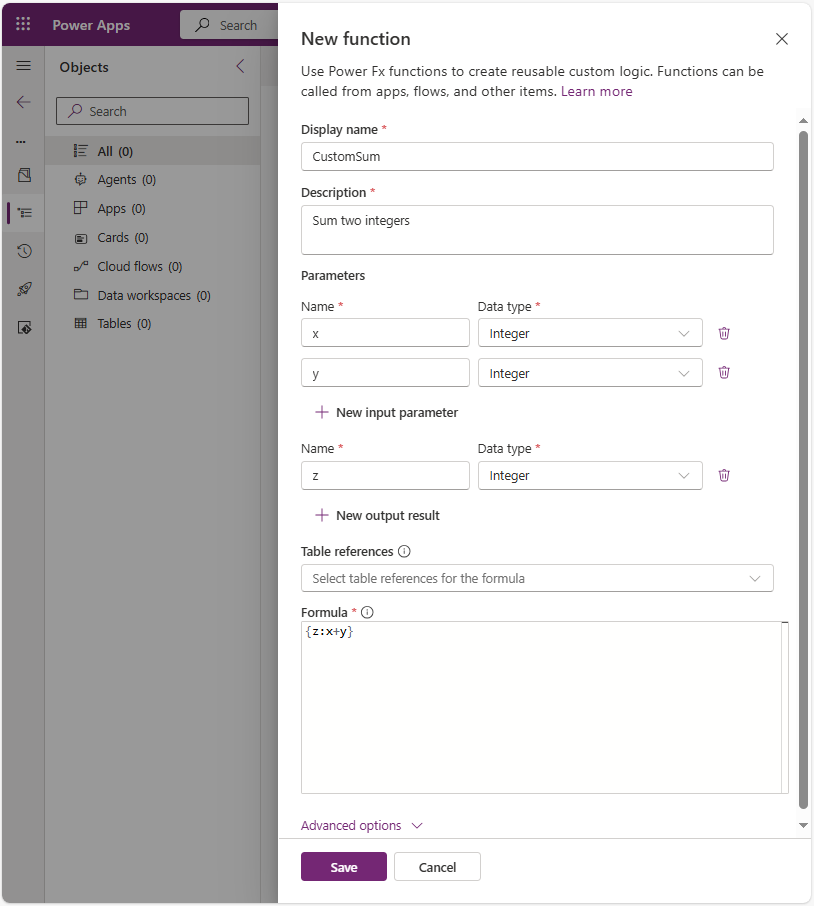
Provide the following details:
- Display name : The human-readable name of the function. Can't be changed once created.
- Description : provide additional context about the function, such as purpose, behavior, and so on. Can't be changed once created.
- Input parameters(s) : add required input parameters. Input paramerts are optional.
To add a parameter click on + New input parameter
Following types are supported: Boolean, Datetime, Decimal, Float, Integer, String
- Output result(s) : add output results parameters. Output results are optional. To add an output result click on + New output result
- Table references : used to associate functions to specific tables. You can select up to five tables to read or write from in your function’s formula.
- Formula: custom function that can be used to perform actions or calculations, defined using the Power Fx expression language
Let's create a simple function to sum two numbers.
I define my function CustomSum with two inputs parameters x and y and one output parameter z.The Power Fx formula to sum the 2 numbers is : {z:x+y}
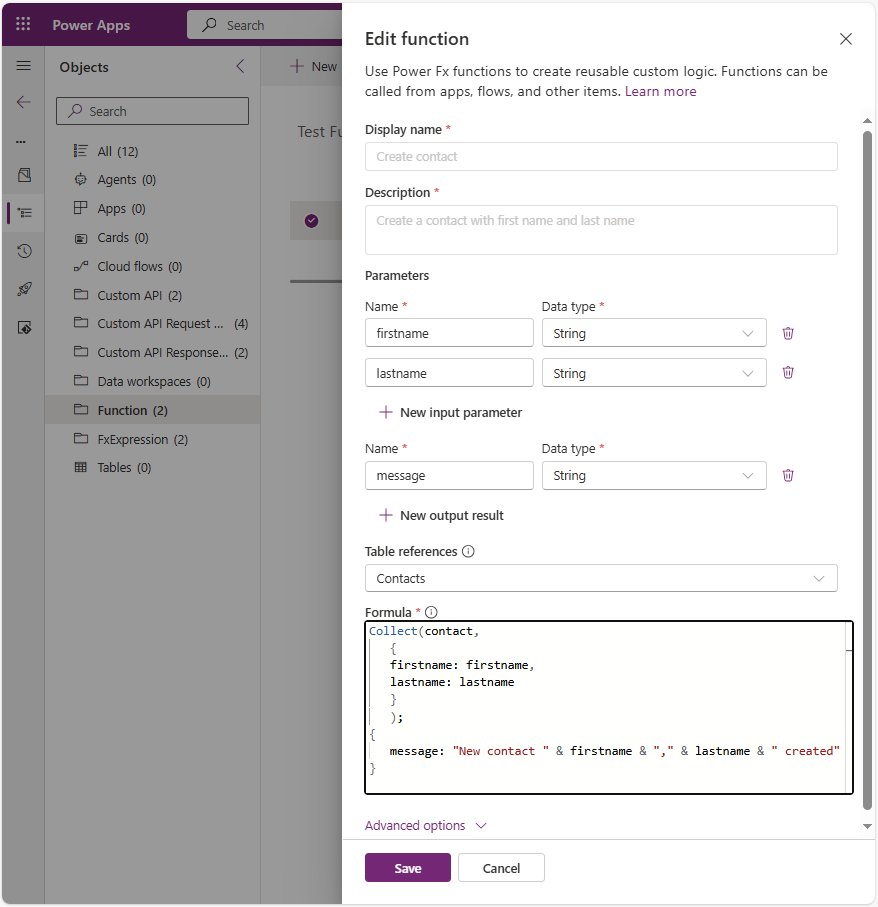
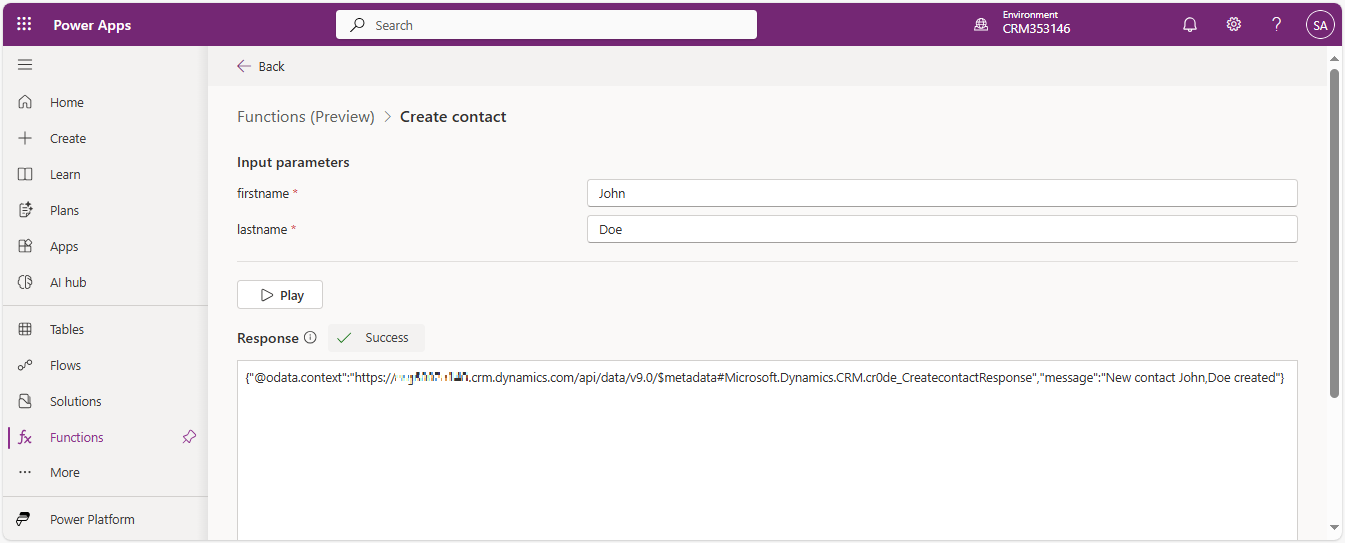
Another example: let's implement a function that creates a contact from two input parameters firstname and lastname (both with string data type)
This time we need to access a table to create a record, so I select 'Contacts' table in Table references
I also define an output result message to indicate that the contact was created successfully
In the Power Fx formula I use the function Collect() to create the recordCollect(contact, { firstname: firstname, lastname: lastname } ); { message: "New contact " & firstname & "," & lastname & " created" }
- Click on Save to create the function
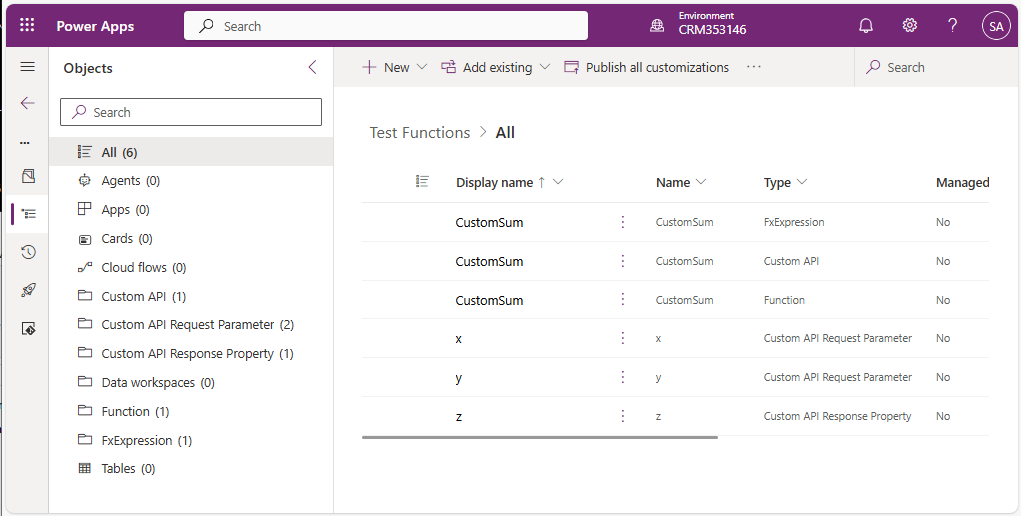
Various components are created and added to the solution:
- a Custom API
- a Function
- a FxExpression
- a custom API Request Parameter for each input parameter (2 in my example)
- a Custom API Response Property for each ouput result (1 in my example)
How to test a function
If you expect to find a button in the command bar when you select your function wihtin the solution, forget it. It is not possible to test a function inside a solution.
To test a function:
- Come out of the solution
- Click on More on the left pane and then click on Discover all

- Click on Functions
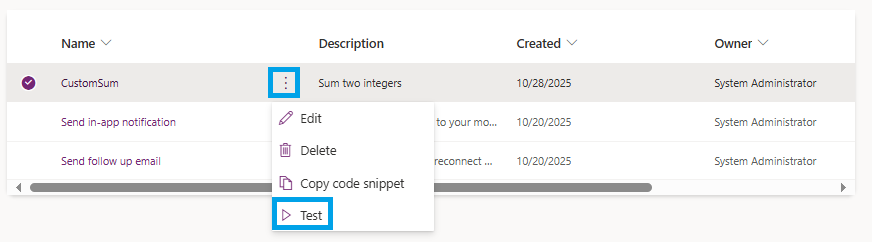
- Select your function and click on Test on the command bar
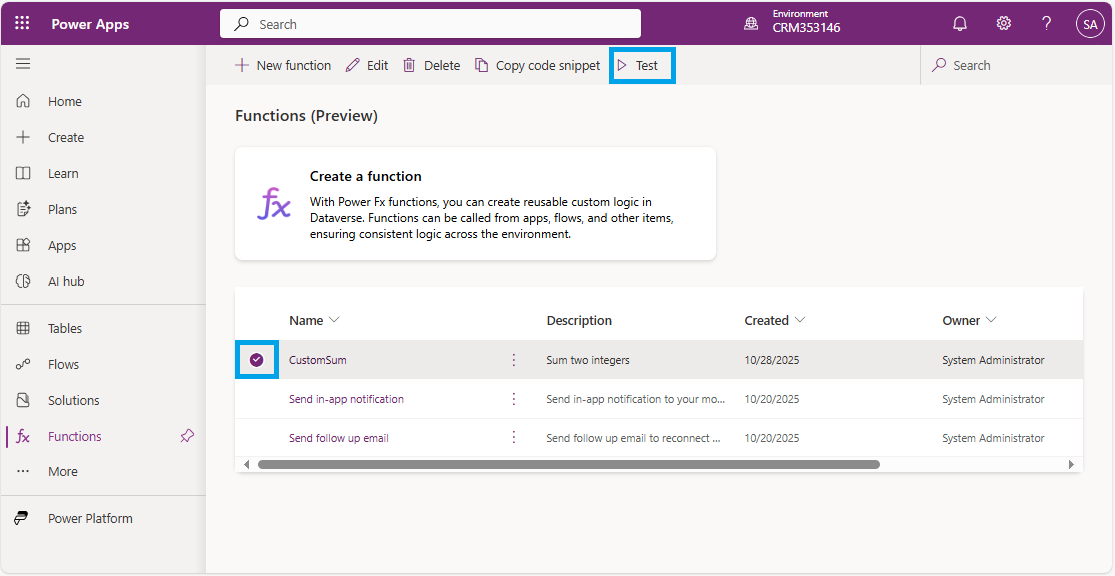
Another way is to click on the ellipsis (...) and select Test in the menu
- Enter a value for each input parameter and click on Play
Result is displayed in the text area at the bottom.
In my example with function CustomSum I set x = 10 and y = 5 and we can see that value assigned to output result is 15
Result is : {"@odata.context":"https://orgxxxxx.crm.dynamics.com/api/data/v9.0/$metadata#Microsoft.Dynamics.CRM.cr0de_CustomSumResponse","z":15}

For the second function Create Contact I set firstname = 'John' and lastname = 'Doe'. You can see the result below:
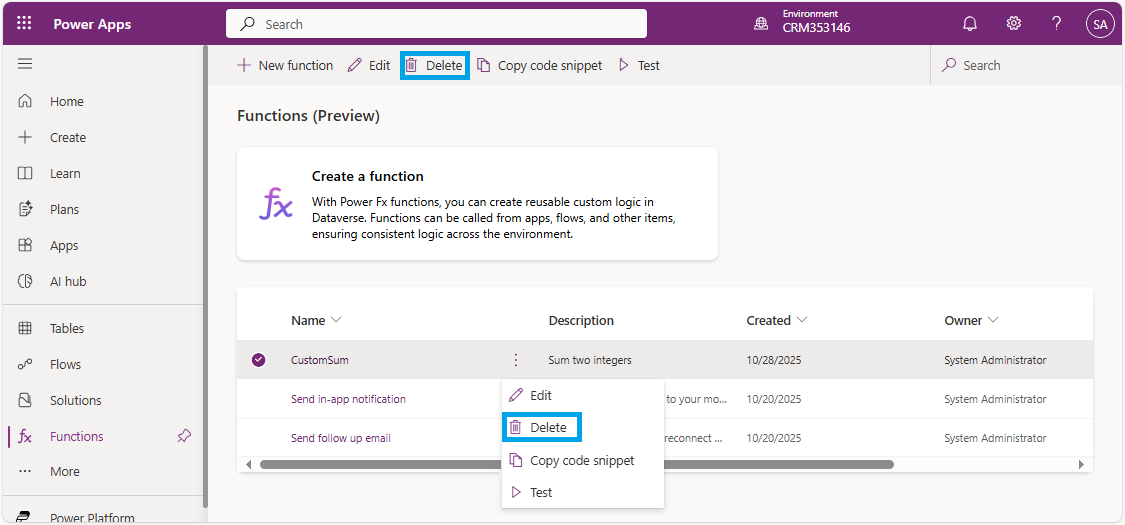
How to delete a function
You must be careful if you want to delete a function. If you delete the function component in your solution only the function itself will be deleted, but related components (Custom API, FxExpression, custom API Request Parameters, Custom API Response Properties) will not be deleted. Therefore, you will end up with orphaned components.
To delete the function and all related components you must follow the same steps as for testing a function (see above): come out of the solution, click on More then Discover all and select Functions.
Then you can click on Delete on the command bar or click on the ellipsis (...) and select Delete.
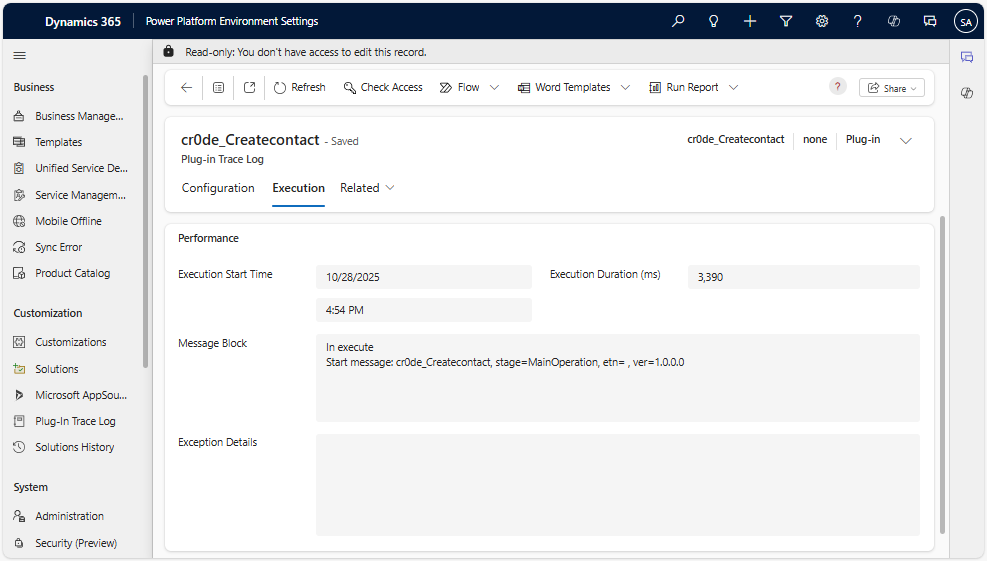
Trace logs
You can access Dataverse functions trace logs in the same place as classic plugins.
Open Power Platform Environment Settings app and click on Plug-in Trace Log on the left pane.
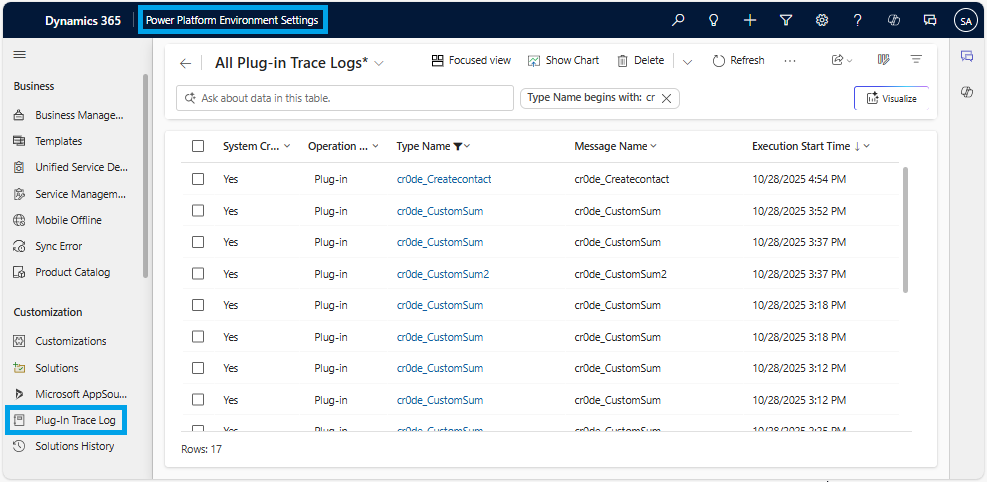
You have access to execution information (duration, message block, exception, ...)
Invoke a function
We now know how to create and test a function, but it's time to use it.
As explained previously, functions are only triggered manually, so you need to call them explicitly.
You can invoke functions in Dataverse from:
- a canvas app
- a custom page in a model driven app
- a Power Automate flow
- from another function
- in your code (Web API)
You can obtain a code snippet of your function that you will then use to call that function:
- Open Power Apps Portal and select your environment
- Click on More on the left pane and then click on Discover all
- Click on Functions
- Select you function and click on Copy code snippet on the command bar

Another way is to click on the ellipsis (...) and select Copy code snippet in the menu
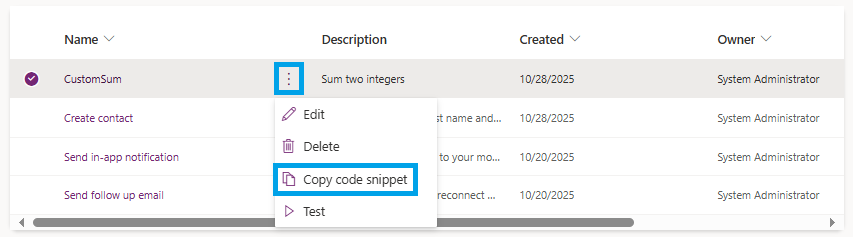
Below the code snippet for my functions CustomSum and Create contact
Environment.cr0de_CustomSum({x:Value,y:Value})
Environment.cr0de_Createcontact({firstname:Value,lastname:Value})
Invoke a function from the Dataverse Web API
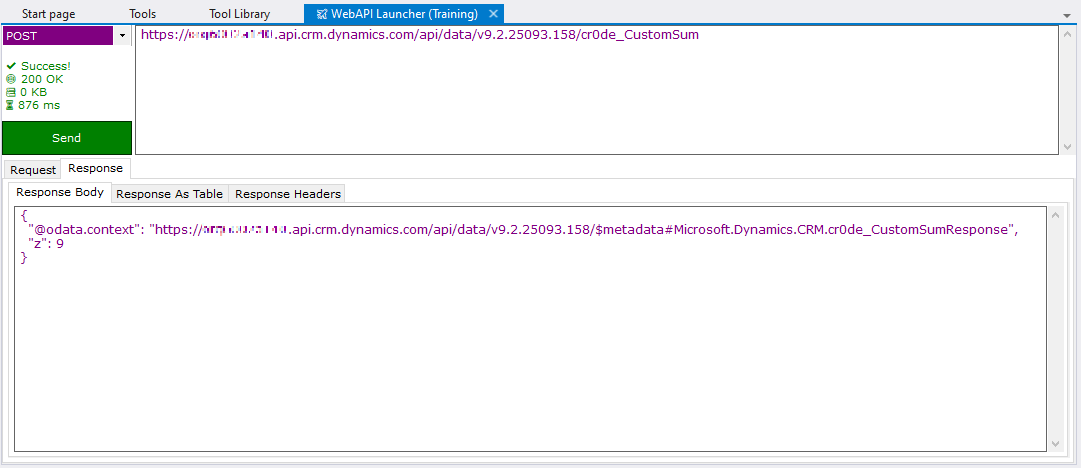
You can invoke a Dataverse function from the Web API with a POST request
Example with the function CustomSum:
POST [Organization URI]/api/data/v9.2/cr0de_CustomSum
OData-MaxVersion: 4.0
OData-Version: 4.0
Content-Type: application/json; charset=utf-8

{
   "x":4,
   "y":5
}
Here the result I get with the plugin WebAPI Launcher in XrmtoolBox:
Invoke a function from within another function
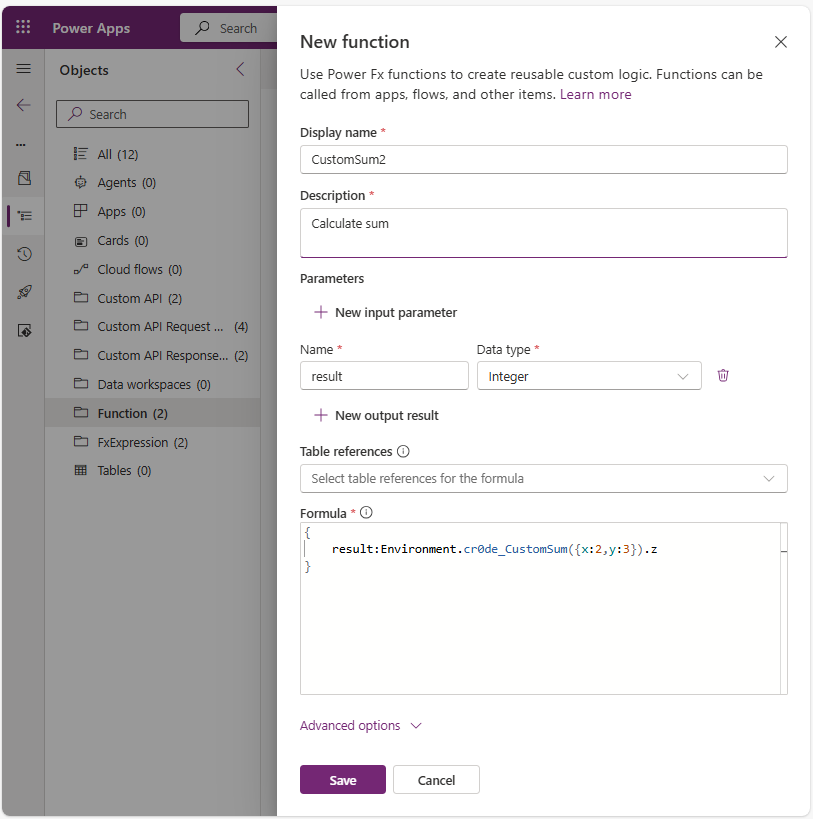
You can invoke a function from any other function.
To invoke a function within another function, use the syntax: Environment.MyFunction({inputParam1: value1, inputParam2: value2, ... inputParamN: valueN}).
Since the output is always a record, use the dot notation to access the output parameters.
For example, if the function MyFunction has two output parameters defined as out1 and out2, you can access them in either of these two ways:
Environment.ExistingFunction({inputParam1: value1, inputParam2: value2, ... inputParamN: valueN}).out1Environment.ExistingFunction({inputParam1: value1, inputParam2: value2, ... inputParamN: valueN}).out2
To demonstrate this, I create a new function CustomSum2 to add 2 and 3. To perform this operation I use the first function CustomSum.
The new function CustomSum2 has no input parameter and one output result result (Integer type).
Power Fx formula of the new function:
{
result:Environment.cr0de_CustomSum({x:2,y:3}).z
}
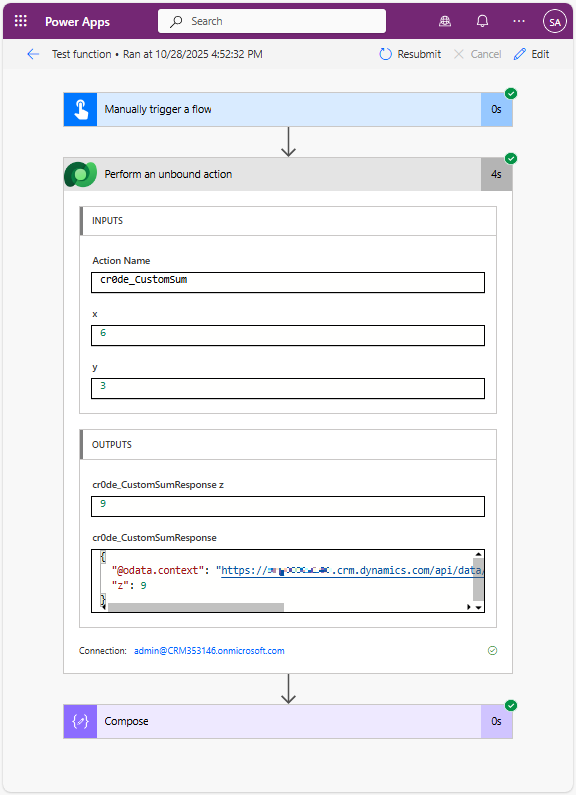
Invoke a function from a Power Automate cloud flow
To use a function in a cloud flow:
- Add a step to your flow
- select Microsoft Dataverse connector
- select Perform an unbound action action
- In Action Name, select the function (cr0de_CustomSum in my example) and provide values for the input parameters (x = 6 and y = 3 in my example)
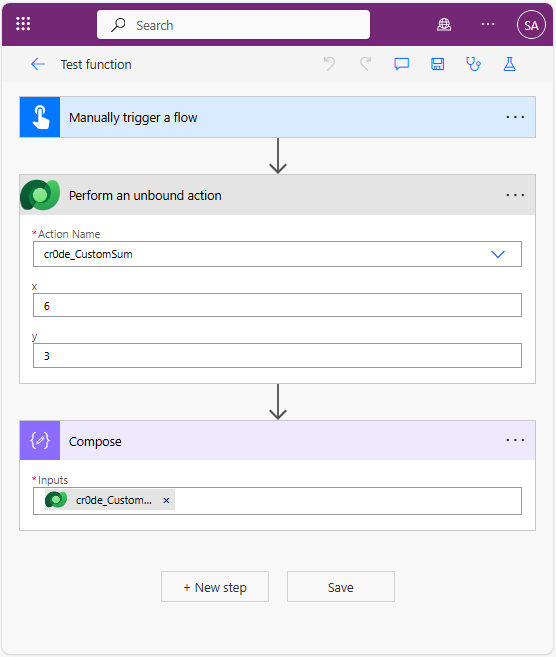
- Add a compose action using the output of the unbound action as an input so that you can access the results of the function as needed
Below the result:
Limitations with functions
Functions have some limitations:
- Max 5 tables per function
- Only manual trigger, cannot be automated (that's the goal of low-code plugins)
- Cannot call external API, limited to Dataverse
- Still in preview : may have bugs. Not suitable for production
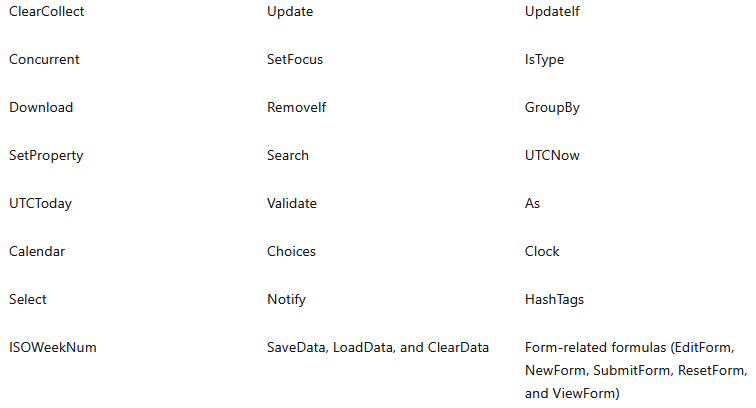
- The following Power Fx function aren't currently supported with functions in Dataverse